Have you ever experienced a flat tire? The thought of it can be quite daunting, but it’s a part of driving. What’s even more daunting is fixing a flat tire, particularly setting the bead. The bead is a part of the tire that ensures it stays mounted on the rim.
Setting the bead refers to the process of getting the tire to seal properly against the rim. Doing this incorrectly can cause the tire to fall off while driving, which is why it’s important to learn how to set bead on tire properly. In this article, we’ll provide you with a step-by-step guide on how to set bead on tire and some tips to make the process easier.
So grab a few tools and let’s get started!
Table of Contents
Gather the Necessary Tools
If you’re wondering how to set a bead on a tire, the first step is to gather the necessary tools. This includes a tire iron, air compressor, valve stem tool, and lubricant. It’s important to have these tools on hand before starting the process to avoid any delays or mishaps.
Once you have your tools, it’s important to ensure the tire is clean and free of any debris before attempting to set the bead. Then, apply lubricant to the tire bead and rim to help facilitate the sealing process. With the tire iron, pry the tire onto the rim and ensure it is properly aligned before inflating with the air compressor.
It’s also important to check for any leaks or damages before fully inflating the tire. By taking the time to gather the proper tools and following these steps carefully, you can successfully set a bead on your tire and avoid any potential safety hazards.
Bead Sealer
Bead sealer is a handy tool to have around when working on tires. But before you get started, you’ll need to have the right tools on hand. Firstly, you’ll need a bead sealer itself.
This is a low-cost tool that can be found at any auto parts store or online. You’ll also need a tire patch kit, a tire pressure gauge, and a rubber mallet to help you seat the tire properly. Once you have these tools in hand, you can begin to prepare your tire for repair.
Bead sealer can be used to seal leaks around the rim of a tire by filling in any small gaps or cracks. This sealing process is crucial to ensuring the safety and longevity of your tires. With the right tools and a little bit of know-how, you can easily perform this task in just a few minutes.
So, don’t hesitate to add a bead sealer to your collection of tire repair tools and get started on giving your tires the protection they need!

Valve Stem Tool
If you’re looking to change a tire or perform some maintenance on your vehicle, one tool you’ll need is a valve stem tool. This tool is essential for removing the valve stem from your tires, allowing you to inflate or deflate them as needed. To gather the necessary tools, you’ll need to start with the valve stem tool itself.
You can find this tool at most auto parts stores or online retailers. You may also need pliers to remove the valve stem, as well as a valve core remover tool if you plan on replacing the valve core. It’s important to make sure you have all the tools you need before beginning any maintenance on your vehicle to avoid any setbacks or frustration.
With the right tools on hand, you’ll be able to change a tire or perform any maintenance with ease and confidence.
Air Compressor
When it comes to using an air compressor, it’s important to have the right tools on hand. To start with, you’ll need an air hose, and it’s important to get the right size for your compressor. Be sure to measure the length you’ll need and get a hose that’s rated for the pressure your compressor can handle.
You’ll also need a set of fittings to connect the hose to your compressor and to any tools or accessories you’ll be using. Other important tools include an air regulator and a filter. The regulator will help you control the air pressure coming out of your compressor, ensuring that you don’t inadvertently damage your tools or waste air.
Meanwhile, the filter will help remove any moisture or impurities from the air, protecting your tools and helping to prevent rust and other damage over time. Finally, if you’ll be using your air compressor to power pneumatic tools, you’ll need to get the appropriate connectors for those tools as well. With the right tools on hand, you’ll be all set to make the most of your air compressor and tackle all sorts of projects with ease.
Prepare the Tire and Rim
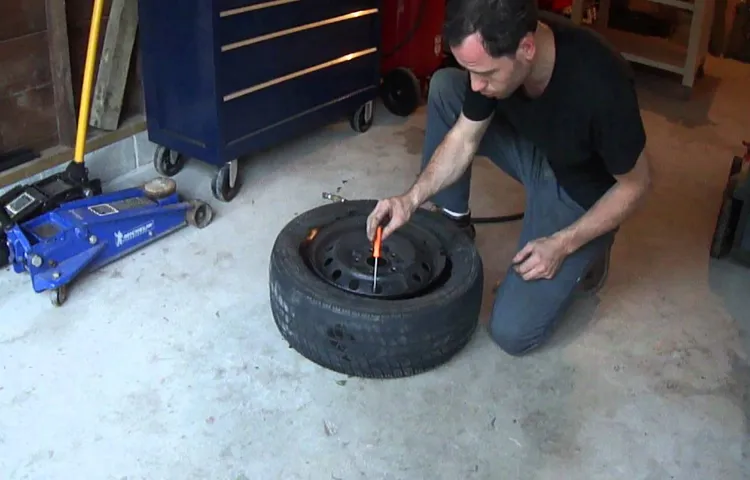
If you’re wondering how to set the bead on a tire, the first step is to prepare the tire and rim. Start by checking the condition of both – make sure there are no cracks or defects in the tire, and that the rim is clean and undamaged. Next, apply a liberal amount of tire lubricant to the inside surface of the tire bead.
This will help the tire slide onto the rim more easily. Once the tire is in position, attach the valve stem and begin inflating the tire slowly. As the pressure builds, listen for the sound of the bead “popping” into place.
If the bead doesn’t seal properly, you may need to try again with more lubricant or adjust the position of the tire on the rim. With a little patience and attention to detail, you can successfully set the bead on your tire and get back on the road safely.
Remove the Old Bead
When it comes to replacing your old tire, the first thing you need to do is prepare the tire and rim before removing the old bead. This means cleaning the rim thoroughly and inspecting it for any damage or defects. It’s also important to check the new tire for any defects before mounting it onto the rim.
Once you’ve inspected everything, it’s time to remove the old bead. This can be done using a bead breaker tool or a pry bar, but be sure to follow the manufacturer’s instructions to avoid damaging the tire or rim. Removing the old bead can be a bit tricky, but with the right tools and technique, you’ll have it off in no time.
By taking the time to properly prepare the tire and rim before removing the old bead, you’ll ensure a smooth and safe tire replacement process. So, take that first step and get ready to replace your old tire with a brand new one!
Clean the Rim
Preparing the tire and rim before cleaning is an essential step to ensure that you give them the best care. First, you need to remove the wheel from the vehicle and place it on a stable surface. Inspect the tire for any damages or punctures that may require repair before you proceed with cleaning.
Once you’re sure there are no damages, you can proceed to clean the rim. First, remove any loose dirt or debris using a stiff-bristled brush, and then rinse off the remaining dirt with water. Be sure to use a strong jet of water to remove any dirt that may be lodged in the crevices of the rim.
Once the rim is free of dirt, you can proceed to clean it with the appropriate cleaning agent. By properly preparing the tire and rim, you can clean them without causing any further damages and ensure that the finish remains intact, giving your ride a clean and polished look that makes heads turn.
Apply Bead Sealer
When it comes to applying bead sealer to the tire and rim, the first step is to ensure they are both thoroughly clean and free of debris. Start by removing any dirt, grime, or rust from the rim using a wire brush and a cleaning solution. Next, inspect the tire carefully for any damage or foreign objects.
If the tire needs repairing, this should be done prior to applying bead sealer. Once the tire and rim are clean and free of damage, add a small amount of bead sealer to the rim’s surface. Using a brush, spread the sealer around the rim, making sure to coat the entire surface.
Next, inflate the tire and place it back onto the rim, ensuring that it’s seated properly. Finally, add more bead sealer over the bead area, and inflate the tire to the manufacturer’s recommended pressure. This should create a tight seal between the tire and rim, preventing any air loss.
Remember, proper cleaning and preparation are key to achieving a successful bead sealer application.
Mount the Tire on the Rim
Setting the bead on a tire can be a tricky task, but with a little patience and the right tools, anyone can mount a tire on a rim successfully. To begin, make sure the rim is clean and free of any debris, as this can affect the tire’s ability to seal properly. Place the tire onto the rim and insert the valve stem into its hole.
Begin to work the tire onto the rim by hand, starting at the valve stem and working your way around the tire. Once the tire is in position, it’s time to inflate it. By inflating the tire, air pressure will force the tire beads to seat against the rim.
Be sure to inflate the tire to the manufacturer’s recommended pressure gradually, to prevent the tire from popping off the rim. Finally, check the tire to ensure that the bead is centered all the way around the rim. With these simple steps and a bit of practice, anyone can mount a tire successfully and safely.
So, the next time you need to mount a tire on a rim or replace a flat tire, don’t hesitate to give it a try with these tips in mind.
Place the Tire on the Rim
When it comes to changing a tire, one of the crucial steps is mounting the tire on the rim. This may seem like a daunting task, but with some patience and practice, it can be done easily. The first step is to make sure that the tire is properly seated on the rim.
You can do this by placing the tire flat on the ground and pushing down on the sidewalls, allowing the tire to settle into its proper position. Once the tire is in place, you can start mounting it onto the rim. It’s important to use the correct tools and techniques to ensure that the tire is mounted securely.
You can use a tire mounting machine or a set of tire levers to pry the tire onto the rim. It might take some effort, but make sure not to damage the rim or the tire as you’re doing it. With the tire and rim properly aligned, you can then inflate the tire to the recommended pressure.
A well-mounted tire will not only provide better handling and stability on the road, but it will also reduce the risk of a blowout. So, take your time and follow these steps carefully to ensure a safe and smooth ride every time.
Insert the Valve Stem
When mounting a tire on a rim, it’s important to insert the valve stem properly. The valve stem is the small cylindrical piece that allows air to be pumped into the tire. To insert the valve stem, push it through the hole on the rim and make sure it’s fully seated.
It’s important to do this before mounting the tire because it can be difficult to reach the valve stem once the tire is in place. Additionally, proper placement of the valve stem can ensure that the tire is balanced when inflated. So take your time and make sure the valve stem is inserted correctly before moving on to the next step in the process of mounting your tire.
Remember, proper installation of the valve stem is key to ensuring that your tire is safe and performs optimally on the road.
Apply Lubricant to the Bead
When it comes to mounting a tire on a rim, it’s important to lubricate the bead to make the process smoother. Applying lubricant to the bead allows the tire to slip onto the rim with less effort and force, ultimately reducing the risk of damage to the tire or the rim. A popular lubricant choice is soapy water, which is easily accessible and has the necessary slipperiness to aid in the mounting process.
However, it’s important to note that too much lubricant can cause the tire to slip off the rim, resulting in a dangerous situation. Applying just enough lubricant is key to ensuring a successful mounting process. Another important tip is to make sure the tire is properly aligned on the rim before proceeding with inflation.
Taking these precautions can save you time, money, and headache in the long run. Happy mounting!
Inflate the Tire
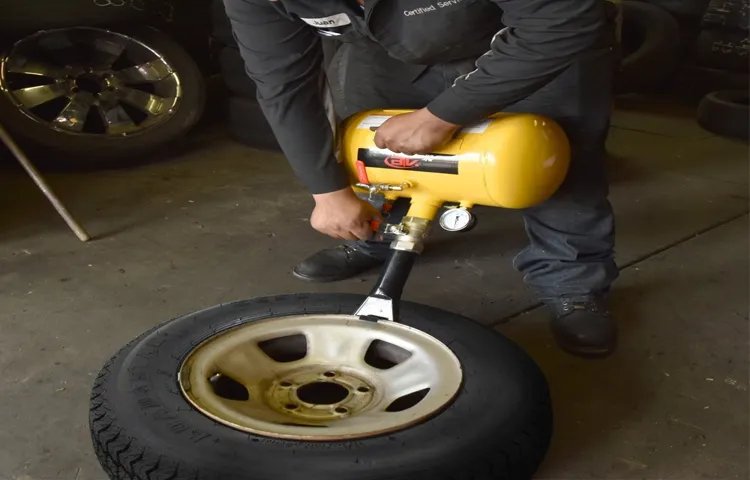
If you’ve just installed new tires on your vehicle or if you’re simply changing a tire, you may need to set the bead before you can inflate it. The bead is the edge of the tire that sits on the rim, and it needs to seal tightly in order to prevent air from escaping. To set the bead, first, ensure that you have the correct tire size for your vehicle.
Next, lubricate the bead and rim with a soapy water solution. Then, carefully position the tire over the rim and begin to inflate it with a floor pump or air compressor. You may hear a popping sound as the bead sets, which indicates that the tire is sealing properly.
If the tire doesn’t set after a few attempts, reposition the tire and try again. Once the tire is fully inflated, double-check that the bead is seated correctly before driving on the tire. With a little patience and persistence, setting the bead on your tire can be a quick and simple process that ensures your vehicle is safe and roadworthy.
Use an Air Compressor
If you want to keep your vehicle in good working condition, it’s important to regularly check and maintain your tires. One of the simplest tasks you can perform is inflating your tires when they start to lose pressure. Rather than rely on a hand pump which can take a considerable amount of time and effort, consider using an air compressor instead.
To inflate your tire with an air compressor, start by checking the recommended pressure for your vehicle’s tires. Then, attach the air hose to the valve stem on your tire and turn on the compressor. Fill the tire until it reaches the recommended pressure, and then turn off the compressor and remove the hose.
Not only is using an air compressor quicker and easier, but it also ensures that you get an accurate and consistent pressure reading that will keep your tires rolling smoothly for miles to come. So next time you need to inflate your tires, don’t break a sweat with a hand pump – use an air compressor for quick and easy inflation.
Check for Proper Inflation and Balance
One of the most important things you can do for your car’s tires is to ensure they are properly inflated. This not only helps to prevent blowouts, but it also improves gas mileage and extends the life of your tires. To make sure your tires are inflated to the correct pressure, you can check the car’s owner’s manual or look for a sticker on the inside of the driver’s side door.
Once you know the correct pressure, use a tire pressure gauge to check each tire and fill them as needed. Keep in mind that proper inflation can also affect balance, so it’s important to get your tires balanced as well. Tires that are out of balance can cause vibrations and wear unevenly, leading to costly repairs down the line.
By taking these simple steps, you can ensure your tires are in top condition and keep your vehicle running smoothly and safely on the road.
Conclusion
So there you have it – the art of setting a bead on a tire. It may seem like a daunting task at first, but with the right tools and techniques, you can have those tires rolling smoothly in no time. Just remember, a little patience and persistence can go a long way, and if all else fails, don’t be afraid to call in the professionals.
After all, there’s nothing wrong with admitting defeat and letting someone else handle the heavy lifting – or in this case, the heavy spinning!”
FAQs
Why is it important to properly set the bead on a tire?
Properly setting the bead ensures that the tire remains securely attached to the rim, preventing accidents or blowouts while driving.
What are the steps involved in setting the bead on a tire?
The steps involve mounting the tire onto the rim, inflating the tire to a specific pressure, and then releasing the air to allow the tire to seat properly onto the rim.
Can I set the bead on a tire without a tire changer or specialized equipment?
It is possible to set the bead without equipment, by using soapy water to lubricate the tire and rim and then using a high-powered air compressor to blast air into the tire until it sets.
How do I determine the correct pressure to set the bead on my tire?
The correct pressure will depend on factors such as the size of the tire and the weight of the vehicle, but can usually be found in the owner’s manual or by consulting a tire specialist.
What should I do if the tire bead won’t set?
If the bead won’t set, check to make sure the tire and rim are clean and seated properly. You may need to add more lubricant or try inflating the tire slightly beyond the recommended pressure to force it to seat.
Can I reuse a tire that has lost its bead?
It is not recommended to reuse a tire that has lost its bead, as this can indicate damage to either the tire or the rim that could compromise safety while driving.
What should I do if I suspect my tire bead is damaged or compromised?
If you suspect the tire bead is damaged, you should have it inspected by a professional immediately and avoid driving on the tire until it has been repaired or replaced.


