Breaking the bead on a tire can be a bit daunting for some, especially for those who are new to tire maintenance. But it’s an important skill to have if you want to save some money on tire changes or if you happen to get a flat tire in the middle of nowhere. Essentially, breaking the bead means separating the tire from the rim, allowing you to access the inside of the tire and either repair it or replace it altogether.
It might sound intimidating, but with the right tools and a little bit of practice, anyone can learn how to break the bead on a tire. In this blog, we’ll guide you through the process step-by-step, offering helpful tips along the way to make the task much easier. So, let’s get started!
Table of Contents
Introduction
If you are looking to repair a tire on your own, it is important to know how to break the bead on a tire. Breaking the bead refers to the process of separating the tire from the rim. It may seem like a difficult task, but it can be done with the right tools and a little bit of know-how.
One way to break the bead is to use a tire iron or spoon to pry the bead away from the rim. Another option is to use a bead breaker tool, which can make the process faster and easier. Regardless of the method you choose, it is important to use caution and make sure you have a good grip on the tire and rim to prevent any injuries.
In the end, being able to break the bead on a tire can save you time and money, and give you the satisfaction of a job well done.
What is Breaking a Bead?
Breaking a bead is a crucial step in the process of changing or repairing a tire. When tires are mounted on wheels, they are secured in place by a tight seal between the tire and the wheel. Breaking this seal is what is referred to as “breaking a bead.
” It involves using a special tool, called a bead breaker, to push down on the tire’s sidewall and separate it from the wheel rim. Breaking a bead is necessary to remove the tire from the wheel in cases of repair or replacement. This simple process makes for a quick and easy way to remove, replace or repair your tire.
Whether you are a seasoned mechanic or a do-it-yourselfer, knowing how to break a bead can save you a lot of time and hassle.

Why Break a Bead?
Breaking the bead of a tire is a process that allows for the removal of the tire from the rim. It involves separating the tire from the wheel by breaking the bond between the two. This is a task that is often necessary for a variety of reasons, including repairing a tire, changing a tire, or mounting a new tire.
While the idea of breaking a bead may sound daunting, it is a relatively simple process that can be completed with the right equipment and a bit of know-how. The main keyword: breaking a bead
Tools Needed to Break a Bead
Breaking the bead on a tire can be a challenging task that requires specific tools. To get the job done right, you will need a bead breaker tool, tire irons, and a tire machine. A bead breaker tool is a device used to break the seal between the tire and the rim.
This tool works by applying force to the sidewall of the tire, forcing it away from the rim. Tire irons are used to remove the tire from the rim once the bead has been broken. They are essential tools for separating the tire from the rim and are available in different shapes and sizes.
A tire machine is a machine used to mount and dismount tires. It makes the process of breaking the bead much easier by using pneumatic pressure to push the tire off the rim. In summary, breaking the bead on a tire requires specialized tools that work together to accomplish the task effectively.
Make sure to have these tools on hand before attempting to break the bead on a tire.
Tire Irons
Tire irons are essential tools for breaking the bead on a tire. Breaking the bead means separating the tire’s inner and outer sides, which makes it easier to replace or repair the tire. A tire iron, sometimes called a tire spoon, is a lever or pry bar that focuses pressure to lift and separate the bead from the rim.
Tire irons vary in size and shape, but most are made of steel and have a curved end that fits between the tire and the rim. When using a tire iron, it’s essential to use caution and follow proper safety procedures to protect yourself and your tires. Using the right tools, including tire irons, can save you time and money, not to mention prevent unnecessary damage to your vehicle’s tires.
So, invest in a good set of tire irons to make tire repairs quicker and easier.
Bead Breaker Tool
If you’re planning to change the tires on your vehicle, having the right tools is essential. One particular tool that you’ll want to have is a bead breaker. This tool is used to break the bead of your tire away from the rim, making it easier to remove the tire.
Although it may seem like a simple task, breaking the bead can be difficult without the right tools. Some tools you’ll need include a bead breaker tool, tire lever, lubricant, and a mallet. The bead breaker tool is specifically designed to break the bead and can be purchased at your local auto parts store.
With the right tools and a bit of know-how, you can successfully remove and replace your vehicle’s tires, saving you time and money in the long run.
Compressor
When it comes to breaking a bead, having the right tools is essential. One of the most effective tools for this task is a compressor. This powerful tool can deliver bursts of air to quickly and easily separate the tire from the rim.
However, it’s important to remember that using a compressor requires careful planning and safety precautions. To start, make sure the air pressure is set correctly to avoid damaging the tire or wheel. Additionally, always wear safety goggles and gloves to protect yourself from any debris or hazards.
With these precautions in place, a compressor can be an incredibly efficient and useful tool for breaking a bead. Whether you’re a professional mechanic or a DIY enthusiast, a compressor is definitely a worthwhile investment to add to your tool collection.
Steps to Break a Bead
Breaking the bead on a tire can be a tricky process but with the right tools and technique, it can be done with ease. Firstly, start by removing the valve stem core and deflating the tire completely. Once the tire is deflated, use a bead breaker tool to separate the tire bead from the rim.
Make sure to position the tool’s blade in between the tire and the rim and press down firmly to break the bead. Next, flip the tire over and repeat the process on the other side. Remember to apply even pressure and be cautious not to damage the rim.
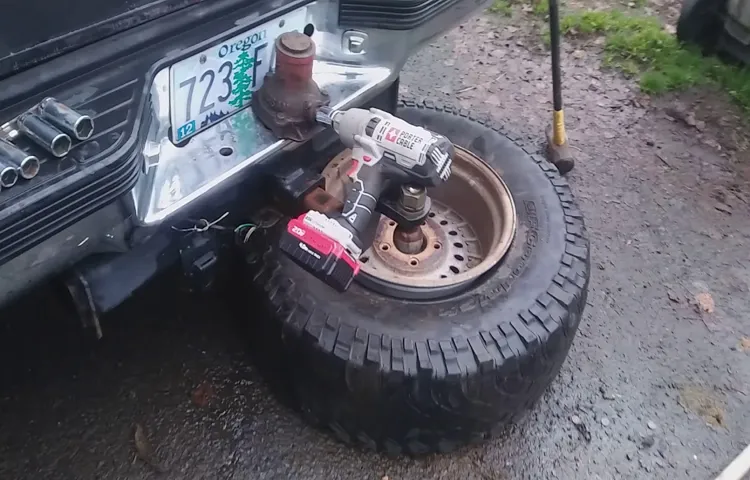
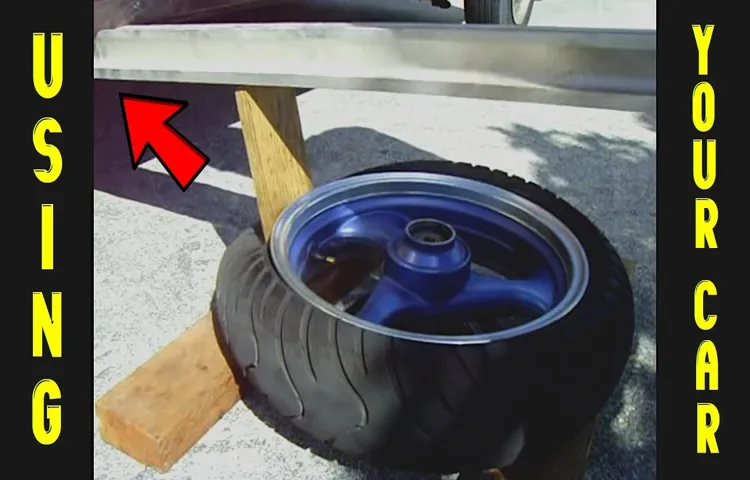
If you don’t have a bead breaker tool, you can also use a flat shovel to break the bead. It’s important to note that breaking the bead on a tire can be hazardous, so make sure you wear protective gear such as gloves and safety glasses. With these simple steps, you’ll be able to break the bead on a tire yourself and save money on costly trips to a mechanic.
Step 1: Loosen the Lug Nuts
Breaking a bead on a tire can seem daunting, but with the right tools and techniques, it can be done easily and efficiently. The first step in breaking a bead is to loosen the lug nuts while the tire is still on the vehicle. Use a lug wrench to turn the nuts counterclockwise until they are loose, but not completely off.
This will prevent the tire from spinning while you are trying to break the bead. Once the lug nuts are loosened, position the vehicle so that the tire you want to break the bead on is easily accessible. Use a jack and jack stands to lift the vehicle off the ground and ensure that it is stable and secure.
With the tire off the ground, you are now ready to move on to the next step in breaking the bead. Remember to always be careful when working with a vehicle and follow all safety precautions. By following these simple steps, you’ll be able to break the bead on a tire like a pro in no time!
Step 2: Elevate the Tire
Once you have the jack positioned and secure, it’s time to elevate the tire. This involves gradually raising the tire off the ground using the jack handle or wrench. The key is to lift it just enough so that there’s room to work, but not so high that the vehicle becomes unstable.
Be sure to consult your owner’s manual for guidance on the proper jacking points for your particular make and model, as well as any other specific instructions. Once the tire is lifted, it’s time to move on to the next step of breaking the bead. This is where things can get a bit tricky, but with the right tools and technique, it’s a manageable task.
Remember to take your time and stay focused, and before you know it you’ll have that old tire off and a brand new one in its place.
Step 3: Remove the Valve Core
Breaking the bead of a tire might sound like a daunting task, but it can be done with a little bit of effort and the right tools. The process is simple and there are only a few steps to follow. Once the tire is securely in place and deflated, the next step is to remove the valve core.
This tiny piece inside the valve stem controls the flow of air in and out of the tire. The valve core needs to be removed to release any remaining air pressure inside the tire. This is crucial in order to fully break the bead of the tire and separate it from the rim.
To remove the valve core, use a valve core removal tool and turn it counterclockwise. Once it is loose, use your fingers to extract it from the valve stem. It’s important to note that the valve core should be replaced after the tire has been repaired or replaced.
Overall, removing the valve core is a necessary step in the process of breaking the bead of a tire.
Step 4: Position the Bead Breaker Tool
When it comes to breaking a tire bead, positioning the bead breaker tool is vital. First, ensure that the tool is positioned correctly by aligning it with the tire’s rim. You want to make sure it perfectly aligns with the part of the tire you’re trying to break free from the rim.
Next, tighten the tool’s arm to the rim and rotate the handle clockwise to start breaking the bead. Once you hear a hissing sound, it means the tire bead is released from the rim. At this point, rotate the handle in the opposite direction to remove the tool carefully.
It’s important to make sure the tool is safely removed, so it doesn’t damage the tire or injure you. Following these simple steps will ensure that you can effectively break the tire bead without any hassle. Remember, always wear protective gear and exercise caution when handling tire-breaking equipment.
Step 5: Tighten the Bead Breaker Tool
Breaking a bead can be a challenging task, but with the right tools and knowledge, you can do it yourself. Tightening the bead breaker tool is the fifth and final step in the process. This step is essential as it helps ensure that the tool is securely attached to the tire and prevents any slipping or movement during the bead breaking process.
You can use a wrench or pliers to tighten the tool’s bolts, but it’s crucial not to over-tighten them as it can damage the tire. Once tightened, it’s important to double-check the tool’s stability and make sure it’s in the correct position before proceeding. By following these steps and being careful throughout the process, you can successfully break the bead and tackle your tire repair needs like a pro.
Step 6: Remove the Tire from the Rim
Breaking a bead on a tire is an essential part of the process when it comes to replacing them. If you’re looking to achieve this task yourself, follow these steps carefully, and you’ll be done in no time! After placing the wheel on a flat surface, start by removing the valve core and deflating the tire entirely. Next, use a bead breaker tool to break the bead seal around the tire.
Once the bead is broken, remove the tire from the rim. Depending on the type of tire you’re dealing with, you may need to use additional tools like tire irons to pry it away from the rim. Keep in mind that this step requires some physical strength, so be sure to take breaks if you need to.
Once the tire is off the rim, remove any remaining debris or dirt from the rim and inspect it for any damage. This process is crucial for ensuring the safety and longevity of your tires, so take your time and be thorough. With a little patience and practice, you’ll soon become a pro at breaking a tire bead.
Safety Precautions
Breaking the bead on a tire can be a daunting task for inexperienced people, but it can be done safely and easily with the right precautions. Before starting the process, make sure to use proper eye and ear protection, as the sound of the bead popping can be very loud and damaging to your hearing. Additionally, make sure the area around the tire is clear of any potential hazards or obstacles.
To break the bead, first, deflate the tire completely, then use a tire iron or pry bar to pry the tire away from the rim on both sides. Be sure to apply pressure gradually to avoid damaging the rim or the tire. With these steps in mind, breaking the bead on a tire should be a simple and safe process.
Wear Eye Protection
Wearing eye protection is vital when it comes to staying safe while engaging in potentially dangerous activities. Whether it’s working in a construction site, operating heavy machinery, or playing contact sports, there will always be a risk of flying debris or accidental impact that could harm your eyes. To avoid any unfortunate incidents, it’s important to invest in high-quality safety glasses or goggles that are specifically designed for the task at hand.
Investing in proper eye protection can ultimately prevent years’ worth of devastating vision problems, not to mention keeping you safer at the moment. So, if you’re a DIY enthusiast or are gearing up for a new woodworking project, remember to always include safety goggles in your list of essentials. A little precaution today can go a long way in preserving your vision and keeping yourself out of harm’s way.
Use Caution when Working with Tire Irons
When it comes to changing a tire, tire irons are an essential tool to get the job done. They aid in removing the old tire and replacing it with a new one. However, if misused, tire irons can cause serious injuries.
That’s why it’s important to take safety precautions when working with them. The first step is to make sure you have the right-sized tire iron for your vehicle. Using the wrong size can lead to slipping and slipping can cause hand injuries.
Always wear protective gloves to lessen the chance of injury. Additionally, be mindful of where you place the tire iron when not in use. Leaving it on the ground or near moving parts of the vehicle can lead to tripping or accidental damage to the car.
Always keep it within reach but in a safe area. Remember, tire irons are useful tools, but use them with caution to avoid accidents and unnecessary injuries.
Keep the Work Area Clean and Organized
Keeping the work area clean and organized is crucial when it comes to maintaining safety in the workplace. A cluttered work area can lead to accidents, such as tripping over items or getting a body part caught in machinery. It’s important to regularly declutter and organize the work area, ensuring that everything has a designated spot.
This will not only reduce the risk of accidents but also improve productivity and efficiency. Implementing a system of routine cleaning and tidying up will also prevent the build-up of dust and debris, which can cause respiratory issues or other health problems. Overall, maintaining a clean and organized work area is a small but significant step in creating a safe and healthy work environment.
Conclusion
Breaking the bead on a tire requires patience, skill, and a bit of brute force. It’s like a delicate dance between the tire and the tool, with each move calculated and precise. But don’t let the process intimidate you – with a little practice, you too can master the art of bead breaking.
Just remember to always use caution, wear proper safety gear, and of course, never underestimate the power of a good tire iron.”
FAQs
What tools do I need to break the bead on a tire?
You will need a tire iron, a bead breaker tool, and a rubber mallet.
Is it necessary to break the bead to change a tire?
Yes, you need to break the bead in order to remove the tire from the wheel.
Can I break the bead on a tire without a bead breaker tool?
Yes, you can use a tire iron and a rubber mallet to break the bead, although it may be more difficult and time-consuming.
How do I use a bead breaker tool to break the bead on a tire?
Place the tool under the tire and press down on the pedal or handle to apply pressure until the bead pops off the wheel.
What safety precautions should I take when breaking the bead on a tire?
Wear eye protection and keep your hands and fingers away from the bead breaker tool to avoid injury.
Can I reuse the tire after breaking the bead?
Yes, you can remount the tire after replacing the tube or repairing a puncture.
What should I do if I can’t break the bead on a tire?
If you are having trouble, try lubricating the bead with soapy water or applying heat with a heat gun to soften the rubber. If all else fails, take the tire to a professional for assistance.


