When the tire pressure light on your Honda Civic turns on, it can be alarming. Is there a problem with your tires? Should you stop driving immediately? Before panicking, it’s essential to understand what causes this light to turn on and how to reset it. In this article, we will explain why the tire pressure light comes on in your Honda Civic and how you can easily reset it.
Think of us as your personal mechanic, guiding you through a simple yet crucial process that will keep you safe and your vehicle in perfect condition. So, let’s get started and learn how to reset your Honda Civic’s tire pressure light.
Check Tire Pressure
If you own a Honda Civic and your tire pressure light has turned on, it may mean that one or more of your tires have lost pressure. The first step in addressing this issue is to check the tire pressure in each of your tires. You can do this by using a tire pressure gauge, which is typically found at your local auto parts store or gas station.
Once you have the gauge, remove the cap from the valve stem on each tire and firmly press the gauge onto the stem. The gauge will then provide a reading of the tire’s pressure in pounds per square inch (psi). Check the recommended psi for your specific Honda Civic model in your vehicle owner’s manual, and inflate or deflate the tires accordingly.
After adjusting the pressure, drive your car for a few minutes and see if the tire pressure light turns off. If it doesn’t, you may need to reset it. To do this, consult your owner’s manual for specific instructions, as the method can vary depending on the year and model of your Honda Civic.
With a little bit of effort, you can ensure that your tires are at the proper pressure and your vehicle is operating safely.
Use Tire Pressure Gauge
Using a tire pressure gauge to check the pressure in your tires is an important step to ensure your safety on the road. It’s a simple process that you can do at home or at a gas station, and it only takes a few minutes. First, make sure that your tires are cool, and then remove the valve cap from the tire stem.
Place the gauge onto the tire stem and press down until you hear a hissing sound. This means that the gauge is making contact with the valve stem. Once you hear the hissing sound, read the gauge to determine the tire pressure.
If the pressure is too low, add air until it reaches the proper pressure level. If the pressure is too high, release air until it reaches the right pressure level. By keeping your tires at the recommended pressure level, you’ll prolong their life, improve gas mileage, and reduce the risk of accidents on the road.

Compare to Recommended Pressure
Checking tire pressure regularly is crucial for maintaining your vehicle’s performance and safety. One way to ensure that your tires are properly inflated is to compare them to the recommended pressure listed in your owner’s manual or on the tire placard, which is typically located in the driver’s doorjamb. The recommended pressure can vary depending on the make and model of your vehicle, as well as the type and size of the tires.
If your tires are overinflated or underinflated, it can lead to uneven tire wear, decreased fuel efficiency, and an increased risk of a tire blowout. By regularly checking and adjusting your tire pressure, you can improve your vehicle’s handling and reduce the risk of accidents on the road. Remember, maintaining proper tire pressure not only helps ensure your safety but also helps extend the life of your tires, ultimately saving you money in the long run.
Resetting the Light
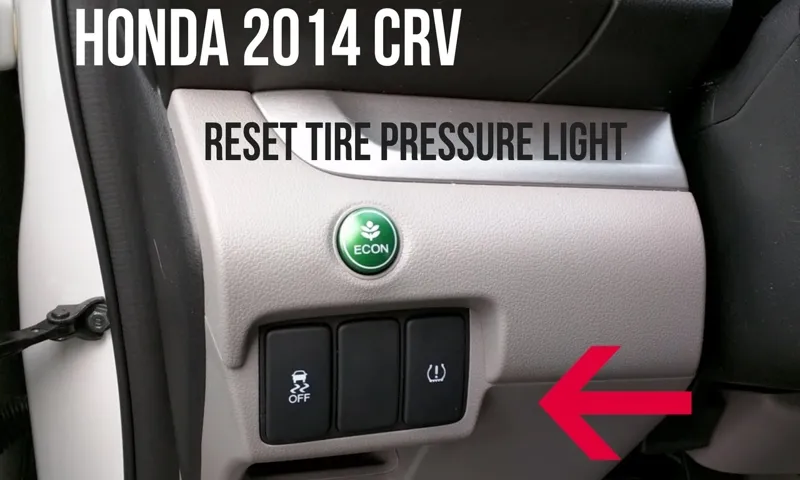
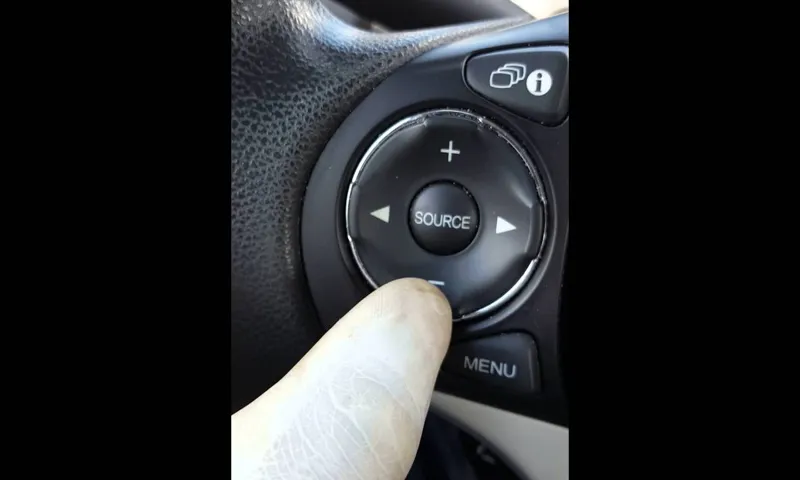
If you own a Honda Civic, you may have noticed the tire pressure light appearing on your dashboard. This can be frustrating, but luckily resetting the light is a simple process. First, locate the reset button, which is usually found near the steering wheel or on the instrument panel.
Turn the key to the “On” position, but do not start the car. Press and hold the reset button until the tire pressure light begins to blink. Release the button, and the light should turn off.
Remember that if the light comes back on after resetting it, you may need to check your tire pressure or have a mechanic inspect your tires. By following these simple steps, you’ll be able to reset your Honda Civic’s tire pressure light and hit the road with confidence.
Turn Car on and Locate Reset Button
When it comes to resetting the light in your car, the first step is to turn on the ignition. Once your car is on, locate the reset button. The location of the reset button can vary depending on the make and model of your car, so be sure to consult your owner’s manual if you’re not sure where to look.
Typically, the reset button is somewhere on the dashboard, but it could also be on the steering wheel or center console. Once you’ve located the reset button, you’ll need to press and hold it down for several seconds. The length of time required to reset the light can also vary based on your car, so be sure to consult your manual to determine the appropriate amount of time.
After holding down the reset button for the required length of time, the light should turn off. If the light persists, there may be a more serious issue with your car that needs to be addressed by a professional mechanic. Resetting the light is just a temporary fix, so be sure to address any underlying issues that may be causing the light to come on in the first place.
Hold Reset Button Until Light Flashes
Are you frustrated with your light not working as it should? Have you tried turning it off and on again with no luck? The solution might be as simple as resetting the light. To do this, hold down the reset button located on the light until it starts flashing. It’s essential to hold down the button for at least 20 seconds until the light blinks to ensure that the reset is successful.
Resetting the light not only solves any ongoing issues but also ensures that it’s working correctly. This simple process should be performed regularly to prevent further problems and keep your light in excellent working condition. By routinely resetting your light, you can ensure that it is always functioning at peak performance, giving you the much-needed convenience and safety you require.
So, the next time you encounter issues with your light, don’t panic, just try resetting it, and you might be pleasantly surprised at how easy the solution can be.
Release Button and Wait for Light to Turn Off
Resetting a light can be a frustrating task, but it is a necessary one when you want to turn off a light that is malfunctioning or simply needs to be reset. To do this, you first need to locate the release button on the light switch. Once you have found it, press and hold it down for a few seconds until the light begins to flash rapidly.
You can then release the button and wait for the light to turn off completely. This usually takes a few seconds, but can take longer depending on the type of light you are resetting. Once the light has turned off, you can turn it back on and it should be working normally again.
Remember, if you are unsure about resetting a light or you are having trouble with it, it is always best to consult an electrician to avoid any potential safety hazards.
Final Steps
Resetting your tire pressure light on a Honda Civic can be a bit confusing at first, but it’s actually a simple process. Once you’ve checked your tire pressure and ensured it’s at the right level, all that’s left is to reset the TPMS system. To do this on a Honda Civic, start by turning on the ignition, but don’t start the engine.
Next, locate the TPMS button, usually located under the steering wheel or on the dashboard. Press and hold the button until the TPMS light blinks twice. That’s it! The system has been reset, and the light should now turn off.
If the light doesn’t turn off after resetting, there may be an issue with one of your tires, and you should have them inspected by a professional. Overall, resetting your tire pressure light on a Honda Civic is a quick and simple process that will save you from unnecessary worry and potentially dangerous driving situations.
Drive Vehicle for at least 10 minutes
After following all the necessary steps to get your vehicle up and running, it’s important to take it for a test drive for at least 10 minutes before hitting the road. This is crucial to ensure that your vehicle is running smoothly and all the previous maintenance checks have been successful. During the test drive, make sure to pay attention to any unusual sounds or vibrations and keep an eye on the dashboard for any warning lights.
It’s also important to test out the brakes, acceleration, and steering to ensure that everything is in proper working order. Don’t forget to buckle up and obey all traffic laws during the test drive to ensure your safety. Once you’ve completed the test drive and everything appears to be in good condition, you’re ready to hit the road! Remember to always keep up with routine maintenance checks to ensure your vehicle stays in top condition.
Double Check Tire Pressure
When it comes to ensuring your vehicle is ready for the road, checking the tire pressure is one of the most crucial steps. Not only does it ensure better fuel efficiency, but it also ensures your safety and prevents tire wear. Before you hit the road, double-check the tire pressure with a reliable tire gauge to make sure it matches the manufacturer’s recommended pressure.
An over-inflated tire can cause uneven tire wear, while an under-inflated tire can lead to poor handling and reduce fuel efficiency. By taking the time to check your tire pressure, you can rest easy knowing you’re doing everything you can to keep yourself and your passengers safe while you drive. Don’t let a simple oversight like incorrect tire pressure ruin your next road trip – take the extra time to make sure your tires are properly inflated to enjoy a safe and comfortable ride.
Conclusion
Resetting your tire pressure light on your Honda Civic is a task that can easily be accomplished with a couple of clicks and a bit of patience. It may seem daunting at first, but with the right tools and knowledge, you’ll be able to keep your wheels rolling smoothly. Just remember, your car’s tire pressure light is like a little beacon, reminding you to check your tires regularly and spare yourself any unexpected surprises.
So, stay vigilant, stay safe, and keep on cruisin’ down that open road!”
FAQs
What could be the reasons for the tire pressure light to come on in a Honda Civic?
The tire pressure may be low, there may be a malfunction in the tire pressure monitoring system, or there may be an issue with the tire sensors.
How can I reset the tire pressure light in my Honda Civic?
First, ensure that all tires are properly inflated. Then, locate and press the tire pressure reset button, which is typically located in the glove box or on the dashboard. Hold the button until the tire pressure monitoring system light blinks twice, indicating that the system has been reset.
Can I continue to drive my Honda Civic if the tire pressure light is on?
It is not recommended as low tire pressure can cause reduced handling and increased risk of a blowout. Check your tire pressure and inflate them appropriately before driving.
What is the ideal tire pressure for a Honda Civic?
The ideal tire pressure for a Honda Civic can vary depending on the year and model. However, it is typically between 32-35 PSI.
How often should I check my tire pressure in my Honda Civic?
It is recommended to check your tire pressure at least once a month or before a long road trip.
Can I reset the tire pressure light without fixing the issue?
Resetting the tire pressure light without fixing the issue will only temporarily turn off the light. It is important to fix the issue causing the light to come on to ensure proper tire pressure and safety.
Can cold weather cause the tire pressure light to come on in a Honda Civic?
Yes, cold weather can cause the tire pressure to decrease and trigger the tire pressure light. It is important to check and inflate your tires appropriately in cold weather conditions.


