Have you ever taken a motorcycle ride and felt your handlebars vibrating? It’s not only uncomfortable, but it also affects your bike’s performance and safety. These vibrations might be a sign that your motorcycle tires are out of balance. Balancing your motorcycle tires is an essential maintenance task that every rider should know how to do, and you don’t have to go to a professional mechanic to do it.
Balancing your motorcycle tires at home is simple and cost-effective, and it will help you avoid potential problems on the road. In this blog post, we’ll guide you through the steps to balance your motorcycle tires at home, so you can enjoy a smooth and safe ride every time.
Table of Contents
Why Balance Your Motorcycle Tire?
Are you experiencing vibrations while riding your motorcycle? One possible reason for this could be an unbalanced tire. Balancing your motorcycle tire is crucial for a smooth and safe ride. It helps in distributing the weight uniformly, reducing vibrations, increasing the lifespan of the tire, and improving fuel efficiency.
But how to balance a motorcycle tire at home? Firstly, ensure that you have the necessary tools like a bubble balancer, wheel weights, and valve stem remover. Next, jack up your motorcycle, remove the wheel, and place it on the bubble balancer. Adjust the weights until the bubble is centered, indicating that the tire is balanced.
Lastly, reinstall the wheel, and you’re good to go. It’s important to balance your motorcycle tire regularly, especially after installing a new one or repairing a puncture. With these simple steps, you can easily balance your motorcycle tire at home and enjoy a smoother and safer ride.
Extend the life of your motorcycle tire
If you want to extend the life of your motorcycle tire, it’s essential to maintain proper balance. Balancing your motorcycle tire is crucial because it helps ensure that the weight distribution is even, providing a smooth and comfortable ride. When your tire is out of balance, you may notice signs like vibration, uneven tread wear, or even a wobbly ride.
Not only is this annoying and uncomfortable, but it can also be dangerous. Unbalanced tires can lead to reduced stability, poor handling, and even accidents on the road. That’s why it’s crucial to balance your motorcycle tire regularly; this will help your tire wear evenly, maximize performance, and keep you safe on the road.
So, remember to balance your motorcycle tire to ensure a smooth, comfortable, and safe ride on your motorcycle.

Improve motorcycle stability on the road
If you’re looking to improve the stability and safety of your motorcycle on the road, one thing you may want to consider is balancing your tires. When your motorcycle’s tires are out of balance, it can lead to vibrations and wobbling that make it harder to control the bike. This can be dangerous, particularly at high speeds or when taking corners.
Balancing your tires involves adding small weights to the rims so that they spin evenly. This ensures that your tires make consistent contact with the road, reducing vibration and making your ride smoother and more stable. So, if you want to improve your motorcycle’s performance and safety, consider having a professional balance your tires.
It’s a quick and affordable way to get the most out of your ride.
Equipment You Need
If you’re wondering how to balance a motorcycle tire at home, you’ll need a few pieces of equipment. First and foremost, you’ll need a motorcycle wheel balancer. There are a variety of balancers available on the market, ranging from simple, manual systems to more complex computerized models.
Some balancers can accommodate a range of tire sizes and weights, while others are designed specifically for smaller motorcycles. You’ll also need a set of weights that can be affixed to the rim of the tire. These weights will correct any imbalances in the tire and ensure smooth handling and braking.
Most motorcycle shops carry weights in a range of sizes, so you can select the right weight for your bike’s tire. Additionally, you’ll need a valve stem tool to remove and reinstall the valve stem. With these tools on hand, you can perform a tire balance at home with a bit of practice and patience.
Motorcycle wheel stand
When it comes to taking care of your motorcycle, having a wheel stand is an essential piece of equipment. Not only does it make maintenance and repairs easier, but it also ensures that your motorcycle stays secure and stable while it’s propped up. There are different types of wheel stands available, but the most common are rear stands that lift the back wheel off the ground.
To use a rear stand, you’ll need to know the type of swingarm your motorcycle has and find a stand that is compatible. You may also need spools or adapters to attach the stand to your motorcycle properly. Another equipment you need is a front stand, which lifts the front wheel of your bike.
Depending on the type of motorcycle you have, you may need to use a combination of rear and front stands to keep your bike upright and secure during maintenance or storage. Investing in a quality motorcycle wheel stand is an investment in your bike’s longevity and performance.
Balancing weights
When it comes to balancing weights, there are several pieces of equipment you’ll need to ensure a successful workout. First and foremost, you’ll want a set of dumbbells or barbells to add or remove weight as needed. Additionally, a weightlifting bench is essential for exercises such as bench presses and flies, as it provides a stable surface to work with and allows for adjustable angles.
A resistance band or cable machine can also be helpful for creating tension and targeting specific muscle groups. Don’t forget about accessories, such as weightlifting gloves to protect your hands and lifting straps for secure grip on heavier weights. With these pieces of equipment, you’ll be well on your way to balancing weights like a pro!
Tire gauge
When it comes to taking care of your car, one of the most important things you can do is to regularly check your tire pressure. This is where a tire gauge comes in – it’s a simple tool that lets you measure the air pressure inside your tires. Having the right tire pressure is key to ensuring your car drives smoothly and efficiently, as well as making sure your tires last as long as possible.
It’s essential to have a reliable tire gauge that you can trust, so that you can keep your tires properly inflated. By doing this, you’ll be able to reduce your risk of a flat tire or a blowout, which can be both inconvenient and dangerous. So be sure to invest in a good tire gauge – it’s a small purchase that can make a big difference in the long run!
Steps to Balance Your Tire at Home
If you’re looking to balance your motorcycle tire at home, there are a few steps you can follow to get it done. First, you’ll need a wheel balancer, which you can either purchase or make yourself. You’ll also need to remove the wheel from your bike and take off the tire.
Once you have the bare wheel, you can attach it to the balancer and adjust it until it’s level. Then, you’ll need to add weights to the wheel to counterbalance any heavy spots. This might take a bit of trial and error, so be patient and keep testing until you get it right.
Once you’re satisfied with the balance, you can put the tire back on the wheel and reattach it to your bike. Balancing your motorcycle tire at home might seem intimidating at first, but with the right tools and a bit of practice, you can do it yourself and save some money in the process.
Step 1: Remove the wheel from the bike
If you’re looking to balance your bike tire at home, the first step is to remove the wheel from the bike. This may seem daunting if you’re not familiar with bike maintenance, but don’t worry- it’s easier than you might think! Start by flipping your bike over so it’s resting on its handlebars and seat. Then, locate the quick-release lever on the wheel you want to remove.
Pull the lever outwards and unscrew it until the wheel is loose enough to remove. Once you’ve taken the wheel off, you’re ready to move on to the next step in the balancing process. Balancing your bike tire is an essential maintenance task that can greatly improve your ride quality and prevent unnecessary wear and tear on your bike.
By removing the wheel from the bike, you’ll be able to take accurate measurements and make adjustments as needed to ensure your tire is perfectly balanced. And don’t worry if you’re new to bike maintenance- with a little bit of practice and some patience, you’ll be a pro in no time! So grab your tools, get to work, and enjoy a smoother, safer ride.
Step 2: Mount the wheel on the stand
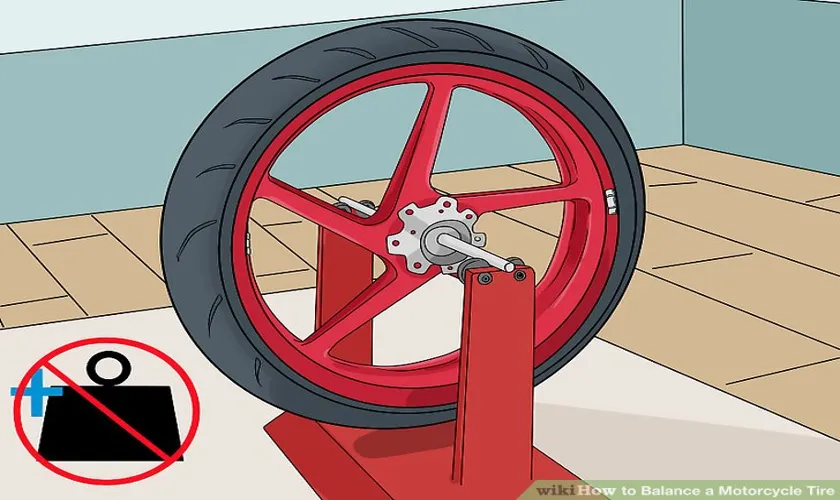
Once you have all your tools at hand, it’s time to get your hands dirty and balance your tires at home. The second step you need to follow is to mount the wheel on the stand. This is a crucial step as it will allow you to achieve an accurate balance.
The first thing you need to do is to remove the wheel from your vehicle and clean it thoroughly. You don’t want any dust or dirt on the wheel as it can affect its weight, leading to an inaccurate balance. Once you have cleaned the wheel, you can proceed to mount it on a wheel stand.
Make sure the stand is stable and secure to avoid any accidents. Once the wheel is in place, you can start the balancing process by attaching weights to the rim to correct any imbalance. Remember to check the manufacturer’s instructions for the recommended placement of the weights.
With a little patience and precision, you’ll have a perfectly balanced tire in no time. So, grab your tools, follow the steps and enjoy a smooth and safe ride on the open road!
Step 3: Determine the heavy side of the wheel
When it comes to balancing your tires at home, there are several steps you will want to follow to ensure a smooth ride on the road. Step 3 involves determining the heavy side of the wheel. This is important because a heavy spot on your wheel can cause a vibration that can be felt through the steering wheel, making for an uncomfortable drive.
One way to determine which side of the wheel is heavy is to use a bubble balancer. Simply place the wheel on the balancer and watch as the bubble moves to indicate the heavier side. Another method is to use a chalk or grease pencil to mark the valve stem on the wheel, then rotate it slowly until the mark is at the bottom.
Whichever side is lower is the heavy side and will need additional weight to be balanced properly. By taking the time to balance your tires correctly, you can help extend their lifespan and improve your driving experience.
Step 4: Add balancing weights
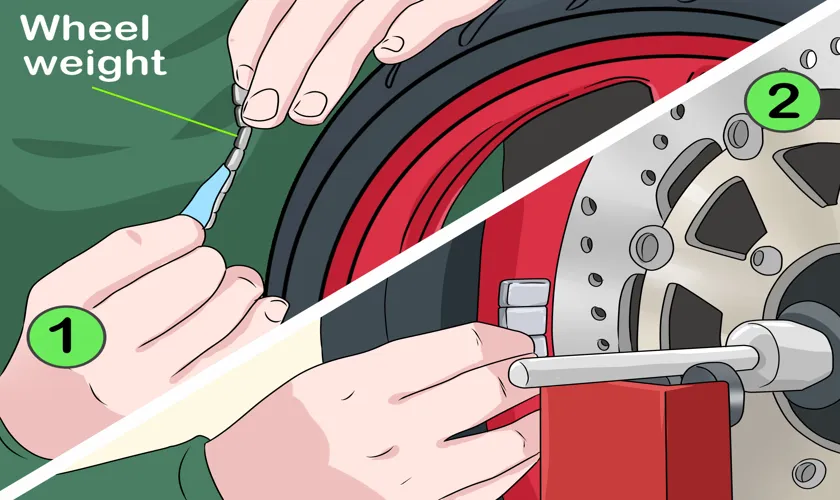
Balancing weights are an essential component of the tire balancing process. Once you’ve determined the correct amount and placement of weights needed, the next step is to add them to the wheel. There are two types of balancing weights, clip-ons, and stick-ons.
Clip-on weights are used for steel wheels, while stick-on weights work best on alloy wheels. To attach clip-on weights, place them on the wheel’s outer lip and use a hammer to gently tap them into place. Stick-on weights can be attached directly to the inner or outer surface of the wheel using an adhesive backing.
When applying stick-on weights, be sure to clean the surface thoroughly and allow it to dry completely before attaching the weight. Remember to apply the weight gradually and check the balance after each weight is applied to ensure a proper balance. Balancing weights are crucial in ensuring the overall performance and longevity of your tire, so be sure to use them correctly.
Step 5: Check the balance
Checking the balance of your tire is the final step in the tire balancing process. It may seem like a small detail, but it’s essential to ensure a smooth and safe ride. To check the balance, you’ll need to use a tire balancer and some weights.
First, place the tire on the balancer, making sure it’s level and secure. Then, spin the tire and wait for it to come to a stop. The balancer will indicate where the balance is off, and you’ll need to add weights to the appropriate spot on the rim to correct it.
Make sure to add weights gradually and check your work by spinning the tire again. When the tire is properly balanced, it should spin evenly without any wobbles or bouncing. By taking the time to balance your tire correctly, you’ll avoid unnecessary wear and tear on your vehicle’s suspension system and enjoy a smoother, safer ride.
Tips for Balancing Your Tire
If you’re wondering how to balance a motorcycle tire at home, you’re in luck! It’s a simple process that anyone can do with a bit of patience and care. First, make sure that your tire is properly inflated to the manufacturer’s specifications. Then, use a wheel balancer to determine whether your tire is out of balance.
If it is, identify the lightest point on the tire by rotating it slowly, and mark it with a piece of chalk or marker. Next, add weights to the rim at the point of imbalance until the tire is balanced. Be sure to double-check your work by spinning the tire again to ensure it’s balanced.
With these tips, you can keep your motorcycle running smoothly and safely on the road!
Use a quality wheel stand
If you’re looking for an efficient way to balance your tires, investing in a quality wheel stand is a must. It’s an essential piece of equipment that is designed to keep your wheel securely in place while you work on it. A wheel stand can help you achieve precise balancing by allowing you to spin the wheel and check for any wobbles or vibrations.
One of the tips for balancing your tire is to always start by cleaning the wheel and tire thoroughly. Dirt and debris can cause an imbalance and throw off your efforts. Another important tip is to make sure you use the right type of weights.
Clip-on weights are the most common type, but adhesive weights may be necessary for certain types of wheels. With the use of a quality wheel stand, along with the proper equipment and technique, you can achieve a smooth and balanced ride every time you hit the road.
Clean the wheel before balancing
Balancing your tires is an important aspect of vehicle maintenance that should not be overlooked. When you have your tires balanced, it ensures that the weight is distributed evenly, which leads to a smoother ride and improved handling. However, before you start the process, it is essential to clean the wheel thoroughly.
This way, you can remove any dirt or debris that may be impacting its balance. You can use a mild soap solution or household cleaner to get the job done correctly. Make sure to also dry the wheel completely before moving onto the next step.
With a clean wheel, you can begin the actual balancing process, which involves determining any weight imbalances and making adjustments accordingly. By taking the time to clean your wheel beforehand, you can ensure that your tire-balancing process goes as smoothly as possible – ultimately leading to a safer, smoother ride.
Use the correct balancing weights
When it comes to tires, balancing is key to ensuring a smooth and safe ride. One of the most important tips for balancing your tire is using the correct balancing weights. Different types of wheels may require different types of weights, and it’s important to consult with a professional to determine what kind of weight is best for your particular tire.
Using the wrong weight or skipping the balancing process altogether can lead to uneven wear, vibration, and even dangerous tire failure. Don’t take chances when it comes to your safety on the road – make sure your tires are properly balanced with the correct weights.
Conclusion
Balancing a motorcycle tire at home may seem daunting, but it is entirely doable with a few key tools and some patience. Just like in life, balance is crucial for a smooth ride. With each rotation, a well-balanced tire prevents wobbling and vibrations that could potentially lead to an accident.
So, don’t let a wobbly tire ruin your joyride – take the time to balance your motorcycle tire at home and enjoy a smoother, safer ride. After all, a balanced life is a happy life, both on and off the road!”
FAQs
What equipment do I need to balance a motorcycle tire at home?
You will need a motorcycle wheel balancer, wheel weights, and some basic tools like a socket wrench and pliers.
Can I balance my motorcycle tire without a specialized balancer?
It is possible to balance your tire without a specialized balancer, but it is highly recommended to use one for accurate results.
How often should I balance my motorcycle tires?
It is recommended to balance your motorcycle tires every time you have them changed or rotated to ensure proper handling and traction.
What are the benefits of balancing my motorcycle tires?
Balanced motorcycle tires ensure smooth handling, improved traction, increased tire life, and reduced vibrations.
How do I know if my motorcycle tire is unbalanced?
Symptoms of an unbalanced tire include vibrations at certain speeds, uneven wear on the tire, and difficulty in handling or steering the motorcycle.
Can I balance my motorcycle tire myself or should I take it to a mechanic?
You can balance your motorcycle tire yourself if you have the necessary equipment and knowledge, but it is recommended to seek the help of a professional mechanic for accurate results.
How long does it take to balance a motorcycle tire at home?
The process of balancing a motorcycle tire at home can take anywhere from 15 minutes to an hour, depending on your level of experience and the equipment you have.


