Do you know how to fill up your tire with air at the gas station? It can be confusing and overwhelming if you’ve never done it before. But fear not, because we’re here to help! In this guide, we’ll walk you through the process step-by-step so you can avoid costly tire repairs and road mishaps. Air pressure is essential to your car’s safety and performance, and checking it regularly can save you both time and money.
So let’s dive in and learn how to air up your tire at the gas station!
Table of Contents
Step 1: Locate the Air Pump
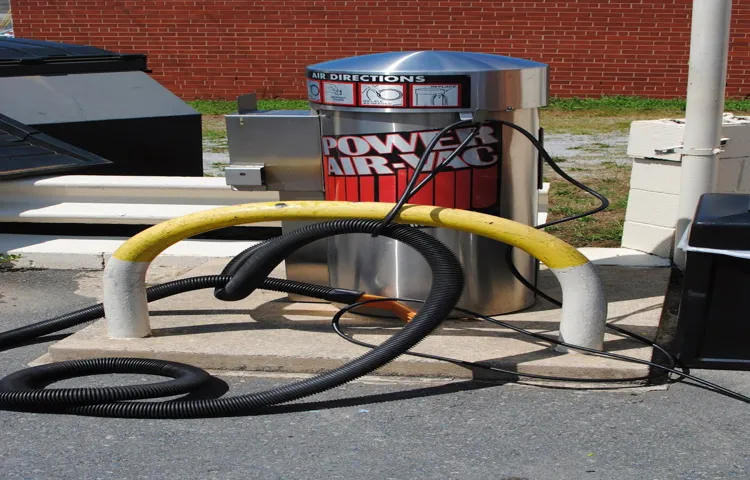
If you’re wondering how to air up a tire at a gas station, the first step is locating the air pump. Depending on the gas station, the air pump may be located near the entrance, near the tire center, or on the side of the building. Look for a sign or ask an attendant for help if you’re unsure.
Once you’ve located the air pump, make sure it’s in good working condition. Check the hose and pressure gauge to ensure they’re functioning properly. If everything looks good, you’re ready to start filling up your tires.
Don’t forget to check the recommended tire pressure for your car, which can be found in the owner’s manual or on a sticker inside the driver’s side door. With these simple steps, you’ll be back on the road in no time with properly inflated tires, which not only improve handling and fuel efficiency but also increase safety while driving.
Look for the air pump near the gas pump or the convenience store.
Locating the air pump for your car’s tires can be a bit of a challenge in new or unfamiliar locations. Fortunately, air pumps are typically located near the gas pumps or convenience store. This makes it easy to check your tire pressure and fill any underinflated tires.
When you arrive at the gas station, start by looking around the exterior of the building. Most stations will have a designated area for air pumps, complete with clear signage and ample lighting. Keep in mind that some air pumps might be located on the side of the building or tucked away behind the gas pumps.
Just remember to take your time and look for the distinct shape and color of an air pump. And if you’re still having difficulty finding it, don’t hesitate to ask the attendant for assistance. Locating the air pump might require a little extra effort, but it’s a critical step in maintaining your vehicle’s safety and performance.
So, always start by locating the air pump if you want to get your tires in top-notch condition.

Step 2: Check Your Tire Pressure
If you’re wondering how to air up your tire at a gas station, the second step is to check your tire pressure. It’s important to have the correct tire pressure for optimal performance, fuel efficiency, and safety. To check your tire pressure, you’ll need a tire pressure gauge.
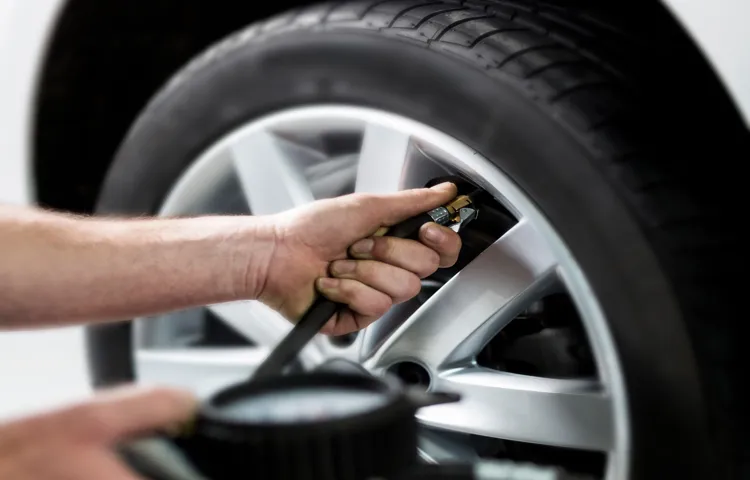
Remove the dust cap from the tire valve and press the gauge onto the valve stem. The gauge should provide a reading in PSI (pounds per square inch). If your tire pressure is too low, add air until it reaches the recommended PSI indicated in your vehicle’s owner’s manual or on the tire’s sidewall.
Be sure to add air in small increments and recheck the pressure often to prevent overinflation. Remember to replace the dust cap once you are finished. By regularly checking and maintaining your tire pressure, you can ensure your vehicle operates at its best and avoid potential safety hazards on the road.
Use a pressure gauge to check the recommended psi for your tire.
When it comes to maintaining your vehicle, checking tire pressure is often overlooked. However, it is critical to regularly check your tire pressure to ensure that your vehicle is performing at its best. To begin, you’ll need a pressure gauge to measure the air pressure in each tire.
Once you have your pressure gauge, you can find the recommended psi (pounds per square inch) for your specific vehicle in the owner’s manual or on a sticker inside the driver’s side door jamb. Simply remove the valve cap from your tire and press the gauge onto the valve stem to measure the pressure. If the psi is lower than the recommended range, use an air compressor to fill the tire to the proper pressure.
It’s also important to remember that tire pressure can fluctuate with changes in temperature, so it’s a good idea to check your tires at least once a month and before extended road trips. Remember, maintaining proper tire pressure is not only crucial for safety, but it can also improve fuel efficiency and prolong your tire’s lifespan.
Most cars have a sticker in the driver’s side door jamb or owners manual.
When it comes to maintaining your car’s safety and performance, checking your tire pressure is one of the most important things you can do. Thankfully, it’s a relatively easy task that you can do on your own. The first step is to locate the recommended tire pressure for your car.
Most cars have a sticker in the driver’s side door jamb or your owner’s manual that will tell you what the ideal tire pressure is. Once you have this information, you can use a tire pressure gauge to check your current tire pressure. If it’s too low or too high, you’ll need to adjust it accordingly.
It’s important to note that tire pressure can fluctuate depending on temperature and driving conditions, so it’s a good idea to check your tire pressure every month or so. By keeping your tires properly inflated, you can improve your car’s fuel efficiency, reduce your risk of blowouts and accidents, and extend the life of your tires.
Step 3: Remove the Valve Cap
Now that you’ve determined the correct tire pressure and attached the air hose to the valve stem, it’s time to remove the valve cap. This small, plastic cap covers the valve stem and protects it from dust and debris, but must be removed in order to effectively inflate the tire. To remove the cap, simply twist it counterclockwise – it should come off easily.
Be sure to place the cap in a safe place so that you don’t lose it! Once the valve cap is removed, you’re ready to move on to the next step in inflating your tire at the gas station. Remember, taking the time to properly inflate your tires can improve fuel efficiency and ensure safer driving conditions.
Unscrew the valve cap and place it aside. Do not lose it!
When it comes to maintaining your tires, unscrewing the valve cap and placing it aside might seem like a small detail, but it is an important step that should not be overlooked. The valve cap is crucial for keeping dirt and debris out of the valve stem, which can potentially cause air loss and lead to flat tires. By removing the valve cap carefully and setting it aside, you not only ensure that it is not lost, but you also minimize the risk of damaging it during the inflation process.
Remember, a missing or damaged valve cap can lead to costly tire repairs and replacements, so it’s essential to take this step seriously. With this simple but crucial step completed, you’re ready to move on to the next stage of tire inflation. So, take the time to unscrew the valve cap and put it in a safe place, and you’ll be ready to go in no time.
Step 4: Attach Hose to Valve Stem
Now that you’ve located the valve stem on your tire, it’s time to attach the hose from the gas station air pump. Make sure the hose’s connector is facing the right way, and then push it firmly onto the valve stem. You should hear a hissing sound as the air begins to flow into the tire.
Be sure to hold the hose securely in place as the pressure builds up. Most gas station air pumps have a built-in pressure gauge that will allow you to monitor the tire’s PSI as it inflates. As you watch the pressure tick up, be careful not to over-inflate the tire, which can be just as dangerous as an under-inflated one.
As a helpful tip, consider filling up the tire in short bursts, checking the pressure in between, until it reaches the necessary level. With a little patience and attention to detail, you’ll be back on the road in no time. Remember to remove the hose from the valve stem and replace the valve stem cap once your tire is securely inflated.
Press the hose connector onto the valve stem and make sure it is secure.
Attaching the hose to the valve stem is a vital step in ensuring that your tires are inflated correctly. Once you have found the valve stem, insert the hose connector onto the valve stem and ensure that it is secure. You should hear a snap sound that confirms that it is appropriately attached.
When attaching the hose to the valve stem, be careful not to bend or break the valve stem. Ensuring that the hose is attached correctly is crucial in inflating the tire to the right pressure. It is also essential in preventing damage to the valve stem, which may cause air leakage in the future.
Once you have attached the hose to the valve stem, be sure to check the pressure gauge to ensure that the tire pressure is within the recommended range. Overinflating or underinflating the tire can cause damage and reduce its lifespan. In conclusion, attaching the hose to the valve stem is a quick and straightforward process, but it is crucial to follow the correct procedure carefully.
You can avoid damage to the valve stem or underinflated and overinflated tires by doing it the right way. Ensuring that your tire pressure is within the recommended range will help keep you safe on the road. Whether you are a seasoned driver or a beginner, this process is vital as it guarantees the safety and lifespan of your tires.
Step 5: Inflate the Tire
Now that you’ve attached the tire gauge and assessed the pressure, it’s time to inflate the tire. If you’re unsure on how to air up tire at gas station, follow these steps. First, locate the air pump at the gas station and make sure it’s working.
Once you’ve found a functional air pump, unscrew the valve cap on your tire and attach the air hose to the valve stem. You’ll want to make sure the connection is secure, so the air doesn’t leak out. Then, turn on the air compressor and begin adding air to the tire.
Pay attention to the pressure gauge while adding air and stop once you reach the recommended pressure level for your specific vehicle. Once you’re finished, unscrew the air hose and replace the valve cap tightly. It’s important to regularly check your tire pressure, as it can affect your vehicle’s gas mileage and overall safety while driving.
So, don’t forget to keep this in mind during your next gas station stop.
Inflating a tire can seem like a daunting task, but it’s actually pretty straightforward once you know what you’re doing. To inflate a tire, start by attaching the air pump nozzle to the tire valve stem. Make sure the nozzle is properly aligned and is securely attached.
Once you’ve done that, press the button on the air pump to start inflating the tire. Make sure you keep an eye on the tire pressure gauge while pumping up the tire so you don’t overinflate it. If you’re not sure what the correct tire pressure is for your vehicle, check the owner’s manual or the sticker on the inside of the driver’s side door.
Remember, having the correct tire pressure is important for safety and can improve your vehicle’s overall performance. So don’t forget to check your tire pressure regularly and inflate them as needed.
Watch the gauge on the pump to make sure you inflate the tire to the correct psi.
Inflating your tire to the correct psi is crucial for maintaining proper tire pressure. It is important to watch the gauge on the pump while you inflate your tire to ensure that you are not over-inflating or under-inflating it. Over-inflated tires can cause poor handling and increase the risk of a blowout, while under-inflated tires lead to decreased fuel efficiency and premature wear.
Properly inflating your tire will also ensure a smooth ride and extended tire life. Always refer to your vehicle’s owner manual for the recommended tire pressure and never exceed the maximum psi listed on the tire itself. By using a tire pressure gauge and checking the psi regularly, you can improve the safety and longevity of your tires for years to come.
Step 6: Remove Hose and Replace Valve Cap
Now that your tire is sufficiently filled with air, it’s time to remove the hose from the valve stem and replace the valve cap. Before removing the hose, make sure that you have checked the tire pressure one last time to ensure that it’s at the correct level. To remove the hose, simply pull it straight off the valve stem and be careful not to let any of the remaining air escape.
Once the hose is removed, you’ll want to quickly replace the valve cap to prevent dirt and debris from getting inside and potentially causing damage. Before driving away, take a moment to do a quick visual inspection of the tire and make sure that everything looks good. Congratulations! You have successfully air up tire at gas station using these easy steps.
Remember to regularly check your tire pressure to ensure the safety and longevity of your tires.
Once the tire is properly inflated, remove the hose and replace the valve cap.
Once you’ve successfully inflated your tire, it’s time to remove the hose and replace the valve cap. This may seem like a minor step, but it’s actually quite important. The valve cap serves as a protective barrier, preventing dirt, dust, and other debris from entering the valve and causing damage.
It also helps to maintain air pressure by preventing air from escaping slowly over time. So, make sure you’re equipped with a valve cap that fits snugly on your tire’s valve. Once you have it handy, simply remove the hose from the valve and replace the cap.
Tighten the cap by hand, but avoid over-tightening as this can damage the valve stem. And just like that, you’re ready to hit the road! Remember, tire maintenance isn’t just about keeping your vehicle safe and your ride smooth, it’s about taking care of your investment. So, keep a watchful eye on your tires and perform regular checks to ensure they’re properly inflated and in good condition.
Step 7: Check Tire Pressure Again
Now that you have used the gas station’s air pump to fill your tires with the appropriate amount of air, it’s time to double-check the pressure. This is important because even a slight mistake in the pressure can lead to bad fuel efficiency, handling problems, and even tire blowouts. To ensure accuracy, remove the air chuck from the tire valve stem and place your tire gauge on it.
The gauge will promptly show the pressure. If it matches the recommended pressure level, you’re good to go. But, if the pressure has exceeded the recommended level, simply release some air from the tire by pressing the valve stem.
You can frequently check for the tire pressure to ensure that it stays within the recommended parameters. In conclusion, checking the tire pressure twice is a must-do step to guarantee your safety while driving, and to keep your tires in good shape for longer.
Recheck the tire pressure to make sure it is at the recommended pressure.
As we near the end of the tire pressure check process, it’s always a good idea to recheck the tire pressure to ensure it matches the recommendation for your specific vehicle. Step 7 involves verifying the tire pressure once again to ensure it’s within the suggested limits. This is crucial because a slight discrepancy in tire pressure can cause significant problems down the road.
By confirming the tire pressure is correct, you can rest assured that your vehicle’s performance will be optimized for safety and efficiency. Plus, it’s always better to double-check and be safe than sorry! So take a moment to recheck the tire pressure before hitting the road, and don’t forget to maintain this routine to keep your car in peak condition.
Conclusion
In conclusion, filling up your tires at a gas station may seem like a simple task, but it’s definitely not one to be taken lightly. Remember to check the recommended PSI for your tires before filling them, as this will ensure a smoother and safer ride. Don’t forget to use the pressure gauge provided and keep an eye out for any signs of wear and tear on your tires.
And finally, whether you’re a seasoned driver or a newbie, always remember that a properly inflated tire is a happy tire. So go ahead, air up your tires, and hit the road with confidence and style!”
Inflating your car tire at a gas station is simple and easy following these steps.
When inflating your car tire at a gas station, one of the most important steps is to check the tire pressure again. This helps ensure that you have enough air in the tire and that the pressure is at the right level for your vehicle. It’s important to note that checking the tire pressure before and after inflating the tire is important because adding air can cause the pressure to increase.
Without checking the pressure again, you might end up over-inflating the tire, which can result in reduced traction and handling, increased wear on the tire, and potential blowouts. By taking the extra time to check the pressure again, you can ensure that your tire is properly inflated and ready for the road ahead. So, always make sure to double-check your tire pressure before hitting the road.
FAQs
Can I use a gas station air pump to fill up my tires?
Yes, gas station air pumps are typically designed for filling up car tires.
How do I know the correct tire pressure for my car?
The correct tire pressure can be found in your car’s owner manual, on the driver’s side door jamb, or by checking with a mechanic.
Is it okay to overinflate my tires at a gas station?
No, overinflating your tires can be dangerous and cause excessive wear. Always reference your car’s recommended tire pressure.
What do I do if the gas station’s air pump isn’t working?
Look for another gas station or consider purchasing a portable air compressor for emergency use.
Can I add air to my tires when they are hot?
It is not recommended to add air to hot tires as the heat can cause the pressure to increase. Wait until the tires have cooled down before checking or adding pressure.
Is it necessary to check my tire pressure after adding air at a gas station?
Yes, it is important to double-check your tire pressure after adding air to ensure it is at the recommended level.
What do I do if I accidentally overinflate my tire at a gas station?
Immediately release some of the air until the pressure is at the recommended level to prevent potential damage to the tire.


