For many motorcycle riders, nothing beats the freedom and thrill of riding on the open road. But while you’re cruising down the highway, the last thing you want is your tire to be out of balance. Not only does this affect your ride quality, but it can also be a safety hazard.
That’s why it’s crucial to know how to balance a motorcycle tire. Luckily, this process doesn’t have to be complicated. With a few simple steps, you can have your tire running smoothly in no time.
In this guide, we’ll take you through the process step-by-step, so you can hit the road with confidence.
Table of Contents
Why is tire balance essential?
When it comes to motorcycle maintenance, balancing your tires is essential. The process involves ensuring the weight distribution on both wheels is equal, preventing vibration and wobbling while riding. One way to balance motorcycle tires is through static balancing, where weights are added to the wheel to achieve a balanced position.
Another way is through dynamic balancing, where a machine spins the tire and wheel assembly to identify any heavy spots, which can then be corrected through weight adjustment. Without proper tire balance, your ride may become unstable, leading to issues like premature tire wear, decreased handling, and even accidents. So if you want to ensure a smooth and safe ride, learning how to balance your motorcycle tires is a crucial step in your maintenance routine!
Smoother Ride
Tire balance is an essential factor that determines the smoothness and stability of your ride. It is essential to balance your tires to ensure proper grip and traction on the road, which can significantly enhance your vehicle’s performance. When your tires are balanced, they spin evenly and ensures that no single section of the tire wears out faster than the other.
This prevents premature wear and tear and extends the life of your tires, saving you both time and money. A poorly balanced tire can cause various problems, including vibrations, noise, and even erratic steering, making it difficult for you to control the vehicle. To ensure your safety and that of others on the road, it is imperative that you take your vehicle to a qualified mechanic who can correctly balance your tires.
Trust me, a well-balanced tire helps you drive better, feel more comfortable on the road, and significantly reduces the risk of accidents.

Increased Safety
Tire balance is essential to increased safety on the road. When tires are not balanced, they can cause a vehicle to vibrate and pull to one side, which can be dangerous. Proper wheel balancing also helps to extend the life of your tires, improve fuel efficiency, and provide a smoother ride.
When a tire is unbalanced, it can cause uneven wear and tear, leading to premature tire replacement. Additionally, unbalanced tires can create more friction on the road surface, which reduces fuel efficiency and increases the amount of wear and tear on your vehicle’s engine and suspension. Overall, tire balance is one of the most important factors in ensuring your vehicle is safe and efficient on the road.
So, if you haven’t had your tires balanced recently, it is definitely something you should consider doing right away.
Tools and Materials Needed
Are you experiencing vibrations on your motorcycle? It could be time to balance your motorcycle tire. Balancing your tires has many advantages, such as a smoother ride, better control, and longer tire life. You will need a few tools and materials to get started.
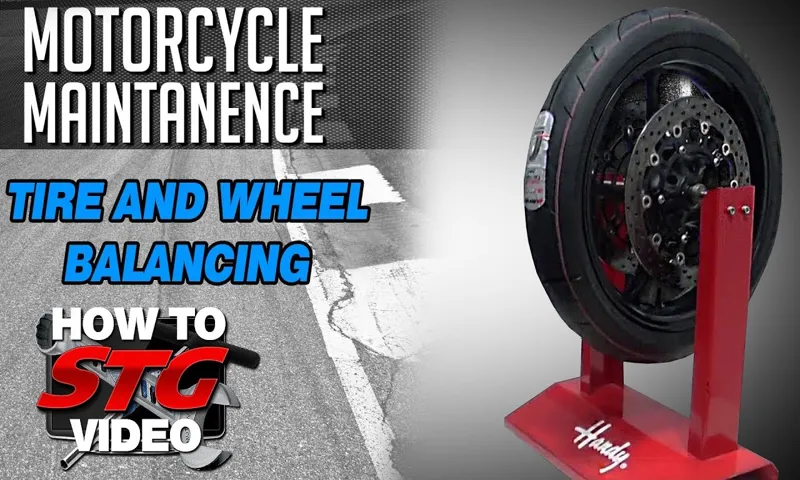
First, you will need a wheel balancer. A wheel balancer will help you identify which part of the wheel is heavier and needs to be compensated. You will also need some wheel weights to place on the lighter side of the wheel.
Additionally, you will need a valve stem tool to remove the valve stem from the wheel. Finally, a torque wrench will be required to tighten your wheel nuts to the manufacturer’s specifications. Before beginning, make sure you have all the necessary tools and have read your bike’s owner’s manual for any specific instructions.
With the right tools and a little patience, you can balance your motorcycle tire easily and safely.
Wheel Balancer
When it comes to wheel balancing, having the right tools and materials is crucial for achieving precise results. One of the most important tools needed for balancing wheels is a wheel balancer. This machine determines if a tire is balanced by measuring its weight distribution and then determining where to add or remove weights to make the tire evenly balanced.
To use a wheel balancer, you will also need wheel weights, which come in various sizes and can be made of steel or lead. Additionally, you will need a valve stem tool to remove and install valve stems, as well as a tire changer to mount and dismount tires. When using these tools, it is important to follow proper safety procedures and wear protective gear to prevent injury.
With the right tools and materials, anyone can balance their wheels and enjoy a smooth, safe ride on the road.
Weights
Weights are an essential tool for building strength and endurance during workouts. You can choose from a range of weights, including dumbbells, barbells, kettlebells, and weight plates, depending on your fitness level and workout goals. To get started, you’ll need some basic equipment such as a weight bench, workout mat, and comfortable workout clothes.
If you’re new to weightlifting, consider using lighter weights to avoid injury and gradually increase your weight as you become more comfortable with the exercises. Adjusting the weight size can help you to scale up and down as you get stronger. Don’t forget that proper form is critical when lifting weights, so seek help from a trainer if you’re unsure about any of the movements.
Remember, consistency is key when lifting weights, so aim to stick to a regular workout routine to see the best results.
Valve Stem Tool
One of the essential tools for maintaining your vehicle’s tires is a valve stem tool. This tool allows you to replace or repair the valve stem, which can get damaged over time due to wear and tear or leaking. To use it, you’ll need a few basic materials, including a valve stem tool, a valve core remover, a valve stem cap, and a replacement valve stem.
Before using the tool, make sure to remove the valve core and deflate the tire completely to avoid any accidents. Once the tire is deflated, remove the old valve stem with the tool and replace it with a new one, making sure to tighten the nut securely. Finally, reinsert the valve core, inflate the tire, and place the valve stem cap back in place.
With these materials and tools, you’ll be able to maintain your vehicle’s tires and ensure their longevity.
Air Compressor
When it comes to using an air compressor, there are a variety of tools and materials that you’ll need to have on hand. Firstly, you’ll need an air hose that is the appropriate size and length for your specific compressor. Additionally, you’ll need a variety of air tools, such as a ratchet, impact wrench, and air hammer, among others.
It’s important to ensure that these tools are compatible with your specific compressor and air hose. In addition to tools, you’ll also need safety equipment such as safety goggles, ear plugs, and protective gloves to avoid injury while working with the compressor. Finally, you may need additional materials depending on the specific project you’re working on, such as sandblasting media, paint, or lubricants.
By having these tools and materials on hand, you’ll be better equipped for any project that requires the use of an air compressor.
Steps to Balance a Motorcycle Tire
If you’re a motorcycle rider, you know how important it is to have your bike’s tires balanced. A balanced motorcycle tire can improve your bike’s handling, reduce vibrations, and increase mileage. Fortunately, balancing a motorcycle tire yourself isn’t too difficult, and it doesn’t require any special tools.
The first step is to remove the wheel and tire from your bike and lay it on a flat surface. Then, you’ll need to find the lightest spot on the tire by spinning it and marking the spot where it stops. Next, attach weights to the opposite side of the tire from the marked spot until the wheel remains steady when spun.
Finally, replace the tire on your bike and ride confidently knowing that it’s properly balanced. It may take a few tries to get it just right, but the result is worth the effort. So, don’t hesitate to give it a try and enjoy a smoother, safer ride.
Step 1: Remove the wheel from the motorcycle
If you’re experiencing vibration or wobbling while riding your motorcycle, it may be time to balance your wheels. Fortunately, balancing a motorcycle tire isn’t as complicated as it sounds as long as you have the right tools and a basic understanding of the process. The first step is to remove the wheel from your motorcycle.
This requires loosening the axle nut, removing the brake caliper, and sliding the wheel out from between the forks. Once the wheel is off, you’ll need to remove the tire from the rim. Depending on your setup, you may be able to do this with a tire iron or a specialized tool designed for this task.
With the tire off the rim, clean the rim and inspect it for any dents, warping, or other damage that could affect the balance. If everything looks good, you can begin the balancing process. Balancing your motorcycle tire takes a bit of time and effort, but it’s a worthwhile investment to ensure a smooth and safe ride.
Step 2: Remove the tire from the wheel
After preparing your motorcycle tire for balancing, the next step is to remove the tire from the wheel. This is an important step to make sure that the tire can be accurately balanced and that any issues with the wheel or tire can be addressed. You will need a tire changing machine or some tire irons to remove the tire.
Begin by removing the valve stem and any wheel weights that may be attached to the wheel. Then use the tire changing machine or tire irons to gently pry the tire away from the wheel. Carefully work your way around the tire until it is completely off the wheel.
Remember to handle the tire carefully to avoid damaging it. Once the tire is removed, you can move on to the next step of the balancing process and inspect the tire and wheel for any signs of damage or wear. By following these steps, you can ensure that your motorcycle tire is properly balanced and ready for safe riding on the road.
Step 3: Clean the wheel
clean motorcycle tire Once the wheel is removed from your motorcycle, it’s essential to clean it thoroughly. Dirt and debris on the wheel can cause vibrations, making it impossible to balance the tire correctly. You can start by using a soft-bristled brush to remove any loose dirt or debris from the wheel.
Be sure to pay attention to the center of the wheel, where the axle fits into the hub. This area tends to accumulate the most dirt and grime. Next, use a mild detergent or degreaser to clean the wheel thoroughly.
Be sure to rinse it with clean water and allow it to dry completely. Any remaining water or cleaner can cause the tire to slip during balancing, making it difficult to get an accurate measurement. Taking just a few extra minutes to clean the wheel thoroughly can make all the difference when you’re balancing your motorcycle tire.
Step 4: Mount the tire on the wheel
Mounting the tire on the wheel is a crucial step while balancing a motorcycle tire. Before doing this step, you need to ensure that the rim and the tire are clean, free of debris, and any possible damage. Now, position the tire on the rim based on the manufacturer’s recommendations.
You can use lubricants such as dish soap or tire-mounting lubricant to ease the process. Once you have positioned the tire, use the tire mounting machine to press the tire onto the wheel. Be sure to follow the recommended pressure and torque specifications to avoid any over or under-tightening.
After the tire is mounted, use the spin balancer to check for any imbalances. This will ensure that the tire is uniformly mounted, which prolongs its life and ensures a comfortable riding experience. By taking this step properly, you can ride your motorcycle with confidence, knowing that your tires are balanced correctly.
Step 5: Balance the tire and wheel assembly
When it comes to motorcycles, ensuring your tires are balanced is critical for safe and smooth riding. Step 5 in balancing a motorcycle tire is balancing the tire and wheel assembly. This step involves using a balancing machine that can detect any imbalance in the tire and wheel assembly.
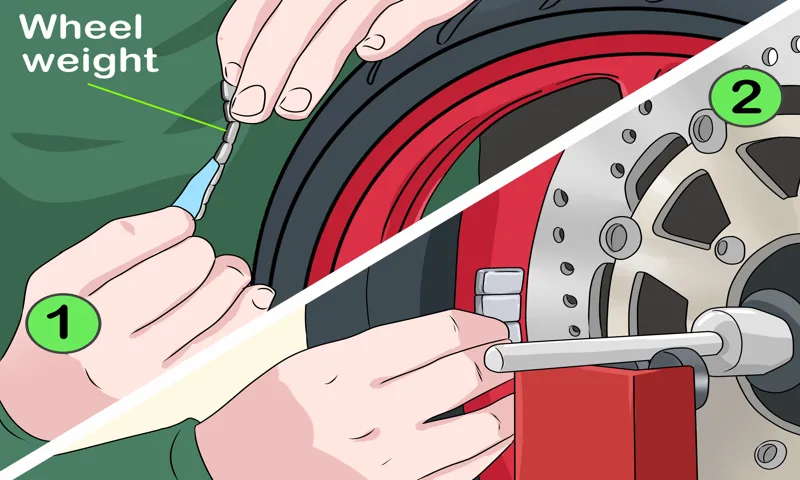
The machine identifies any areas that require additional weight to maintain balance and uses small weights to make the necessary adjustments. Once the weight has been added, the machine is used again to ensure that the tire and wheel assembly are perfectly balanced. An unbalanced tire and wheel assembly can cause vibrations that reduce the lifespan of the tire, decrease fuel efficiency, and negatively affect handling.
Therefore, taking the time to balance your motorcycle’s wheels and tires is a crucial step in keeping you and your bike safe on the road.
Step 6: Refit the wheel on the motorcycle
Once the tire is balanced, it’s time to refit the wheel onto the motorcycle. First, ensure that the wheel is aligned correctly with the bike’s axle. Then, slide the axle through the wheel’s center, ensuring that it’s securely in place.
Tighten the axle nut and torque it to the manufacturer’s specifications. Next, reinstall the brake caliper, ensuring that it’s properly aligned and securely fastened. Double-check all bolts and nuts, ensuring that everything is tightened to the correct torque specs.
Finally, check the tire pressure, ensuring that it’s at the recommended level for your bike. When all is said and done, take the bike for a quick spin to confirm that everything is working correctly, and you’re ready to hit the road with a perfectly balanced tire. Remember, safety first.
A poorly balanced tire can lead to dangerous handling issues and put you and your bike at risk. Taking the time to properly balance your tire is a crucial part of motorcycle maintenance that can make all the difference in your riding experience.
Conclusion
In conclusion, balancing a motorcycle tire is like finding the perfect balance between excitement and safety. It requires patience, precision, and attention to detail, just like riding a motorcycle. By following these steps, you can ensure a smooth, stable ride and the ultimate adrenaline rush.
So, go ahead and give your wheels the TLC they deserve, because a balanced motorcycle tire is a happy motorcycle tire. And a happy motorcycle tire makes for an even happier rider. Happy balancing!”
FAQs
What are the benefits of balancing motorcycle tires?
Balancing motorcycle tires can improve handling, increase tire lifespan, and reduce wear and tear.
How often should motorcycle tires be balanced?
Motorcycle tires should be balanced every time they are installed, and then every 5,000 to 7,000 miles thereafter.
Can I balance motorcycle tires myself?
Yes, you can balance motorcycle tires yourself using a wheel balancer, but it may be more accurate to have them balanced by a professional.
What is the difference between static and dynamic tire balancing?
Static balancing involves finding the heaviest part of the tire and counterbalancing it, while dynamic balancing involves finding and counterbalancing the heavy spots that change as the tire rotates.
How do I know if my motorcycle tires are unbalanced?
Signs of unbalanced motorcycle tires include wobbling or vibration at high speeds, uneven tire wear, and poor handling.
Is tire balancing necessary for motorcycle safety?
Yes, tire balancing is important for motorcycle safety because unbalanced tires can cause loss of control, tire wear, and damage to bike components.
Can incorrectly balanced tires damage my motorcycle?
Yes, incorrectly balanced tires can cause damage to the suspension, bearings, and other components of a motorcycle over time.


