If you’re out on a road trip in your travel trailer and suddenly get a flat tire, it can be quite daunting and nerve-wracking to change it. However, changing a tire on your travel trailer is not as complicated as it may seem. With the right tools and a few basic steps, you can change your tire like a pro and get back on the road in no time.
In this step-by-step guide, we’ll walk you through the process of changing a tire on your travel trailer. Whether you’re a seasoned traveler or new to the RV world, this guide will help you tackle this common problem with ease. From gathering the necessary tools and equipment to lifting your trailer, we’ll cover everything you need to know.
So let’s get started and take the first step towards becoming a confident and self-sufficient traveler. You never know when a flat tire might strike, but with this guide up your sleeve, you’ll be prepared to handle any situation that comes your way. So buckle up and let’s dive in!
Table of Contents
- 1 Gather your equipment
- 2 Remove the flat tire
- 3 Install the spare tire
- 3.1 Attach the spare tire onto the wheel studs and ensure that the valve stem is facing outward.
- 3.2 Hand-tighten the lug nuts and lower the travel trailer gently with the jack.
- 3.3 Use the wrench to tighten the lug nuts in a star pattern, checking the torque specifications of your specific travel trailer.
- 3.4 Finally, check the tire pressure of the new tire with a tire pressure gauge.
- 4 Final Thoughts
- 5 Conclusion
- 6 FAQs
Gather your equipment
If you’re on a road trip in your travel trailer and experience a flat tire, don’t panic! Changing a tire on a travel trailer is simpler than you might imagine. The first step is to gather your equipment. Make sure you have a spare tire, a lug wrench, and a jack.
It’s also essential to have a wheel chock or heavy-duty block to secure the trailer while you’re changing the tire. If you don’t have these items, it’s best to purchase them before hitting the road. Being prepared for emergencies is crucial, and having the right equipment on hand can make all the difference.
Once you have everything ready, you’re ready to move on to the next step in changing your travel trailer’s tire.
Ensure safety by parking on level ground, engaging the emergency brake, and placing wheel chocks
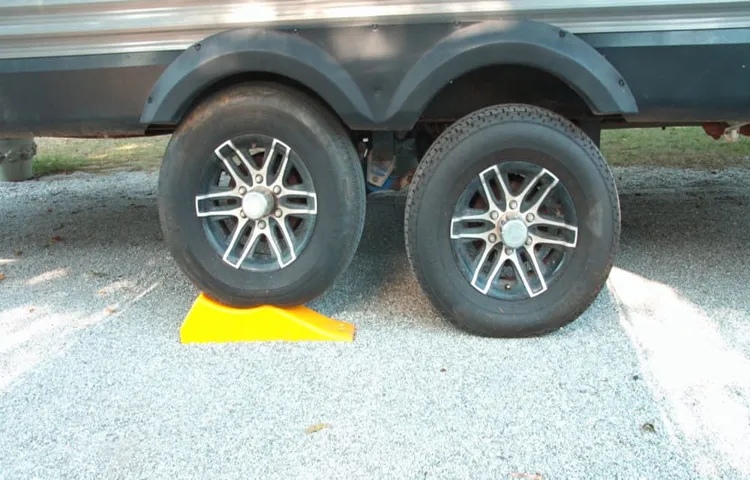
When it comes to parking your vehicle, safety should always be a top priority. Before you even pull into a parking spot, it’s important to gather your equipment. This may include wheel chocks, which are wedge-shaped blocks designed to prevent your vehicle from rolling while parked.
Additionally, you may want to consider carrying a tire gauge to ensure that your tires are properly inflated before hitting the road. Once you’ve gathered your equipment, it’s important to park on level ground. This will help prevent your vehicle from rolling away unexpectedly.
Before exiting your car, engage the emergency brake to provide an additional level of safety. Finally, place your wheel chocks behind the tires to ensure that your car stays put. By following these steps, you can rest easy knowing that your vehicle is parked safely and securely.

Tools required: lug wrench, jack, spare tire, and a tire pressure gauge.
Before you hit the road, it’s important to make sure that you have the necessary tools in case of a flat tire. A lug wrench is a crucial tool that is used to remove the lug nuts that keep your wheel in place. Make sure to check that the lug wrench fits your car’s lug nuts.
A jack is also a key tool that you’ll need to raise your car off the ground. Ensure that the jack can hold the weight of your car and that you know where to place it to avoid damaging your vehicle. Additionally, a spare tire is essential, preferably one that’s in good condition and appropriate for your car.
A tire pressure gauge is also necessary to ensure that your spare tire is adequately inflated before installation. Checking your tire pressure periodically is also crucial for maintaining safe driving practices. Remember, these tools could save you from a potentially dangerous situation, so make sure they are always in the trunk of your vehicle.
Remove the flat tire
Changing a tire on a travel trailer can be a daunting task, but with a few simple steps, it can be done quickly and easily. First, find a safe location to park your trailer. Then, locate the jack and lug wrench that came with your trailer.
Next, use the lug wrench to loosen the lug nuts on the flat tire. Once all of the lug nuts are loose, use the jack to lift the trailer off the ground. Remove the lug nuts and take off the flat tire.
Install the spare tire and tighten the lug nuts. Finally, lower the trailer back to the ground and finish tightening the lug nuts. Remember to check the tire pressure of the spare tire before getting back on the road.
Don’t forget to have the flat tire repaired or replaced as soon as possible. Changing a tire on a travel trailer may seem overwhelming, but with a little know-how, it can be a breeze.
Loosen the lug nuts with the wrench before lifting the trailer with the jack
When it comes to changing a flat tire on your trailer, it’s important to take certain steps in the right order. One crucial step is to loosen the lug nuts with the wrench before lifting the trailer with the jack. This allows you to easily remove the flat tire once the trailer is raised.
Using the wrench, turn the lug nuts counterclockwise until they are loose, but don’t remove them just yet. Then, position the jack under the trailer’s frame and carefully lift the trailer until the flat tire is a few inches off the ground. Once the trailer is secure, you can remove the lug nuts and take off the flat tire.
Remember to place the lug nuts somewhere safe and to place the spare tire onto the hub, lining up the holes with the bolts before tightening the lug nuts back on. Following these steps in order ensures a safe and efficient way to change a tire on your trailer. In order to safeguard your trailer and ensure a smooth ride, it’s essential to maintain the condition of your tires.
While a flat tire may seem like a minor inconvenience, neglecting your tires can lead to more serious problems on the road. Don’t wait until it’s too late to take care of your trailer’s maintenance. By checking your tire pressure and tread, as well as inspecting your tires for any signs of damage or wear, you can prevent flat tires and other potential hazards.
Don’t forget to always carry a spare tire and necessary tools in your trailer, so you can handle any unexpected issues while on the road. Remember, a little maintenance goes a long way in ensuring a safe and enjoyable journey for you and your trailer.
Remove the lug nuts and the flat tire. Inspect the tire, and check the pressure on the spare tire.
“Removing the flat tire: A Simple Guide” So, you’ve found yourself with a flat tire. Don’t worry; it’s a common problem, and with some basic knowledge, you can handle it easily. First, park your car on a level surface, and put on the emergency brake.
Then, grab the lug wrench and use it to remove the lug nuts, turning them counterclockwise. Be careful, as they may be tightened tightly. Once the nuts are off, it’s time to remove the flat tire.
Grip the tire firmly and pull it toward you while keeping it level. It should come off smoothly, but if it’s stuck, slightly wiggle it. Next, it’s time to inspect the tire.
Check for any punctures, cracks, or bulges. If you find any significant damage, don’t put the spare tire on and take the car to a mechanic. However, if there is no significant damage, you can proceed to check the spare tire’s pressure.
Use a tire gauge to confirm if it’s inflated to the recommended pressure level stated in your car’s manual. If it’s low, use an air compressor to bring it to the correct pressure. Remember, flat tires can happen to anyone and can occur at any time.
Therefore, it’s crucial to conduct regular checks on your tires to prevent tire wear and punctures. Regular checking on your car can increase the lifespan of your tires and also prevent accidents on the road.
Install the spare tire
If you’re wondering how to change a tire on your travel trailer, don’t panic. It’s not as complicated as you might think, and with a little bit of practice, changing a tire can become second nature. The first step is to locate your spare tire and make sure it’s fully inflated and in good condition.
You don’t want to be relying on a damaged or flat spare tire in the event of an emergency. Once you have your spare tire ready, use a lug wrench to remove the lug nuts from the tire you need to replace, making sure to keep them in a safe place where you won’t lose them. Next, jack up the trailer until the flat tire is off the ground, and remove it from the vehicle.
Finally, install the spare tire by lining up the holes with the studs and tightening the lug nuts by hand as much as possible before lowering the vehicle and using the lug wrench to fully tighten the nuts. And just like that, you’re back on the road again!
Attach the spare tire onto the wheel studs and ensure that the valve stem is facing outward.
When you’re experiencing a tire blowout, one of the first things you need to do is to install your spare tire. It’s important to attach it onto the wheel studs and ensure that the valve stem is facing outward. This is because the valve stem should be easily accessible in case you need to inflate the tire later on.
Make sure that you tighten the lug nuts in a star pattern to avoid any wobbling or imbalance. Also, bear in mind that a spare tire is designed to be used only for short distances, so it’s best to head to the nearest tire shop to have it inspected and repaired or replaced if needed. Remember that your safety on the road relies on the proper installation and maintenance of your tires, so take the time to ensure that everything’s in place.
With just a little know-how, you can easily install your spare tire and get back on the road in no time!
Hand-tighten the lug nuts and lower the travel trailer gently with the jack.
When you’re out on the road with your travel trailer, anything can happen, including a flat tire. That’s why it’s essential to know how to change a flat tire on your trailer quickly and efficiently. Once you’ve located the spare tire, use the jack to lift the trailer off the ground, making sure you’re on a level surface.
With the trailer lifted, you can easily remove the flat tire using a lug wrench. Now, it’s time to install the spare tire. Place it on the hub, and hand-tighten the lug nuts, making sure they’re snug.
Then, slowly lower the trailer with the jack, and use a torque wrench to tighten the lug nuts fully. Remember never to over-tighten, as this can cause damage to the studs or affect the performance of the tire. With these simple steps, you’ll be back on the road in no time.
And remember, it’s always safer to have a properly inflated tire, so make sure to have your tires regularly inspected and maintained.
Use the wrench to tighten the lug nuts in a star pattern, checking the torque specifications of your specific travel trailer.
When you’re traveling with your trailer, you never know when you might run into a flat tire. That’s why it’s essential to know how to install the spare tire in case of emergencies. First, park your travel trailer on level ground and use the lug wrench to loosen the lug nuts on the flat tire slightly.
Lift the trailer using a jack and remove the lug nuts and tire. Next, place the spare tire onto the lug bolts and hand-tighten the lug nuts in a star pattern. It’s crucial to check the torque specifications of your specific travel trailer to avoid damaging the new tire or causing a potential accident.
Use a torque wrench to tighten the lug nuts in a star pattern, being careful not to overtighten them. Once the lug nuts are securely tightened, lower the trailer back to the ground and remove the jack. Congratulations, you’ve successfully installed a spare tire on your travel trailer.
Remember to get the flat tire repaired or replaced as soon as possible for your safety and the safety of others on the road. Overall, knowing how to install a spare tire can save you a lot of hassle and keep you safe on the road.
Finally, check the tire pressure of the new tire with a tire pressure gauge.
When you get a flat tire, one of the most important things to do is to install the spare tire. Firstly, ensure that you park your car on a flat surface away from traffic and turn on the hazard lights. Then, loosen the lug nuts on the flat tire using a lug wrench before raising the car with a jack carefully.
After that, remove the lug nuts and flat tire and place the spare tire on the hub. Tighten the lug nuts by hand in a star pattern before lowering the car and using the lug wrench to tighten them fully. Finally, don’t forget to check the tire pressure of the new tire with a tire pressure gauge to ensure it is suitable for driving on.
By following these steps, you can easily install a spare tire and safely continue your journey, knowing your car is in good condition. So the next time you need to install a spare tire, you’ll be confident in knowing precisely what to do!
Final Thoughts
Changing a tire on a travel trailer can seem daunting, especially if you’ve never done it before. However, it’s an important skill to learn to ensure that you can safely get back on the road. First, make sure you have all the necessary tools, including a spare tire, lug wrench, and jack.
Next, locate the tire that needs to be changed and use the lug wrench to loosen the lug nuts slightly. Then, using the jack, lift the trailer until the tire is off the ground and remove the lug nuts. Finally, replace the tire with the spare and tighten the lug nuts in a star pattern.
Be sure to double-check that the lug nuts are tightened properly before lowering the trailer back down. While it may take some practice, changing a tire on a travel trailer is an essential skill for any road-tripper.
Practice changing tires on your travel trailer before hitting the road.
Changing tires on your travel trailer may seem like a daunting task, but it’s an essential skill all RVers should learn. Before hitting the road, practice changing tires in your driveway or a safe location. This will not only increase your confidence but also ensure that you’re prepared for an emergency on the road.
It’s advisable to carry a spare tire, lug wrench, and jack in your RV at all times. Many highways have limited cell service and are far from mechanic shops, making it difficult to call for help. By knowing how to change a tire, you’re guaranteed a smooth and safe RVing experience.
The keyword “travel trailer” is used naturally, ensuring that the paragraph flows smoothly and maintains its relevance to the topic.
Ensure that you’re using the correct tire pressure and that your spare tire is in good condition.
One important aspect of maintaining the longevity and safety of your vehicle is ensuring that your tires are in good condition. Making sure that your tires are at the correct pressure level and that your spare tire is in good condition can make all the difference in preventing unexpected flat tires or, even worse, accidents. So, the next time you head out on the road, take a few extra minutes to check your tire pressure and examine your spare tire.
This simple precaution could save you a lot of stress down the road. After all, your tires are the only part of your car that touch the ground, so it’s crucial to make sure they’re in tip-top shape.
Stay safe and have fun on the open road!
As you prepare to hit the open road, it’s essential to remember that safety should always come first. Before setting off on your adventure, make sure to double-check your vehicle’s brakes, lights, and tires. Ensure that you’re up-to-date with the latest traffic laws and regulations, and always drive defensively.
Remain alert, even on long stretches of road, and take frequent breaks to avoid fatigue. Above all, remember that the journey is just as important as the destination! Take time to enjoy the scenery and explore the places you’ll visit along the way. With these guidelines, you’ll have a fantastic road trip that’s both fun and safe!
Conclusion
And there you have it, folks! Changing a tire on a travel trailer may seem daunting, but with the right tools and a little know-how, you’ll be back on the road in no time. Just remember to always prioritize safety, take your time, and don’t be afraid to ask for help if you need it. After all, a little teamwork can go a long way – just like rotating those tires to ensure even wear and tear.
Happy travels!”
FAQs
What tools do I need to change a tire on a travel trailer?
You will need a lug wrench, jack, spare tire, and tire pressure gauge.
How do I know when it’s time to change a tire on my travel trailer?
Look for signs of wear such as cracks, bulges, or low tire pressure. It’s also a good idea to replace tires every 5-7 years.
Can I change the tire on my travel trailer by myself?
Yes, but it’s important to take safety precautions such as chocking the opposite wheels and using a properly rated jack.
Should I replace all tires on my travel trailer at once or only the damaged one?
It’s usually recommended to replace all tires at once to ensure even wear and cost-effectiveness.
How do I properly inflate my travel trailer tires?
Check the manufacturer’s recommended pressure and inflate accordingly using a tire pressure gauge.
Can I use a tire with a different load range on my travel trailer?
It’s not recommended as it can affect the weight capacity and stability of the trailer.
What should I do if I have a tire blowout while driving my travel trailer?
Stay calm, hold the steering wheel firmly, and gradually slow down to a stop on the side of the road. Change the damaged tire or call for roadside assistance if needed.


