Have you ever found yourself stranded on the side of the road with a flat tire? It’s a frustrating and inconvenient situation that can put a damper on your day. If your tire happens to be tubeless, finding the source of the leak can be a bit more challenging. However, fixing a tubeless tire leak is not impossible, and with a little know-how, you can get back on the road in no time.
First things first, you need to locate the leak. This can be done by removing the tire from the wheel and inspecting the inside and outside for any visible holes or punctures. If you can’t find the leak by visual inspection, you can try submerging the tire in water to see if any bubbles appear, indicating the location of the leak.
Once you have located the leak, you need to prepare the tire for repair. Use a rough grit sandpaper to rough up the area around the leak, then clean it thoroughly with rubbing alcohol. This will help the patch adhere better to the tire.
Now it’s time to patch the tire. There are a variety of tire patch kits available on the market, ranging from simple plug kits to more complex patch and plug kits. Follow the instructions on your chosen kit carefully, making sure to insert the patch snugly into the hole.
Finally, remount the tire onto the wheel and inflate it to the manufacturer’s recommended pressure. Give the tire a thorough inspection to make sure the patch has held and that there are no other leaks or issues. Fixing a tubeless tire leak may seem daunting, but with a little patience and effort, it can be done.
By taking the time to locate and properly patch the leak, you can avoid getting stranded on the side of the road in the future.
Table of Contents
Identifying the Leak
One of the most frustrating issues that can happen to tubeless tires is a leak. These leaks can manifest in several ways, from small pinprick holes to larger gashes. The first step in fixing a tubeless tire leak is to identify the source of the issue.
One common way to do this is by using soapy water to locate bubbles, which suggest air escaping from the tire. Once you locate the exact location of the leak, you’ll be better equipped to assess the damage and determine what type of repair is needed. Whether it’s a simple patch or replacement of the entire tire, getting the leak fixed is essential for safe and efficient riding.
With some patience and a bit of elbow grease, you can get your tubeless tire running smoothly again in no time.
Check valve stem
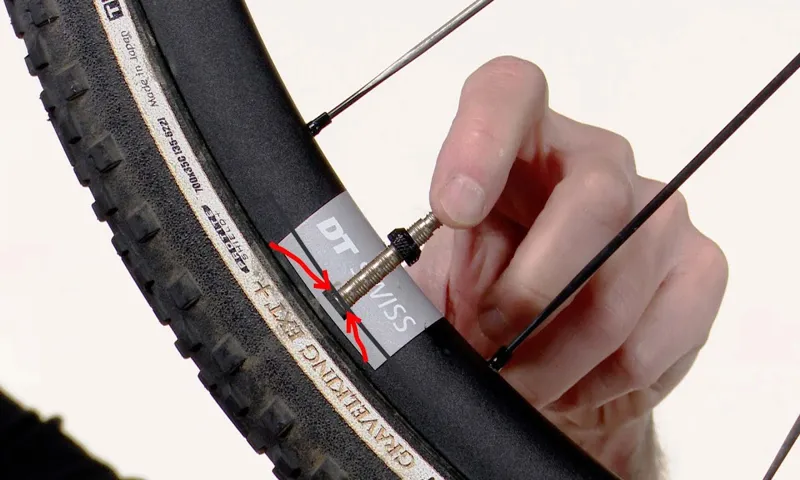
When you suspect that the check valve stem is the source of the leak, you first need to confirm that the valve stem is the culprit. Start by checking the valve stem itself for any signs of damage or corrosion. If you notice any visible issues, replace the valve stem with a new one to prevent future leaks.
If the valve stem looks good, you can try tightening the packing nut or adding some lubricant to see if this takes care of the issue. However, be cautious not to overtighten the nut, as this may result in further damage. A good rule of thumb is to tighten the nut until the leak stops, then give it an additional quarter turn.
Remember, checking the valve stem is just one step in the process of identifying and fixing a leak. It’s essential to identify the specific source of the problem to avoid costly and time-consuming repairs in the future.

Check sidewall
When you experience a flat tire, the first step is to identify the source of the problem. One common cause of a flat tire is a puncture, which can be easily identified by checking the sidewall of the tire. Look for a visible cut or hole in the sidewall, or any other signs of damage.
If you see any damage, it’s likely that the tire is irreparable and needs to be replaced. However, in some cases, the damage may be small enough to be repaired by a professional. It’s important to deal with a flat tire as soon as possible, as driving on a flat tire can cause further damage to your vehicle and put your safety at risk.
So, if you notice any signs of a flat tire, don’t hesitate to get it checked out.
Check tread
When it comes to identifying a leak in your tire, one of the first things you should check is the tread. The tread on your tire can give you a lot of information about the condition and integrity of the tire, and can often reveal where a leak may be coming from. To check your tread, you can use a penny or a tread depth gauge.
Simply insert the penny into the tread with Lincoln’s head facing down. If you can see the top of his head, your tires may be too worn and may need to be replaced. If you use a tread depth gauge, make sure to measure at multiple points across the tire to get an accurate reading.
If you notice uneven wear or excessively worn areas, it could be a sign of a leak or some other issue that needs to be addressed. Remember, keeping your tires in good condition is crucial for maintaining safe and efficient driving, so always take leaks and other tire issues seriously.
Fixing the Leak
Are you tired of dealing with a pesky tubeless tire leak? Luckily, fixing the issue is easier than you may think. First, locate the source of the leak. This can be done by adding sealant and rotating the tire slowly until a small puncture or hole is found.
Once found, remove any debris from the area and apply a tire plug or sealant. It’s important to remember to let the sealant set for a minimum of 24 hours before attempting to ride on the tire again. Additionally, regularly checking the tire pressure can prevent leaks from occurring in the first place.
By following these simple steps, you can easily fix a tubeless tire leak and get back to enjoying your ride with confidence.
Reinforce the hole with sealant
If you’ve discovered a leak in your home, the first step is to locate the source. Once you’ve found the spot where water is entering, the next step is to reinforce the hole with a sealant. This will prevent any further water damage and ensure that the leak won’t continue.
You can use a variety of sealants, such as silicone or epoxy, depending on the specific needs of your situation. It’s important to follow the instructions carefully and apply the sealant evenly to create a strong, waterproof barrier. Once the sealant has dried, you can test the area to ensure that the leak has been successfully fixed.
Remember, it’s always best to address leaks early to prevent larger problems down the road. So don’t wait to take action if you suspect a leak in your home.
Use a tire plug kit
If you’re dealing with a punctured tire, the first thing you want to do is check if a tire plug kit can solve the problem. It’s an easy and affordable solution that you can perform at home, without needing to visit a mechanic. A tire plug kit consists of a spiral tool and a sticky cord that fills the hole from the inside, sealing it and preventing air from escaping.
First, identify the puncture’s location and remove any sharp objects that may still be stuck in the tire. Next, insert the spiral tool in the hole and twist it to enlarge the hole and make it easier for the cord to fit in. Thread the cord through the tool and push it in until it’s flush with the tire’s surface.
Lastly, trim the excess cord and inflate the tire, and voila! You’ve repaired the puncture, and you can hit the road again. Remember that a tire plug kit is only recommended for small injuries, and if you notice any bulges or cuts, the tire should be replaced entirely.
Remove the tire and patch it
When you notice that your tire is leaking, the first thing to do is to remove it and patch it. It can be frustrating to have to deal with a flat tire, but with a little bit of effort, you can have it fixed and ready to go in no time. First, use a jack to lift the car off the ground and remove the lug nuts holding the wheel in place.
Once the tire is off, inspect it for any signs of damage or wear before removing the valve stem and deflating the tire. Next, use a tire patch kit to locate the leak and fill it with rubber cement before applying the patch. Finally, inflate the tire to the recommended pressure and reattach it to the car using the lug nuts.
It’s important to be thorough when patching a tire to avoid any future leaks or issues. By taking the time to properly repair your tire, you can ensure that your car stays safe and running smoothly on the road.
Preventing Tubeless Tire Leaks
As a tubeless tire user, encountering a leak is inevitable. However, there are ways to prevent it from happening or at least minimize the chances of it happening. Firstly, ensure that the tire is set up correctly with the designated sealant and proper tire pressures.
Additionally, frequently checking the tire for any punctures or worn-out threads can prevent a small leak from becoming a bigger problem. Applying a tire plug kit or sealant on the spot where the leak occurred can also fix the issue temporarily, but make sure to bring your bike to a professional for a permanent solution. Lastly, regular maintenance of your tubeless tire system is crucial in preventing leaks.
Make sure to clean your tires and rims to avoid any build-up that may cause leaks. With these preventative measures, you can enjoy a hassle-free and smooth ride on your tubeless tires without worrying about leaks.
Proper installation procedure
When it comes to installing tubeless tires, proper procedure is essential to prevent leaks. The first step is to inspect the rim tape and make sure it is in good condition, without any cracks or tears. Next, clean the rim bed thoroughly to ensure a good seal.
It’s also important to make sure that the valve stem is properly installed and tightened. When mounting the tire, use a tire lever to work the bead onto the rim, being careful not to pinch or damage the tire. Finally, add sealant to the tire and inflate to the recommended pressure.
By following these steps and taking care to avoid any potential snags or punctures during the installation process, you can help ensure a leak-free ride. Remember, proper installation is crucial for the longevity of the tire and your safety.
Maintain proper tire pressure
Maintaining proper tire pressure is crucial for preventing tubeless tire leaks. When tire pressure is too low, the tire can become damaged and lose air quickly. Conversely, if the pressure is too high, it can cause the tire to burst unexpectedly.
So how do you ensure your tire pressure stays within the appropriate range? Check your vehicle manual or the manufacturer’s website to find the recommended tire pressure levels for your specific tires. Then, use a tire pressure gauge to check the pressure regularly, at least once a month. If the pressure is low, add air until it reaches the recommended level.
By keeping your tire pressure at the appropriate level, you can significantly reduce the risk of tubeless tire leaks and keep your vehicle running smoothly.
Final Thoughts
In conclusion, there are several ways to fix tubeless tire leaks. The first step is to identify where the leak is coming from by removing the tire and inspecting it thoroughly. Once you’ve located the leak, you can then patch it with a vulcanizing patch or use sealant to plug the hole.
It’s important to note that sealant isn’t a permanent fix, so it’s best to take your bike to a professional if you have recurring leaks. Remember to always check your tire pressure regularly and avoid over-inflating your tires, as this can lead to punctures. By following these steps, you can be sure to have a safe and leak-free ride.
So, the next time you encounter a tubeless tire leak, don’t panic and follow these simple steps to get back on the road quickly and efficiently.
Conclusion
As with all things in life, fixing a tubeless tire leak requires patience, attention to detail, and a willingness to get a little dirty. But fear not! Armed with a tire plug kit, a sealant injector, and a can-do attitude, you can be back on the road in no time. And if all else fails, remember what they say: if you can’t fix it, just let the air out and call it a day! (But seriously, please don’t do that.
Keep those tires properly inflated, folks).”
FAQs
What causes a tubeless tire to leak air?
A tubeless tire can leak air due to punctures, worn-out valve stems, damaged rims, or a faulty tire sealant.
Can you repair a tubeless tire leak yourself?
Yes, you can repair a tubeless tire leak yourself with the help of a tire plug kit that includes rubber plugs and insertion tools.
How long can you drive with a tubeless tire leak?
It is not recommended to drive with a tubeless tire leak as it can cause further damage to your tire and compromise your safety. You should address the leak promptly.
How do you locate a tubeless tire leak?
You can locate a tubeless tire leak by listening for a hissing sound, spraying soapy water on the tire to see where bubbles form, or using a tire pressure monitoring system.
Can you prevent tubeless tire leaks?
You can prevent tubeless tire leaks by maintaining proper tire pressure, avoiding road hazards, regularly inspecting your tires, and using high-quality tire sealants.
What is the cost of fixing a tubeless tire leak?
The cost of fixing a tubeless tire leak can vary depending on the severity of the damage and whether you repair or replace the tire. It can range from a few dollars to several hundred dollars.
When should you replace a tubeless tire instead of repairing it?
You should replace a tubeless tire instead of repairing it if it has a large or sidewall puncture, is worn beyond the recommended tread depth, or has sustained damage to the internal plies of the tire.


