So, you’ve got yourself a brand new set of running board lights and you can’t wait to install them on your vehicle. But wait, how exactly do you hook them up? Don’t worry, we’ve got you covered. In this blog post, we’ll guide you through the process of connecting your running board lights, step by step.
Think of running board lights as the icing on the cake of your vehicle’s exterior. They not only enhance the overall appearance but also provide that extra touch of functionality and safety. Whether you want to improve nighttime visibility or add a touch of style, these lights are a great addition to any vehicle.
Now, before we dive into the installation process, let’s make sure you have all the necessary tools and equipment. You’ll need a set of running board lights (of course), a power source such as the vehicle’s battery or fuse box, wiring harnesses, connectors, electrical tape, wire strippers, and a few basic hand tools. Once you have everything ready, the first step is to decide where you want to mount the running board lights.
You can choose to install them on the side of your vehicle’s running boards or underneath the doors. Whichever option you go for, make sure you measure the length of your running boards and the lights to ensure a proper fit. Next, you’ll want to locate a suitable power source for your running board lights.
This can be your vehicle’s battery or fuse box, depending on the type of power source you prefer. If you choose the battery, you’ll need to connect the positive and negative wires of the lights directly to the battery terminals. On the other hand, if you opt for the fuse box, you’ll have to tap into an existing circuit using add-a-circuit connectors.
Once you have decided on the power source and made the necessary connections, it’s time to wire up the running board lights. Start by stripping the ends of the wires and connecting them to the corresponding wires of the harness. Use electrical tape or connectors to secure the connections and prevent any potential shorts.
Table of Contents
Introduction
Are you looking to add some extra style and functionality to your vehicle? Installing running board lights is a great way to do just that. Not only do they enhance the look of your car, truck, or SUV, but they also provide added visibility and safety when getting in and out of your vehicle at night. So, how do you go about hooking up running board lights? Well, it’s actually easier than you might think.
In this blog post, we’ll walk you through the process step by step, so you can have your new lights up and running in no time. Let’s get started!
What are Running Board Lights?
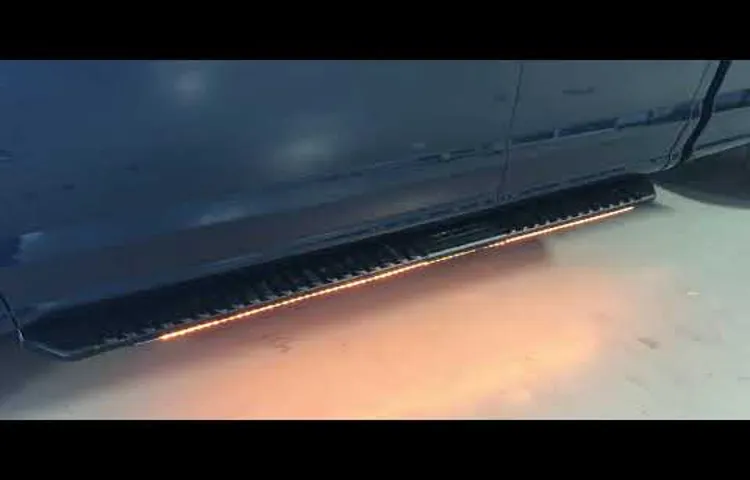
Running board lights, also known as step lights or side step lights, are a type of auxiliary lighting that is installed on the sides of vehicles, specifically on the running boards or side steps. These lights serve multiple purposes, including providing additional visibility and safety when entering or exiting the vehicle, illuminating the ground next to the vehicle to prevent accidents or injuries, and adding a stylish and functional touch to the overall appearance of the vehicle. Running board lights are typically small LED lights that are mounted flush or recessed into the running boards, and they can be wired into the vehicle’s electrical system or connected to a separate switch for independent control.

Why Install Running Board Lights?
running board lights, install running board lights, benefits of running board lights, vehicle safety, enhanced visibility. Introduction: Are you looking for a way to enhance the safety and visibility of your vehicle? Installing running board lights might be the perfect solution for you. These small yet powerful lights can provide a number of benefits, not only to your vehicle but also to your overall driving experience.
In this blog post, we will explore the reasons why you should consider installing running board lights and how they can improve your safety on the road. So, let’s dive in and discover the many advantages of these illuminating additions!
Tools and Materials Needed
Tools and Materials Needed
Step 1: Prepare Your Vehicle
If you’re looking to add some extra style and visibility to your vehicle, installing running board lights can be a great option. Not only do they provide additional lighting for entering and exiting your vehicle, but they also add a touch of flair to your ride. To begin the installation process, you’ll first need to prepare your vehicle.
Start by gathering all the necessary tools and equipment, such as a wrench, wire strippers, and electrical tape. Additionally, make sure to select a suitable location for mounting the lights, taking into consideration the length and width of your vehicle’s running boards. Once you have everything ready, it’s time to move on to the next step and begin the installation process.
Locate the Running Board Placement
The first step in installing running boards on your vehicle is to prepare it for the installation process. This involves locating the running board placement on your specific make and model of vehicle. Running board placement can vary depending on the type of vehicle you have, so it’s important to consult your vehicle’s owner’s manual or contact the manufacturer for specific instructions.
The running boards are typically installed along the bottom of the vehicle’s body, providing a convenient step for passengers to use when getting in and out of the vehicle. By properly preparing your vehicle and finding the correct placement for the running boards, you can ensure a successful installation that adds both functionality and style to your vehicle.
Measure and Mark the Position of the Lights
In order to install new lights on your vehicle, you first need to prepare your vehicle. This involves cleaning the area where the lights will be installed and removing any existing lights or accessories. You also need to gather all the necessary tools and equipment for the installation process.
This includes things like screwdrivers, wrenches, and electrical wiring. Once you have everything ready, you can then proceed to measure and mark the position of the lights. This step is important to ensure that the lights are installed in the right place and at the correct angle for optimal visibility.
It may require you to use a measuring tape or ruler to determine the exact distance between the lights and other parts of your vehicle. Once you have the measurements, you can then mark the positions using a pencil or chalk. This will serve as a guide for the installation process and help you ensure that the lights are installed correctly.
Prepare the Vehicle Surface for Installation
“prepare vehicle surface for installation” Other possible keywords (use variations of these keywords throughout the blog): – vehicle surface preparation – preparing vehicle surface for installation – steps to prepare vehicle for installation – getting your vehicle ready for installation – prepping the vehicle surface for installation Paragraph: Hey there, car enthusiasts! So, you’ve finally decided to install something cool on your vehicle, huh? Well, before you jump right into it, there’s an important step you should never skip – preparing your vehicle surface for installation. Think of it like getting a canvas ready for a masterpiece painting or priming a wall before applying a fresh coat of paint. Taking the time to properly prepare your vehicle will ensure that whatever you’re installing sticks well and looks great! So, how do you go about doing that? Let’s dive into the first step – preparing your vehicle.
“
Step 2: Install the Lights
Now that you have selected the perfect running board lights for your vehicle, it’s time to install them. Installing running board lights can not only enhance the appearance of your vehicle but also increase visibility and safety. Here’s a step-by-step guide on how to hook up running board lights.
Start by gathering all the necessary tools and equipment for the installation. This may include a wrench, wire cutters, electrical tape, butt connectors, crimping tool, and zip ties.
Locate a suitable mounting location for the lights on the underside of your running boards. Ensure that there is enough space for the lights and that they will be visible when illuminated.
Use the provided brackets or mounting hardware to secure the lights in place. Make sure they are tightly fastened to prevent any movement or damage while driving.
Next, you will need to connect the wiring for the lights. Begin by identifying the positive and negative wires on the light harness.
Usually, the positive wire is red, while the negative wire is black or white. Use wire cutters to trim the excess length of the wires, leaving enough to reach the power source or controller.
Choose the Type of Lights
lights, install, type of lights
Mount the Lights onto the Running Board
“Mount the Lights onto the Running Board” Now that you have gathered all the necessary materials and prepared the running board, it’s time to move on to the exciting part – installing the lights! This step is crucial as it will determine the overall visibility and aesthetic appeal of your running board lights. To begin, make sure to lay out all the lights and check if they are in working condition. Once you are confident that everything is in order, find the mounting brackets that came with the lights.
These brackets will secure the lights onto the running board and keep them in place even during bumpy rides. Attach the brackets to the lights using the provided screws, ensuring a tight fit. Then, carefully position the lights on the running boards, making sure they are evenly spaced and aligned.
Once you are satisfied with the placement, use a screwdriver to secure the mounting brackets onto the running boards. Tighten the screws firmly but be careful not to overtighten, as this could damage the lights or running board. With the lights securely in place, take a step back and admire your handiwork! You are one step closer to transforming your vehicle into a real head-turner.
Connect the Wiring Harness
“Connect the Wiring Harness”
Step 3: Connect the Wiring
So, you’ve got your running board lights all set up and ready to go. Now it’s time to connect the wiring and get these bad boys working. Don’t worry, it’s not as complicated as it may seem.
First, you’ll need to locate the power source for your running board lights. This could either be an existing power source in your vehicle or a separate power source specifically for the lights. Once you’ve found the power source, you’ll need to connect the positive and negative wires from the lights to the corresponding terminals on the power source.
This can usually be done using connectors or by stripping the ends of the wires and twisting them together. Next, you’ll need to locate a suitable ground point for the lights. This is a metal surface on your vehicle that will provide a direct path to the negative terminal of the battery.
You can use a grounding strap or wire to connect the negative wire from the lights to the ground point. Make sure the ground point is clean and free of any paint or corrosion for a good connection. Once you’ve connected the wiring, it’s a good idea to test the lights to make sure everything is working properly.
Double-check all of your connections and make sure they are secure. Turn on your vehicle and switch on the running board lights. If they don’t turn on, check for any loose connections or blown fuses.
Remember, it’s always a good idea to consult your vehicle’s manual or seek the help of a professional if you’re unsure about any step in the process. Safety should always be your top priority when working with electrical systems in your vehicle. Happy wiring!
Identify the Vehicle’s Wiring System
“car wiring system” Connect the Wiring Once you have identified the vehicle’s wiring system, it’s time to connect the wires. This step is crucial to ensure proper functioning of the car’s electrical components. Before you start connecting the wires, make sure you have all the necessary tools and materials at hand.
You will need a wire stripper to remove the outer insulation from the wires, a crimping tool to attach the connectors to the wires, and electrical tape to secure the connections. To begin, match the color-coded wires from the aftermarket device or accessory with the corresponding wires in the vehicle’s wiring system. This may require referring to the wiring diagrams provided by the manufacturer or doing some research online.
Once you have identified the matching wires, strip about half an inch of insulation from each wire using the wire stripper. Next, twist the exposed wires together using your fingers or a pair of pliers. This will ensure a secure connection.
Once the wires are twisted together, you can use the crimping tool to attach the connectors. Simply insert the twisted wires into the connector and squeeze the crimping tool to secure them in place. After all the connectors are attached, it’s a good idea to use electrical tape to further secure the connections.
Start by wrapping a few layers of electrical tape around each individual connector, making sure to cover the exposed metal parts. Then, wrap a few more layers of electrical tape around the entire bundle of wires to provide added protection. Once all the connections are secure, it’s time to test the newly installed device or accessory.
Turn on the car’s ignition and check if everything is working as intended. If not, double-check your connections and make any necessary adjustments. Remember, it’s crucial to ensure proper connections to avoid any electrical issues or malfunctions in the car’s electrical system.
Connect the Positive and Negative Wires
In the third step of connecting the wiring for your project, it’s time to focus on the positive and negative wires. These wires are essential for ensuring that the electrical current flows in the right direction and powers your device correctly. To start, you’ll need to identify which wire is positive and which wire is negative.
Typically, the positive wire is red and the negative wire is black, but it’s always a good idea to double-check the manufacturer’s instructions just to be sure. Once you’ve identified the wires, it’s time to make the connections. Start by stripping a small section of insulation off the end of each wire, making sure not to cut any of the actual conducting wires inside.
Then, twist the exposed wire strands together and secure them with a wire nut or electrical tape. Make sure the connection is tight and secure so that it doesn’t come loose during use. Finally, repeat this process for any additional positive and negative wires that need to be connected.
Remember, it’s crucial to connect the positive and negative wires correctly to ensure the safe and efficient operation of your device.
Secure the Wiring Harness
In order to securely connect the wiring harness, there are a few important steps to follow. First, it is crucial to ensure that the wiring harness is in good condition and free from any damage or wear. Next, carefully connect each wire to its corresponding terminal or connector.
It is important to make sure that the connections are tight and secure, as loose or faulty connections can lead to electrical issues or even fire hazards. Here’s an analogy for you: think of the wiring harness as the nervous system of your vehicle, with each wire acting as a neuron, transmitting signals and power throughout the vehicle. Just like a well-functioning nervous system is essential for the body’s proper functioning, a secure and properly connected wiring harness is crucial for the smooth operation of your vehicle.
By taking the time to securely connect the wiring harness, you can ensure that your vehicle’s electrical system is reliable and safe.
Step 4: Test and Secure
So, you’ve successfully installed your running board lights and now it’s time to move on to the final step – testing and securing them. This step is crucial to ensure that your lights are functioning properly and securely attached to your vehicle. To test the lights, simply turn on your vehicle’s ignition and activate the running board lights.
Check to see if all the lights are working and if they’re providing the desired illumination. If you notice any issues, such as flickering lights or one bulb not lighting up, you may need to check the wiring connections or replace the faulty bulbs. Once you’re satisfied with the functionality of your lights, it’s time to secure them.
Use the provided brackets or mounting hardware to firmly attach the lights to your running boards or the underside of your vehicle. Make sure the lights are properly aligned and securely fastened to prevent any vibrations or possible damage while driving. In addition, consider using waterproof sealant or silicone around the connections to protect them from moisture and ensure long-lasting performance.
By completing these final steps, you’ll have successfully hooked up your running board lights and can now enjoy the enhanced visibility and style they bring to your vehicle.
Test the Lights
test lights, secure lights
Secure the Lights and Wiring
Lights and wiring are crucial components of any home security system, as they provide additional visibility and deter potential intruders. Once the lights and wiring have been installed, it’s important to test them to ensure they are working properly. This can be done by turning on the lights and checking that they illuminate the desired areas.
Additionally, it’s important to test the wiring to ensure there are no loose connections or faulty wiring that could cause a fire or damage to the system. Once the lights and wiring have been tested and deemed to be in good working order, it’s important to secure them to prevent tampering or vandalism. This can be done by installing protective covers or enclosures around the lights and wiring, or by placing them in strategic locations that are difficult to reach.
By securing the lights and wiring, you can ensure that your home security system remains functional and effective.
Conclusion
And there you have it, the illuminating guide on how to perfectly hook up running board lights. Remember, with a little patience and a touch of electrical prowess, you can turn your vehicle into a beacon of style and functionality. So go ahead, light up your presence on the road like a shooting star, and let those running board lights shine brighter than the sun! Just be sure to use your newfound powers responsibly, because nobody likes a flashy show-off who blinds other drivers.
Stay safe, stay lit, and most importantly, stay connected to the world of running board illumination!”
Enjoy Your Newly Installed Running Board Lights
running board lights, test and secure, newly installed, enjoy
Additional Tips and Safety Precautions
test and secure. Once you have installed your outdoor security cameras, the next step is to test them and make sure they are properly secured. Testing the cameras will help ensure that they are functioning correctly and provide you with the best possible security.
Start by checking the camera’s field of view and adjusting its position if necessary. Make sure the camera can capture the entire area you want to monitor. Then, test the camera’s night vision capabilities by turning off the lights and checking if the camera can capture clear footage in low light conditions.
Additionally, make sure the camera’s motion detection feature is working properly by walking around the monitored area and checking if the camera records the movement accurately. Finally, secure the camera by mounting it securely to a wall or other suitable surface. Make sure the camera is out of reach and cannot be tampered with easily.
Additionally, you may want to consider adding an extra layer of security by installing a security camera enclosure or housing to protect the camera from the elements and potential vandalism. Keep in mind that regular maintenance is essential to keep your cameras in optimal condition, so make sure to clean and inspect them regularly. By properly testing and securing your outdoor security cameras, you can have peace of mind knowing your property is well protected.
FAQs
What are running board lights?
Running board lights are auxiliary lights that are installed underneath the running boards of a vehicle. They are used to improve visibility and enhance the overall style of the vehicle.
Why should I install running board lights?
Installing running board lights can provide added safety by increasing visibility, especially at night or in poor weather conditions. Additionally, they can enhance the aesthetic appeal of your vehicle, giving it a sleek and modern look.
Are running board lights legal?
The legality of running board lights varies depending on the jurisdiction. It is important to check your local laws and regulations to ensure that you are in compliance. In some areas, running board lights may be restricted to specific colors or have particular installation requirements.
How do I choose the right running board lights for my vehicle?
When choosing running board lights, consider factors such as the size and style of your vehicle, the desired brightness and color of the lights, and any specific regulations that may apply in your area. It is also important to select lights that are suitable for the weather conditions and durability requirements of your vehicle.
How can I install running board lights on my vehicle?
The installation process may vary depending on the specific make and model of your vehicle, as well as the type of running board lights you choose. Generally, the installation involves securing the lights underneath the running boards using brackets or clips, and connecting them to the vehicle’s electrical system. It is recommended to follow the manufacturer’s instructions for proper installation.
Are running board lights easy to install by myself?
The level of difficulty for installing running board lights may vary depending on your experience and familiarity with automotive electrical systems. If you are comfortable working with wiring and have the necessary tools, you may be able to install the lights yourself. However, if you are unsure or uncomfortable with electrical work, it is recommended to seek professional installation.
How do I wire running board lights to my vehicle’s electrical system?
Wiring running board lights to your vehicle’s electrical system typically involves connecting the lights to a power source, such as the vehicle’s battery or fuse box. This may require running wires through the vehicle’s chassis and firewall. It is important to use proper wiring techniques, such as soldering or crimping connections, and to fuse the wiring for safety. It is recommended to consult a professional or reference a wiring diagram specific to your vehicle for accurate and safe installation.


