If you’re a Jeep Grand Cherokee owner looking to add some extra functionality and style to your vehicle, installing running boards is a great option. Running boards not only provide a convenient step for getting in and out of your Jeep, but they also add a sleek and rugged look. Plus, they can help protect your vehicle’s rocker panels from rocks and other debris.
In this blog post, we’ll walk you through the step-by-step process of how to install running boards on your Jeep Grand Cherokee. Whether you’re a seasoned DIYer or new to working on cars, you’ll find that this installation is relatively straightforward and can be completed in just a few hours. So, let’s dive in and get started!
Table of Contents
Introduction
Are you thinking about installing running boards on your Jeep Grand Cherokee? Well, you’re in the right place! In this blog section, we will guide you step-by-step on how to install Jeep Grand Cherokee running boards. Running boards not only enhance the appearance of your vehicle but also provide a convenient step for getting in and out of your vehicle, especially for passengers with limited mobility. So let’s get started and give your Jeep Grand Cherokee a stylish and functional upgrade!
About Jeep Grand Cherokee Running Boards
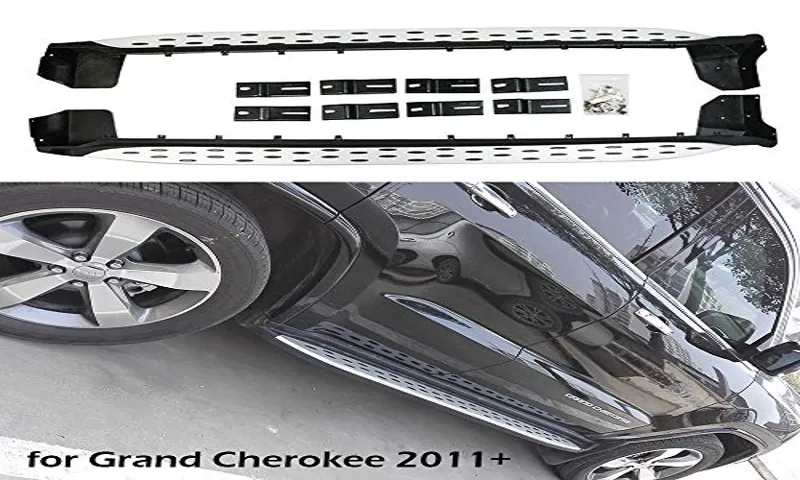
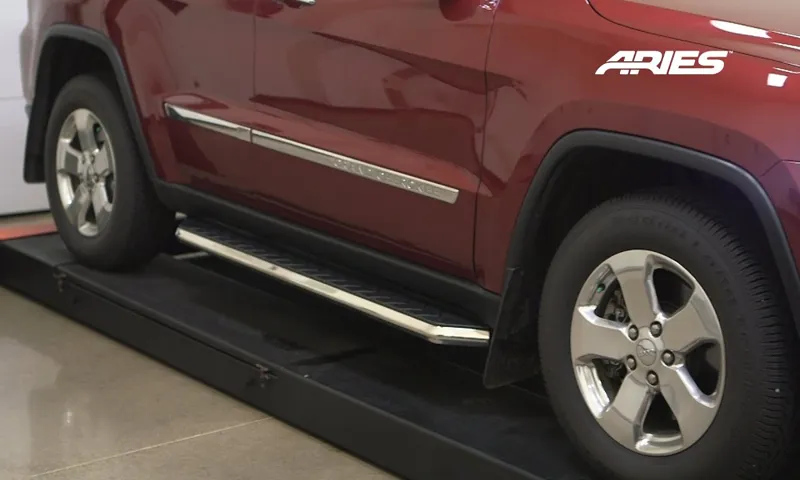
Jeep Grand Cherokee running boards, which are also commonly known as side steps, are an accessory that can enhance the functionality and appearance of your vehicle. These running boards are typically made from durable materials like aluminum or stainless steel and are designed to provide a solid platform for you to step on when entering or exiting your Jeep Grand Cherokee. Not only do running boards make it easier for you and your passengers to get in and out of your Jeep, but they also offer added protection for the vehicle’s lower body.
They can act as a barrier between your Jeep and any debris, rocks, or road spray that may be kicked up while driving. This can help prevent damage to the vehicle’s paint job and undercarriage, potentially saving you money on repairs in the long run. In addition to their practical benefits, Jeep Grand Cherokee running boards can also enhance the overall look of your vehicle.
They can give your Jeep a more rugged and sporty appearance, making it stand out on the road. With various styles and finishes available, you can choose running boards that match or complement the aesthetic of your Jeep Grand Cherokee. Installing running boards on your Jeep Grand Cherokee is a relatively simple and straightforward process.
Most running board kits come with all the necessary hardware and instructions, making it easy for you to do it yourself. However, if you are not comfortable with DIY projects, you can always seek professional installation. Overall, Jeep Grand Cherokee running boards are a practical and stylish accessory that can improve the functionality and appearance of your vehicle.
Whether you are looking for easier access to your Jeep, added protection, or a more rugged look, running boards are a great addition to consider. So why not take your Jeep to the next level and invest in a set of running boards today?

Benefits of Installing Running Boards
running boards, benefits, installing
Preparation
One of the best ways to enhance the look and functionality of your Jeep Grand Cherokee is by installing running boards. Running boards not only give your vehicle a sleek and stylish appearance, but they also make it easier to enter and exit the vehicle, especially for those with mobility challenges. If you’re wondering how to install running boards on your Jeep Grand Cherokee, don’t worry, it’s a relatively simple process that you can do yourself with a few basic tools.
First, you’ll need to gather all the necessary materials, including the running boards themselves, a wrench, a socket set, and a torque wrench. Then, carefully follow the installation instructions provided by the manufacturer. Typically, you’ll need to remove the plastic body moldings from the sides of your Jeep before attaching the running boards.
Once the moldings are removed, you can then attach the brackets to the underside of your vehicle using the provided hardware. Finally, secure the running boards onto the brackets and tighten everything using the torque wrench. With a little bit of patience and the right tools, you’ll have your Jeep Grand Cherokee looking even more stylish in no time.
Gather the Required Tools and Materials
“Tools and Materials for Your Project” Before embarking on any project, it’s important to gather all the necessary tools and materials. Despite the excitement of starting a new project, proper preparation is key to ensuring smooth progress and successful results. So, what exactly do you need? Well, it depends on the nature of your project.
Are you building something from scratch or simply doing repairs? Are you working with wood, metal, or electronics? Once you have determined the scope of your project, you can make a list of the tools and materials you will need. This can include anything from hammers, screwdrivers, and drills to specific types of nails, screws, glue, or paint. It’s also important to have protective gear such as goggles, gloves, and a dust mask to ensure your safety.
Remember, having the right tools and materials not only makes your job easier but also helps you achieve the best possible outcome.
Prepare the Vehicle
prepare the vehicle
Step 1: Positioning the Running Boards
Installing running boards on a Jeep Grand Cherokee can provide added convenience and style. To begin the installation process, it’s important to properly position the running boards. Start by determining the correct location for each running board.
It’s typically best to start at the front end of the vehicle and work your way towards the back. Make sure to align the running board with the existing mounting holes under the vehicle. You may need to use a measuring tape or other tools to ensure proper positioning.
Once you have determined the correct location, use a marker or tape to mark the spots where the mounting brackets will be attached. This will help ensure that the running boards are installed evenly on both sides of the vehicle. By taking the time to carefully position the running boards, you can ensure a secure and stylish installation on your Jeep Grand Cherokee.
Locate the Correct Mounting Points
mounting points, running boards, positioning, step 1
Attach the Running Boards to the Brackets
running boards, brackets, attaching, positioning
Step 2: Attaching the Running Boards
So, you’ve decided to enhance the look and functionality of your Jeep Grand Cherokee by installing some new running boards. Good choice! Running boards not only give your vehicle a sleek and stylish appearance, but they also provide a convenient step up into your Jeep, making it easier to get in and out. In this step-by-step guide, I’ll show you how to install running boards on your Jeep Grand Cherokee.
First, you’ll need to gather all the necessary tools and equipment. This includes a ratchet wrench, a torque wrench, mounting brackets, and of course, the running boards themselves. Make sure you have everything ready before you start the installation process.
Once you have everything ready, you can get started. Begin by placing the mounting brackets onto the designated areas on your Jeep’s frame. These brackets will serve as the anchor points for your running boards.
Use your ratchet wrench to tighten the bolts that hold the mounting brackets in place. Make sure they are securely fastened to ensure the stability of your running boards. Once the mounting brackets are securely in place, it’s time to attach the running boards themselves.
Line up the holes on the running boards with the holes on the mounting brackets. This may require a bit of maneuvering and adjusting to get the perfect fit. Once the holes are aligned, insert the bolts through the holes and tighten them using your ratchet wrench.
Be sure to follow the manufacturer’s instructions regarding torque specifications for the bolts. Ensure that all the bolts are tightened to the specified torque to prevent any loosening or damage to the running boards. Once all the bolts are tightened, double-check your work to ensure that everything is secure.
Align the Running Boards with the Mounting Points
running boards, mounting points, attaching, aligning When it comes to adding running boards to your vehicle, it’s important to ensure that they are securely attached. One crucial step in the installation process is aligning the running boards with the mounting points. This ensures that they are properly positioned and will not shift or come loose while you’re driving.
To begin, carefully line up the mounting points on the running board with the corresponding points on your vehicle. This may require some adjustment and double-checking to ensure they are aligned correctly. Once you have them lined up, it’s time to attach the running boards to the mounting points.
This can typically be done by tightening screws or bolts, depending on the specific mounting system. It’s essential to follow the manufacturer’s instructions and use the appropriate tools to prevent any damage or issues with the installation. By taking the time to properly align and attach your running boards, you can enjoy the added convenience and style they bring to your vehicle while ensuring they stay securely in place.
Secure the Running Boards to the Vehicle
running boards, attaching running boards, secure running boards, vehicle, installation process. Alright, now that you have gathered all the necessary tools and materials, it’s time to start attaching the running boards to your vehicle. This is a crucial step in the installation process as it ensures that the running boards are securely fixed and stable.
To do this, you will need to follow a few simple steps. First, locate the mounting brackets that come with your running boards. These brackets are designed to fit onto the frame of your vehicle and provide a secure attachment point.
Place the brackets onto the designated areas on your vehicle and make sure they are lined up properly. Next, grab the bolts and washers that also came with your running boards. Insert the bolts through the holes in the brackets and secure them with the washers.
Make sure to tighten them well, but be careful not to overtighten as this could cause damage to the brackets or vehicle. Once all the brackets are securely attached, it’s time to position the running boards onto them. Lift the running boards and place them onto the brackets, making sure they are aligned and centered.
You may need the help of a friend or family member to hold the running boards in place while you secure them. Finally, grab the nuts that came with your running boards and thread them onto the bolts. Use a wrench to tighten the nuts, ensuring that the running boards are firmly attached to the brackets and the vehicle.
Give them a gentle shake to test their stability, and if they feel secure, you’re good to go! Attaching the running boards to your vehicle is an important step in the installation process. By following these steps and securing the running boards properly, you can ensure that they will stay firmly in place and provide the support and convenience you need. So go ahead, get those running boards attached and enjoy the added style and functionality they bring to your vehicle!
Double Check the Alignment
Attaching running boards to a vehicle is not only a functional addition but also an aesthetic one. However, it is essential to double-check the alignment when installing running boards to ensure they are properly aligned with the vehicle’s body. This step is crucial to ensure that the running boards are securely attached and provide the desired look.
To double-check the alignment, you can start by placing the running boards against the vehicle’s body and comparing their positioning to the vehicle’s instructions or specifications. You can also use a measuring tape to ensure that the running boards are equidistant from the ground on both sides. By taking the time to double-check the alignment, you can ensure that your running boards not only look good but also function properly and provide a comfortable step for getting in and out of your vehicle.
Step 3: Finalizing the Installation
Now that you have all the necessary tools and materials, it’s time to finalize the installation of your Jeep Grand Cherokee running boards. First, double-check that all the bolts, brackets, and other components are securely fastened and tightened. You don’t want anything coming loose while you’re driving.
Next, give the running boards a final wipe-down to remove any fingerprints or smudges. This will ensure that they look clean and polished. Once that’s done, take a step back and admire the finished product.
Your Jeep Grand Cherokee now has sleek and stylish running boards that not only add a touch of flair but also provide practical benefits like easier access to the vehicle. So go ahead, take a moment to appreciate your handiwork – you deserve it!
Tighten all Bolts and Screws
tapping into the conversation above Whenever you are carrying out an installation project, one crucial step that should not be overlooked is tightening all the bolts and screws. This may seem like a simple task, but it is crucial for ensuring the stability and durability of the installation. Tightening all the bolts and screws helps to prevent any loose connections that could potentially lead to accidents or damage in the future.
Think of it like building a solid foundation for your project, ensuring that everything is secure and stable. Just like how a loose screw can cause a wobbly table, a loose bolt can compromise the integrity of the entire installation. So take your time to carefully tighten all the bolts and screws, making sure that they are firm and secure.
It’s always better to be safe than sorry, and this step will give you peace of mind knowing that your installation is built to last.
Check for any Loose Connections
In the final step of the installation process, it’s important to check for any loose connections. After mounting your new device or appliance and making the necessary electrical connections, it’s always a good idea to ensure everything is secure and properly attached. Loose connections can lead to a host of issues, ranging from poor performance to potential safety hazards.
So take a few extra minutes to inspect all the connections and make sure they are tight. This includes any electrical wiring, cords, or cables that may be involved in the installation. By double-checking this crucial step, you can ensure that your new addition functions properly and safely in your home or office.
Conclusion
And that’s it! You’re now ready to conquer the world (or, you know, just the grocery store) with your stylish new running boards. With their sleek design and easy installation process, these running boards will have your Jeep Grand Cherokee looking like the ultimate off-roading beast in no time. So get out there, show off your new addition, and leave everyone else in awe of your superior DIY skills.
Happy adventures, fellow Jeep enthusiasts!”
Enjoy Your Jeep Grand Cherokee Running Boards
Jeep Grand Cherokee running boards
FAQs
How do I install running boards on a Jeep Grand Cherokee?
To install running boards on a Jeep Grand Cherokee, follow these steps:
1. Gather the necessary tools and materials, including the running board kit, a socket wrench set, and a drill with drill bits.
2. Locate the mounting points on the Jeep’s frame or rocker panel where the running boards will attach.
3. Using the drill, create holes at the designated mounting points if they are not pre-drilled.
4. Place the running board onto the mounting points and align them properly.
5. Secure the running board to the mounting points using the provided bolts and washers.
6. Tighten the bolts using the socket wrench set until the running board is securely attached.
7. Repeat the process for the remaining running boards on the other side of the Jeep.
8. Once all running boards are installed, double-check the tightness of the bolts and make any necessary adjustments.
9. Test the running boards by applying weight to ensure they are properly installed and can support the intended load.
10. Enjoy your newly installed running boards on your Jeep Grand Cherokee!
What are the benefits of installing running boards on a Jeep Grand Cherokee?
Installing running boards on a Jeep Grand Cherokee can provide the following benefits:
– Easier access: Running boards make it easier to get in and out of the Jeep, especially for shorter individuals or those with mobility challenges.
– Enhanced safety: The added step provided by running boards can help prevent slipping and falling when entering or exiting the vehicle, especially in wet or icy conditions.
– Protection: Running boards can help protect the lower sides of the Jeep from road debris, rocks, and other hazards.
– Style and aesthetics: Running boards can enhance the appearance of the Jeep and give it a more rugged and sporty look.
– Functionality: Running boards can serve as a convenient platform for loading and unloading cargo onto the roof rack or reaching items stored on the roof.
Are running boards compatible with all Jeep Grand Cherokee models?
While running boards are generally compatible with most Jeep Grand Cherokee models, it is recommended to check with the specific manufacturer or seller to ensure compatibility with your exact model and year. Additionally, variations in trim levels and aftermarket modifications may affect the installation process and compatibility.
Can running boards be installed on a Jeep Grand Cherokee with fender flares?
Yes, running boards can typically be installed on a Jeep Grand Cherokee with fender flares. The fender flares do not usually interfere with the installation process or the functionality of the running boards. However, it is recommended to check with the specific manufacturer or seller to ensure compatibility and proper fitment with fender flares.
Are running boards easy to install on a Jeep Grand Cherokee?
The installation process for running boards on a Jeep Grand Cherokee can vary depending on the specific model and the type of running board kit being used. However, with the right tools and instructions, installing running boards can be a relatively straightforward DIY project. It may require some drilling and basic mechanical skills, but for most people, it is a manageable task. If you are unsure or uncomfortable with the installation process, it is always recommended to seek professional assistance.
Can running boards be used to support a roof rack on a Jeep Grand Cherokee?
Running boards are not typically designed to support the weight of a roof rack on a Jeep Grand Cherokee. However, some running board models may have additional features or accessories that allow for the integration of a roof rack. It is important to consult the manufacturer or seller to determine if the running boards you are considering have the necessary capabilities to support a roof rack.
Can running boards be painted to match the color of a Jeep Grand Cherokee?
Running boards are typically available in different finishes and colors to match the style and aesthetic preferences of Jeep Grand Cherokee owners. However, if you have a specific color in mind that is not readily available, it is possible to paint the running boards to match the color of your Jeep. It is recommended to use automotive-grade paint and follow proper surface preparation and painting techniques for a durable and professional-looking finish.


