Have you ever found yourself with overinflated tires and wondering how to let out some air? Whether you’re preparing for a long road trip or simply trying to maintain your vehicle’s optimal tire pressure, knowing how to let air out of a tire safely and effectively is an essential skill for every driver. The process may seem straightforward, but there are a few important considerations to keep in mind before grabbing the nearest tire gauge and releasing some pressure. In this blog post, we’ll cover the step-by-step process of letting air out of a tire, as well as some tips and tricks to make the process as smooth as possible.
From understanding the correct tire pressure to using the right tools and techniques to release air, we’ll cover everything you need to know to ensure that you can quickly and easily let air out of your tires whenever the need arises. So, let’s get started and learn how to safely and effectively deflate your tires!
Table of Contents
What You Will Need
Are you wondering how to let air out of a tire? If so, don’t worry! It’s actually a pretty simple process. All you’ll need is a tire pressure gauge, a valve stem tool, and a bit of elbow grease. Firstly, remove the cap from the valve stem and place the pressure gauge onto it.
This will give you an initial read of how much air is in the tire. Next, use the valve stem tool to press down on the stem, which will release the air. It’s important to release air slowly and regularly check the pressure gauge to ensure you don’t let out too much air.
You can repeat this process until the desired pressure is reached. Remember, proper tire pressure is vital for road safety and fuel efficiency, so it’s important to check it regularly. With these simple tools and steps, you can easily let air out of your tires whenever needed.
– Tire pressure gauge – Valve stem tool – Pliers
When it comes to maintaining your vehicle, there are certain tools and equipment that you should always have on hand. These include a tire pressure gauge, a valve stem tool, and a pair of pliers. The tire pressure gauge is essential for keeping your tires properly inflated, which improves fuel economy and ensures safe driving.
The valve stem tool will enable you to quickly and easily remove and replace your valve stems, which is necessary for tire maintenance and repair. And of course, pliers are a must-have for any mechanic, as they can be used for a variety of tasks, including tightening bolts and removing stubborn pieces. By keeping these tools on hand, you can save yourself time and money by taking care of your vehicle on your own and avoiding costly trips to the mechanic.
So don’t wait until you have a flat tire or other issue to stock up on these essential items – invest in them today and keep your car running smoothly for years to come.

Step 1: Locate the Valve Stem
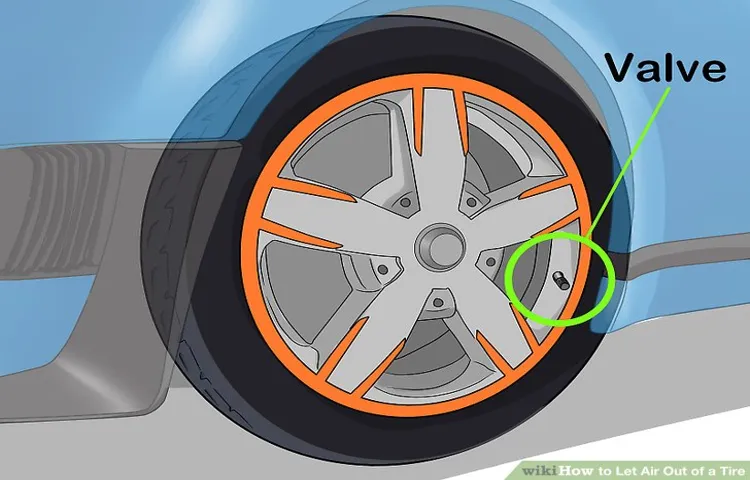
If you’re wondering how to let air out of a tire, you’ve come to the right place. The first step is to locate the valve stem. This is a small metal tube sticking out of the tire that contains the valve used to inflate and deflate your tire.
You’ll recognize it by its small circular cap on the end of it. Often, this cap will have a small notch in it that you can use to unscrew it with a tool, like a key or a coin. Once you have the cap off, check to make sure the valve itself is clear of debris or dirt.
If it looks dirty, you can clean it off by using a clean cloth or tissue. While doing this, make sure to hold the valve stem steady, so it doesn’t move around when you’re letting the air out. Now, place your tire gauge over the valve and press down firmly, and hold it in place until you hear the sound of air escaping.
You’ve successfully let air out of your tire! Remember, it’s important to only let out the recommended amount of air pressure, which can be found in your car’s manual or on the tire itself.
– Identify the valve stem on the tire – Check for proper tire pressure before deflating
When it comes to maintaining your tires, the first step is to locate the valve stem. This is the small, protruding tube that allows air to be added or removed from the tire. The valve stem is typically located on the side of the tire, near the rim, and is marked by a small cap that can be removed with your fingers.
Once you’ve located the valve stem, it’s important to check the tire pressure before deflating it. This will ensure that you are not removing more air than necessary and will help you determine how much air needs to be removed in order to achieve the proper tire pressure. By taking the time to locate the valve stem and check the tire pressure, you can prolong the life of your tires and ensure that they are properly inflated for optimal performance.
So, take a moment to find that valve stem and give your tires the care they need!
Step 2: Remove the Valve Cap
Now that you have the pressure gauge in place, it’s time to move onto the next step in releasing air from your tire. This step involves removing the valve cap, which is typically located at the top of the valve stem. You can use your fingers to unscrew it counterclockwise and be sure to avoid dropping it or misplacing it.
If your valve cap is difficult to remove, you may need to use pliers, but be gentle to avoid damaging the valve stem. Once the cap is removed, you’ll have clear access to the valve core, which is the small pin inside the valve stem that allows air to flow in and out. It’s essential to ensure your valve cap is put back on after you’re finished with all the steps, as it helps to keep dust and debris from clogging the valve and causing pressure loss.
Remember to take care not to cross-thread the cap when screwing it back in place, which could cause a leak.
– Unscrew the cap from the valve stem
Before starting the process of inflating a tire, it’s essential to unscrew the cap from the valve stem. This simple yet vital step ensures that the air can flow freely into the tire while inflating it. Valve caps protect the valve core from dust and dirt, and it is essential to keep them safe to prevent any leaks.
However, removing valve caps can be challenging as they can get stuck due to rust or dirt accumulation. One easy way to remove them effectively is to use a pair of pliers or a valve cap removal tool. Another important thing to keep in mind is to hold on to the valve cap once it’s off because losing it can cause trouble later on.
With the removal of the valve cap, we are one step closer to inflating our tire to the optimum pressure and enjoying a smooth ride.
Step 3: Press the Valve Stem
If you’re wondering how to let air out of tire, it’s a relatively simple process that you can easily do at home. The first step is to find a valve stem on the tire. Once you’ve located it, remove the cap if there is one.
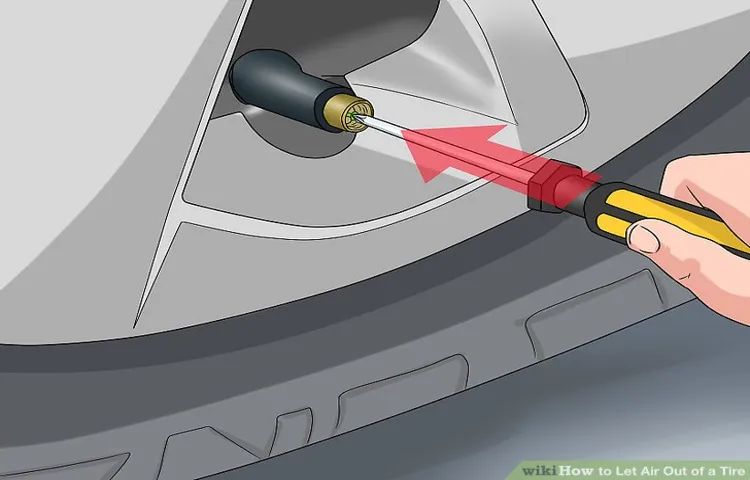
Next, use a tire pressure gauge to check the current tire pressure. If the tire is overinflated, you’ll need to remove some air. To do this, press down on the center pin in the valve stem with a small object like a pen cap or the back of a tire gauge.
You’ll hear a hissing sound as air is released from the tire. Be sure to only let out a little bit of air at a time and then check the tire pressure again to see if it’s at the desired level. Remember, safety always comes first.
Never overinflate or underinflate your tires as this can cause serious problems for your vehicle and your safety.
– Use the valve stem tool to depress the valve stem – Hold it down until desired pressure is reached
When it comes to inflating your tires, step 3 is crucial. It’s all about pressing the valve stem and achieving the desired pressure for optimal tire performance. First, you’ll need a valve stem tool to depress the valve stem.
This tool is typically included in most tire inflator kits and is essential for the job. Once you have the tool, it’s time to use it. Simply place the tool on the valve stem and press down.
You’ll feel the tool depress the stem, which is essential for getting the air in. Hold the valve stem down as you pump air into the tire, making sure you reach the desired pressure. This part can take some trial and error, so be patient and stay aware of the pressure as you go.
Remember, having the right tire pressure can make all the difference in your driving experience. So take your time with this step and make sure you get it right. Your car (and your passengers) will thank you!
Step 4: Check Again
Now that you’ve let some air out of the tire, it’s time to check the pressure again. Use your tire gauge to measure the pressure. If it’s still above the recommended level, release some more air.
If it’s too low, add air back in until it reaches the recommended level. It’s essential to make sure that you check the tire pressure when the tire is cold, as the heat can cause the air to expand, giving you the wrong reading. You may need to repeat this process a few times to get the perfect tire pressure.
It’s crucial to get the right tire pressure for your vehicle, as it affects the handling, fuel consumption, and even the lifespan of your tires. Remember, safety is paramount, and maintaining proper tire pressure is an essential part of keeping you and your passengers safe on the road.
– Recheck tire pressure with gauge – Replace valve cap when finished
After inflating your tires, it’s important to double-check the pressure to ensure that it’s accurate. This can easily be done with a tire pressure gauge, which can be found at any auto parts store or online. By checking the pressure with a gauge, you’ll be able to confirm that it matches the recommended level listed in your owner’s manual.
It’s also important to replace the valve cap when finished, as this will help to prevent any dirt or debris from entering the valve and causing damage. By taking the time to recheck your tire pressure and replace the valve cap, you can rest assured that your tires are properly inflated and ready for the road. So, don’t forget this crucial step and keep your vehicle running safely and smoothly.
Final Thoughts
In conclusion, knowing how to let air out of a tire can save you a lot of hassle and keep your vehicle running smoothly. It’s important to have the right tools, such as a tire pressure gauge and valve stem tool, and to check the recommended tire pressure for your specific vehicle. Remember to only let out small amounts of air at a time, checking the pressure frequently to ensure you don’t go too far.
It’s also important to dispose of any old or damaged tires properly, as they can be a safety hazard and harm the environment. By following these steps, you can maintain the health of your tires and ensure a safe and comfortable driving experience.
– Regularly checking and maintaining tire pressure is important for safe driving – Use caution when deflating tires and wear appropriate protective gear.
Maintaining proper tire pressure is crucial for safe driving, and it’s easy to incorporate into your regular vehicle maintenance routine. Regularly checking your tire pressure can help ensure your tires are inflated to the appropriate level, which can improve fuel efficiency and extend the life of your tires. Additionally, underinflated tires can be a safety hazard, as they make it more difficult to control your vehicle and can cause tire failure.
When it comes to deflating tires, it’s important to exercise caution and wear appropriate protective gear to prevent injury. With a little bit of attention and care, you can help keep your tires in great shape and enjoy a safer, more efficient driving experience.
Conclusion
Well, folks, that’s how you deflate a tire. Just remember to use caution and always have a tire pressure gauge on hand to ensure you’re releasing the correct amount of air. And please, don’t use your teeth to release the air – we don’t want any dental emergencies on our hands.
So go forth, take on those deflated tires with confidence, and keep on rollin’ smoothly.”
FAQs
1. How do I let air out of a tire using a tire gauge? A: First, unscrew the valve cap on the tire. Press the end of the tire gauge onto the valve stem, and you’ll hear a hissing sound as the air escapes. Continue holding the gauge onto the valve until you reach your desired tire pressure. 2. What’s the easiest way to let some air out of my tires? A: One of the quickest and easiest ways to let air out of a tire is to press on the valve stem with the back of a pen or pencil. This will release a small amount of air, and you can repeat the process until you’ve reached the desired tire pressure. 3. Is it safe to let air out of a tire while the tire is hot? A: It is not recommended to let air out of a tire while it is hot. Waiting until the tire has cooled off will provide a more accurate reading and help you avoid potential injuries from heat or pressure. 4. Can I use pliers to let air out of a tire? A: Using pliers to let air out of a tire is not recommended as it can damage the valve stem, causing a leak or even a flat tire. Stick to using a tire gauge or other safe methods. 5. What should I do if I let too much air out of a tire? A: If you let too much air out of a tire, you can refill it using a tire pump or visit a professional mechanic to get it fixed. Driving on an underinflated tire can damage the tire and also jeopardize your safety on the road. 6. How often should I check the air pressure in my tires? A: You should check the air pressure in your tires at least once a month or before a long road trip. Maintaining proper air pressure can improve fuel efficiency, prolong the life of your tires, and ensure your safety on the road. 7. Should I let air out of my tires when driving on gravel roads? A: It’s not necessary to let air out of your tires when driving on gravel roads. In fact, it can cause the tire to wear out faster and increase the risk of a flat tire. It’s better to maintain proper tire pressure and drive slowly on gravel roads.


