
Have you ever found yourself stranded on the side of the road due to a flat tire? If so, you know all too well the frustration that comes with it. But what if you could change that tire yourself, without having to wait for roadside assistance? What if you knew how to mount a tire on a rim, step-by-step?Well, wonder no more. In this guide, we’ll take you through the process of mounting a tire on a rim, from start to finish.
We’ll cover everything from the equipment you’ll need to the proper technique for getting that tire properly mounted on the rim. So whether you’re a seasoned DIY mechanic or just getting started, this guide will have you changing tires like a pro in no time.No longer will you have to rely on others to change your tire for you, or worse, wait on the side of the road for help.
With this step-by-step guide, you’ll be able to mount a tire on a rim with ease. So let’s get started, and get back on the road in no time.
Preparation
Mounting a tire on a rim is an essential skill that every driver should know. Preparation is key to ensure a smooth and safe process. Start by checking the tire to make sure there are no damages and it is the correct size for the rim.
Also, ensure that the rim is clean and free from dirt and rust, which can cause uneven fitting. To make the process easier, use tire lubricant to help the tire slide onto the rim. Be sure to use the appropriate tools, such as tire irons and a valve core tool, to avoid damaging the tire or rim during installation.
It is also important to check the tire pressure before and after installation to ensure it is at the recommended level. Taking these measures when preparing to mount a tire on a rim can save time and prevent any mishaps during the process.
Gather Necessary Tools
Preparation is key when it comes to gathering necessary tools for a project. Whether it’s a DIY home improvement project or a large-scale construction job, you want to make sure you have everything you need before starting. This will not only save you time and money in the long run, but it will also make the task at hand much easier.
So, where do you begin? Start by identifying the tools you need for the job. Make a list and double-check it to make sure you haven’t missed anything important. Once you have your list, gather all the tools together in one place so they’re easily accessible when you need them.
Don’t forget to make sure they’re all in good working order, and if anything needs replacing or fixing, do it before you start the project. Remember, preparation is key to a successful outcome!
Get the Right Tire Size
When it comes to getting the right tire size, preparation is essential. First off, it’s important to understand the basics of tire sizing such as the width, aspect ratio, and diameter. This can be found on the sidewall of your current tires or in your vehicle’s manual.
Once you have that information, it’s time to determine the right size for your vehicle. It’s recommended to stick to the manufacturer-recommended size to ensure proper handling and performance. However, if you want to upgrade to a different size, make sure to consult with a professional to avoid any safety issues.
So, before heading out to purchase new tires, take the time to prep and determine the correct tire size for your vehicle.
Examine the Tire and Rim Condition
Before hitting the road, one of the most crucial aspects to consider is the tire and rim condition. It’s necessary to check the tires’ air pressure, tread depth, and overall condition to avoid any potential hazards. Begin the preparation process by ensuring that you have the correct pressure in each tire, which can be found in the car’s manual or on a sticker near the driver’s door.
Make sure that they have the recommended tread depth, which can be measured using a penny by checking if Lincoln’s head is completely covered. If you notice any wear or tear, nicks, cuts, bulges, or uneven wear patterns, it’s time to consider new tires. Inspect the rims for any bent or damaged areas that could cause issues while driving.
It’s essential to address any tire or rim issues before hitting the road to ensure that you’re driving with the utmost safety.
Removing the Old Tire
When it comes to mounting a tire on a rim, the first step is removing the old tire. This may seem like a daunting task, but with the right tools and techniques, it can be done quickly and easily. Begin by deflating the tire completely, then use a tire iron to loosen the lug nuts and remove the wheel from the car.
Next, use a tire bead breaker to loosen the tire from the rim. This tool works by applying pressure to the sidewall of the tire, causing the bead to separate from the rim. Once the tire is loose, you can use a tire spoon to remove it from the rim.
This can be a bit tricky, so take your time and work slowly to avoid damaging the rim. With the old tire removed, you’re now ready to mount your new tire on the rim.
Deflate the Tire
To start removing the old tire, it’s essential to first deflate it completely. You don’t want to be struggling with a tire that’s still inflated, and it’s also a safety concern as a fully inflated tire may burst during the removal process. To deflate the tire, remove the valve cap from the valve stem and press down on the valve core with a valve tool or simply a screwdriver until all the air has escaped.
Be sure to unscrew the valve cap completely to prevent it from flying off and potentially causing damage. It’s crucial to keep a watchful eye on the air pressure gauge while deflating the tire to ensure that all the air has been released. Once it’s completely deflated, the next step is to remove the wheel from the vehicle.
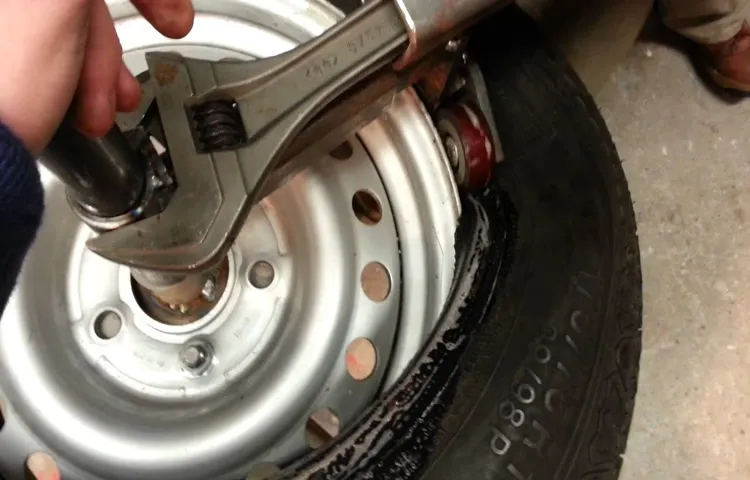
Break the Beads Using a Tire Iron
Removing the old tire from your car’s wheel can be a daunting task, especially if you’ve never done it before. To make this process easier, you’ll need a tire iron, which is a long metal bar designed to pry off the tire from the rim. The tire iron has a curved end that you can use to hook onto the edge of the tire’s bead, which is the thick rubber that lines the edge of the wheel.
Once you’ve hooked the tire iron onto the bead, you’ll need to apply force to break the seal between the bead and the rim. This can be done by pulling the tire iron upward or downward, depending on which direction you find it easier to apply force. The key is to apply enough force to snap the seal without damaging the tire or the rim.
Once you’ve broken the bead, you’ll need to repeat the process on the other side of the tire before removing it completely. With some practice and patience, you’ll be able to remove the old tire with ease and get your car back on the road in no time.
Remove the Tire and Tube
Removing the old tire is the first step to fix a flat. It’s important to ensure your safety before you begin with the procedure. First, flip your bike over onto its handlebars and seat.
Then, using tire levers, wedge them underneath the tire bead and pull it away from the rim. Once you’ve loosened the tire, use your hands to remove it from the rim. Afterward, remove the inner tube from the tire by prying it out with your tire levers.
Be mindful of any punctures or damage that may have caused the flat. If you’re unsure where the puncture is, pump up the inner tube and listen carefully for the escaping air, or hold it next to your cheek to feel for little bursts of air. Once you’ve located the puncture, mark it with a pen so you can find it when you’re ready to patch or replace it.
With the tire and tube removed, you’re ready to move on to the next step in the process of fixing your flat tire.
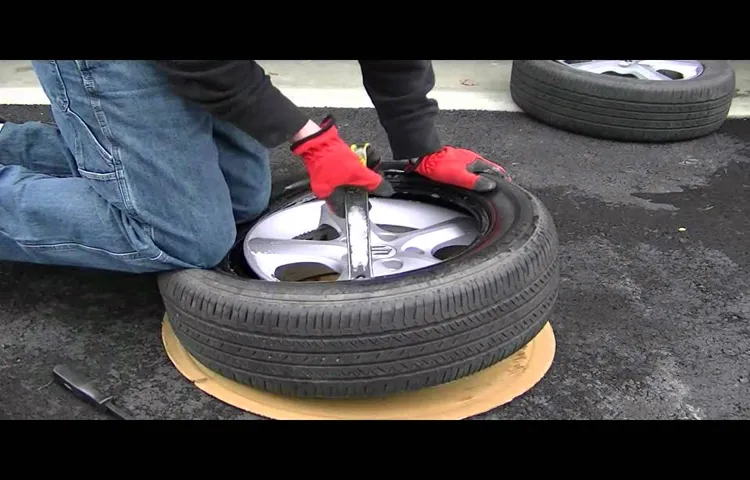
Installing the New Tire on the Rim
Mounting a tire on a rim can seem daunting, but it’s a relatively straightforward process with a few key steps. Firstly, it’s important to ensure that both the wheel and tire are clean and free from any debris or obstructions. Next, carefully align the tire onto the rim, fitting the valve stem into the appropriate hole.
Use a tire iron or other appropriate tool to slowly lever the rest of the tire onto the rim, checking that everything is seated correctly. Once the tire is fully mounted on the rim, use an air compressor or pump to inflate the tire to the manufacturer’s recommended pressure. It’s important to check the pressure regularly, and adjust it if necessary.
And voila! Your tire is now mounted onto the rim and ready to use. Just like that, you’ve conquered the basic mechanics of how to mount a tire on a rim.
Grease the Bead Area
When it comes to installing a new tire on your rim, there are a few things you should keep in mind. One important step is to grease the bead area. This ensures that the tire can easily slip onto the rim without resistance.
Without proper lubrication, the tire can become stuck, making it difficult to align properly. Applying a small amount of grease to the bead area will also help seal the tire properly, preventing air leaks and reducing the risk of a blowout. Just be sure not to apply too much grease, as this can cause the tire to slip on the rim while driving, creating a dangerous situation.
By greasing the bead area before installing a new tire on your rim, you’ll ensure a smooth and safe ride every time.
Insert the Tube and Tire
After you’ve successfully removed the old tire, it’s time to install the new one. First, place one side of the tire onto the rim. Then, take the tube and insert it into the tire, starting with the valve.
Make sure that the tube is evenly inserted and not twisted. Now, push the other side of the tire onto the rim, making sure that the tube isn’t pinched between the tire and rim. This can cause the tube to burst and ruin all your hard work! To ensure the tire is properly seated, use your thumbs to push the tire walls onto the rim’s edges.
This will make sure there aren’t any kinks or bulges. Lastly, inflate the tube to the recommended pressure level, as stated on the tire itself. It’s best to use a gauge to be accurate.
Now you’re ready to hit the road with your freshly installed tire! Remember, always stay safe and check your tire pressure regularly to avoid any potential issues on your ride.
Align the Valve Stem
When it comes to installing a new tire on a rim, it’s important to align the valve stem. The valve stem is the portion of the tire that allows air to be added or released. Ensuring that it is properly aligned will facilitate proper inflation and prevent damage to the tire.
To align the valve stem, simply position it in line with the larger of the two indentations on the rim. From there, gently press the tire onto the rim, being careful not to pinch the tube. Once the tire is fully seated on the rim, you can inflate it to the recommended pressure.
By taking the time to properly align the valve stem, you’ll ensure a safe and efficient ride with your new tire.
Inflating and Finishing Up
Now that you’ve successfully mounted the tire onto the rim, it’s time to inflate and finish up the process. First, make sure you know the recommended tire pressure for your specific vehicle. You can usually find this information in your owner’s manual or on a sticker inside the driver’s side door jamb.
Once you have the correct tire pressure, attach a tire pressure gauge to the valve stem on the tire and check the pressure. If it’s too low, use an air compressor to add air until you reach the recommended pressure. If it’s too high, use a tire pressure gauge to release some air until you reach the recommended pressure.
Once the tire is inflated to the correct pressure, it’s important to inspect it for any leaks or damage. Look for any bulges or cuts in the sidewall and make sure the tire is seated properly on the rim. Then, use a tire balancing machine to balance the tire and make sure it runs smoothly.
Finally, tighten the lug nuts in a star pattern to ensure even pressure on the tire. Double check that they are tight and your tire is secure before hitting the road. By following these steps, you’ll be able to confidently mount and inflate a tire on a rim, ensuring a safe and smooth ride for yourself and your passengers.
Inflate the Tire
Now that you’ve checked your tire pressure and made sure it’s at the recommended level, it’s time to inflate the tire. Grab your trusty tire inflator, attach it to the valve stem, and start pumping. Keep an eye on the pressure gauge as you go to make sure you don’t overinflate the tire.
If you do accidentally overinflate, use the pressure release valve to let some air out and get it back to the proper level. Once you’re done inflating, it’s important to carefully check the tire for any signs of damage or wear. Look for any cracks, bulges, or cuts in the tire’s tread or sidewall.
If you see any damage, it’s best to replace the tire before hitting the road again. But if everything looks good, you’re all set! Now it’s time to put your tools away and enjoy your properly inflated tire.
Check Tire Pressure
Inflating your tires to the proper pressure is a simple task that can improve your vehicle’s fuel efficiency, handling, and overall safety. To get started, you’ll need to locate the recommended tire pressure for your specific make and model. This information can usually be found on a sticker inside your driver’s side door jamb or in your vehicle’s owner manual.
Once you know the proper pressure, you can use a tire gauge to check the current air pressure in each tire. If a tire is low, use an air compressor to add air until you reach the recommended pressure. Don’t forget to check the pressure again after a few minutes of driving, as air temperature can cause the pressure to fluctuate.
Once you’ve inflated all your tires to the recommended pressure, be sure to replace the valve caps and double-check that they’re tight. Properly inflated tires not only keep you safe on the road, but they also improve your gas mileage and save you money in the long run. So take a few minutes to check your tire pressure regularly and enjoy a smoother ride!
Verify the Tire is Seated Properly
When you finish inflating your tire, it’s crucial to make sure it’s seated properly. This step ensures your tire is secure and won’t come off while you’re driving. To do this, check the sidewalls of the tire to ensure they’re fully pressed against the rim’s flanges.
If there’s a gap, that means the tire isn’t seated correctly and you’ll need to let the air out and try again. Remember to always double-check the manufacturer’s instructions to make sure you’re inflating the tire to the correct pressure. Overinflating can cause the tire to burst, while underinflating can cause poor handling and tire wear.
So take the time to check the tire’s seating and pressure to ensure a safe and comfortable ride.
Test the Tire for Any Leaks or Issues
Once you’ve inflated your tires to the recommended PSI, it’s important to make sure there are no leaks or issues before hitting the road. One way to do this is to listen for any hissing sounds or feel for any air escaping while you run your hand along the tread. Another way is to apply a mixture of water and soap onto the valve stem and any potential problem areas, such as the sidewalls or tread, and watch for bubbles forming.
If there is a leak, you’ll need to remove the tire and inspect it for any punctures or damage. If everything looks good, give the tire a final check to ensure it’s securely fastened to the rim before heading out on your next adventure. Remember, regularly monitoring your tire pressure can improve your vehicle’s handling and fuel efficiency, saving you money in the long run.
Conclusion
In conclusion, mounting a tire on a rim can seem like a daunting task but with the right tools and technique, it’s a breeze. Just remember to use plenty of lubrication, apply firm pressure evenly around the rim, and use your muscles- not your fingers- to get that tire popped on. So next time you need to mount a tire on a rim, unleash your inner mechanic and tackle the job like a pro!”
FAQs
What tools do I need to mount a tire on a rim?
You will need a tire iron, a bead breaker, a valve stem tool, and a pry bar.
Is it necessary to lubricate the bead before mounting a tire on a rim?
Yes, lubricating the bead with soap or a specialized tire lubricant will make it easier to install the tire on the rim.
What is the correct way to position the tire on the rim?
The tire should be aligned with the valve stem and mounted in a way that the rotation arrow on the tire lines up with the direction of rotation.
How much air pressure should I put in the tire after mounting it on the rim?
The recommended air pressure will be listed on the sidewall of the tire. It is important to follow this recommendation for optimal performance and safety.
Can I mount a tire on a rim without a machine?
It is possible to mount a tire on a rim manually, but it requires a lot of skill and effort. It is usually easier and safer to have it done by a professional with the right equipment.
What is the cause of tire bead leaks after mounting?
Tire bead leaks can be caused by incorrect or uneven mounting of the tire on the rim, faulty valve stems, or damaged tire beads.
Can I reuse a tire that has been mounted on a rim before?
It is generally not recommended to reuse a tire that has already been mounted on a rim, as it may have suffered damage or wear during its previous use. It is best to use a new tire for optimal safety and performance.