Have you ever found yourself stranded on the side of the road with a flat tire and no spare in sight? It’s a frustrating situation, but with a plug kit and a little know-how, you can fix the problem and get back on the road in no time. Plugging a tire is a simple process that can save you time and money. It involves inserting a rubber plug into the punctured area of the tire to seal the hole and prevent air from escaping.
With the right tools and techniques, you can plug your tire quickly and easily, without the need for a professional. In this blog post, we’ll cover the step-by-step process of how to plug a tire with a plug kit. We’ll also provide you with tips and tricks to ensure a successful repair.
So, whether you’re a seasoned mechanic or a beginner, read on and learn how to plug a tire like a pro.
Table of Contents
Introduction: What is a Tire Plug Kit?
Have you ever found yourself with a flat tire and no spare nearby? Or perhaps you’ve had a slow leak and need a temporary solution until you can get to the mechanic? That’s where a tire plug kit comes in handy. It’s a tool that can help you quickly and easily repair small punctures in your tire, saving you time and money. Using a tire plug kit is a simple process that can be done in just a few steps.
First, locate the puncture in your tire and remove any debris from the site. Next, insert the plug into the hole using the provided tools and trim off any excess material. Finally, inflate your tire to the recommended pressure and you’re good to go.
With a little bit of practice and some basic knowledge, anyone can learn how to plug a tire with a plug kit. So next time you find yourself in a sticky situation, don’t panic – just grab your trusty plug kit and get back on the road in no time.
Components of a Tire Plug Kit
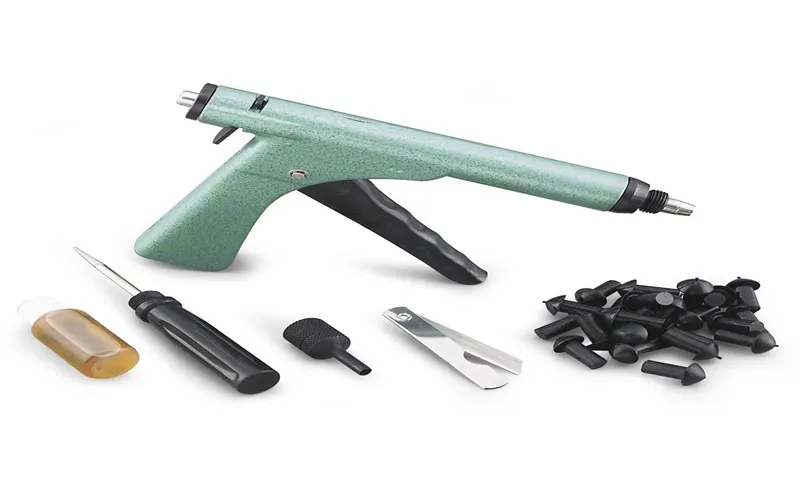
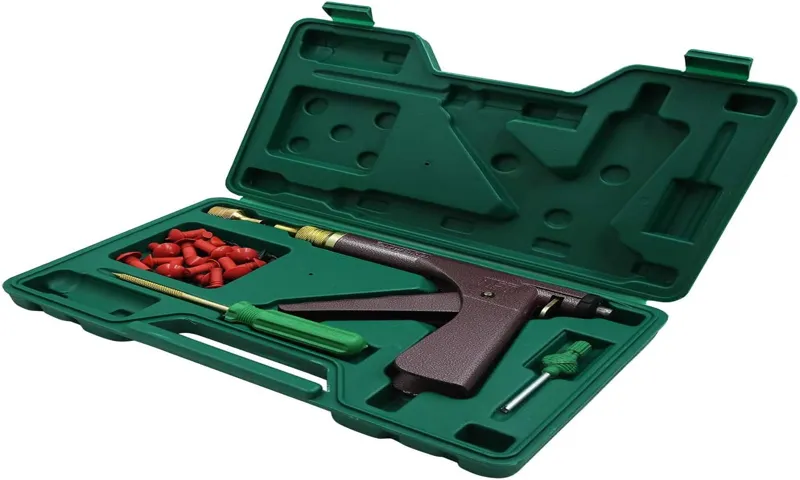
A tire plug kit comes in handy when your vehicle’s tire experiences a puncture. It is a small kit that comprises all the essential tools required to repair a flat tire temporarily. A tire plug kit usually contains different components, including insertion tools, rubber plugs, and reamers.
Insertion tools are tiny but crucial components that help you insert the rubber plugs into the puncture hole. Rubber plugs are the core components of the kit and are made explicitly for tire punctures. Reamers, on the other hand, are used to elongate and clean the hole to make it easy to insert the rubber plug.
Besides that, a tire plug kit also contains a user guide that provides clear instructions on how to use the various components of the kit. The guide typically contains detailed step-by-step instructions, making it easy for you to understand the repair process. In summary, a tire plug kit is a vital tool to have, as it helps you repair your vehicle’s tire quickly and easily in case of a puncture, enabling you to get back on the road without seeking professional assistance.

When to Use a Plug Kit
A tire plug kit is a handy tool for fixing punctured tires quickly and effortlessly. It contains a set of tools, including a reamer, plug inserter, and rubber plugs. In essence, tire plug kits are designed to fix small holes in tubeless tires caused by punctures, nails, and screws.
The kit is easy to use and can be utilized by anyone with basic knowledge of tire repairs. However, it’s worth noting that tire plug kits are not a permanent solution and should not be used to repair major punctures or sidewall damage. If you experience a severe puncture or sidewall damage, it’s best to replace the tire entirely or bring it to a professional for proper repairs.
Overall, tire plug kits are a valuable tool for emergency tire repairs and can save you from being stranded on the side of the road.
Steps to Plug a Tire Using a Plug Kit
If you find yourself with a flat tire and don’t have a spare on hand, a plug kit can be a lifesaver. Knowing how to use it correctly is crucial, so here are the steps to follow. First, locate the puncture and remove any debris from the tire.
Then, using the reamer tool included in the kit, make the puncture hole a little bigger and roughen up the inside wall of the hole. Next, insert the plug into the needle tool and apply rubber cement to the plug and needle. Insert the needle into the hole and push the plug in until only about an inch remains outside the tire.
Finally, use the snips to cut off the excess plug and inflate the tire to the correct pressure. It’s important to remember that a plug is only a temporary fix and you should have the tire professionally patched as soon as possible. With these steps, you’ll be back on the road in no time and ready to handle any unexpected flat tire!
Step 1: Locate the Puncture
Plugging a tire may sound like a daunting task, but with the right tools and steps, it can be a straightforward process. The first step is locating the puncture. This can be done by looking for a visible object, such as a nail or screw, or by checking for a hissing sound and feeling for air escaping.
Once the puncture is located, it’s essential to remove any debris from the tire and prepare the area for the plug. A tire plug kit typically includes a reamer to clean out the puncture and a plug installation tool to insert the rubber plug. The rubber plug is coated in adhesive and inserted into the puncture using the installation tool.
It’s important to ensure the plug is inserted firmly, and excess material is trimmed with scissors, leaving just enough to fit flush with the surface of the tire. The tire can then be reinflated to the manufacturer’s recommended pressure, and a quick test drive can confirm the plug’s effectiveness. Overall, plugging a tire is a relatively easy process, and having a kit on hand can save time and money by avoiding the need for costly tire replacements.
Step 2: Remove the Object from the Tire
Once you have located the object that is causing the puncture, it’s time to remove it from the tire. This step is crucial to ensure that the puncture is fully exposed, allowing you to plug the hole properly. Before you begin, make sure the tire is secured safely on the ground.
Next, using a pair of pliers or tweezers, grab onto the object and gently and steadily pull it out. Be careful not to push the object in farther or damage the tire further. Once the object is removed, examine the hole to determine if it is large enough to plug.
If the puncture is too large or too close to the sidewall, plugging may not be an option, and you may need to replace the tire entirely. However, if the puncture is small enough, you can move onto the next step of plugging the tire using the plug kit. Remember, safety always comes first when dealing with punctured tires, so if you are unsure about what to do, seek assistance from a professional.
Step 3: Ream the Hole
Plugging a tire can be a lifesaver in a pinch, and learning how to do it yourself can save you a trip to the mechanic. One important step in this process is reaming the hole before inserting the plug. Reaming refers to widening the hole with a tool called a reamer to create a suitable space for the plug.
This helps the plug fit snugly into the hole and stay secure. It’s important to be gentle while reaming to avoid damaging the tire further. Carefully insert the reamer into the hole and turn it clockwise while applying gentle pressure.
Continue until the hole is widened enough for the plug to fit without any resistance. As a precaution, it’s a good idea to check the inside of the tire for any sharp objects that may have caused the puncture before inserting the plug. With this simple step, you’ll be one step closer to a safe, secure tire.
Step 4: Insert the Plug
Now that you’ve reamed out the puncture hole in your tire and threaded the rubber plug through the eye of the insertion tool, it’s time to insert the plug. First, remove the tool’s handle and slowly insert the plug into the hole until there’s just an inch or so sticking out. Next, apply some lubricant to the exposed part of the plug and the surrounding area to help it slide in smoothly.
Now, place the insertion tool against the tire, making sure that the tool and plug are lined up with the hole. Firmly push the tool and plug into the tire, making sure not to push too hard and break the plug. Finally, pull the tool straight out of the tire and quickly and carefully cut off the excess plug, leaving only about a quarter of an inch sticking out.
Voila! You’ve now plugged your tire and you’re ready to get back on the road. Just remember to get your punctured tire repaired by a professional as soon as possible.
Step 5: Trim Excess Plug
After inserting the plug into the punctured area, it’s time to trim the excess plug. Using a pair of scissors or pliers, carefully cut off any excess plug that’s sticking out of the tire surface. You don’t want any protruding bits of rubber that could cause unwanted friction or even a new puncture.
Make sure to trim the excess flush with the tire’s surface so that you have a smooth and even finish. After trimming, make sure to check for any leaks by applying soapy water to the area and watching for bubbles. If there are no bubbles, you can safely continue your journey.
Remember, trimming the excess plug is just as important as inserting the plug itself, so take your time and ensure that you do a thorough job.
Conclusion: When to Seek Professional Help
Plugging a tire may seem like a daunting task, but with the right tools and a little bit of patience, you can become a tire-plugging pro. First, locate the puncture and clean the area thoroughly. Next, insert the plug into the puncture using the insertion tool provided.
Finally, trim the excess plug and reinflate the tire. Now you’re ready to hit the road again, without a care in the world – well, except maybe for those pesky road hazards.”
FAQs
What tools do I need to plug a tire with a plug kit?
You will need a tire plug kit, tire pressure gauge, pliers, and a tire inflator.
Can I plug a tire with a plug kit instead of replacing it?
Tire plugs should only be used as a temporary fix until you can get the tire professionally replaced.
How do I locate the puncture in my tire?
Use soapy water or tire inflator sealant to find the puncture by looking for bubbles or hissing air.
Can I plug a sidewall puncture with a plug kit?
No, sidewall punctures cannot be repaired with a tire plug kit and require professional repair or replacement.
How long does it take to plug a tire with a plug kit?
It typically takes about 15-30 minutes to plug a tire using a plug kit.
Is it safe to drive on a tire that has been plugged?
It is safe to drive on a tire that has been properly plugged, but it is recommended to not exceed 50 mph and get the tire replaced as soon as possible.
How many times can a tire be plugged with a plug kit?
A tire should only be plugged once, and should then be professionally repaired or replaced.


