Have you ever found yourself in a situation where your tubeless tire loses air pressure? It can be a frustrating and stressful experience, especially if you’re on the road or in the middle of a trail. But don’t worry; inflating a tubeless tire is a simple process that you can easily do by yourself. Firstly, check for any visible damages to the tire and replace if necessary.
Then, remove the valve core using a valve core remover to make inflating the tire faster. Insert a pump with a tubeless-specific head or a compressor to inflate the tire. Make sure you inflate the tire to the recommended pressure level and then listen for any leaks.
If you hear any leaks, use sealant to seal the puncture, or if it’s too big, use a plug or patch accordingly. After sealing, inflate it again to ensure that it holds air. If everything checks out, then you’re good to go! Remember to periodically check the air pressure of your tubeless tire to prevent any loss of tire pressure while riding.
Overall, the process of re-inflating a tubeless tire is relatively simple, but it’s essential to know-how just in case an emergency arises. Happy riding!
Table of Contents
Gather the Necessary Tools
If you find yourself with a flat on a tubeless tire, don’t despair. With a few simple tools and a bit of know-how, you can reinflate your tire and be back on the road in no time. First, gather your tools.
You’ll need a tire pump, tire sealant, and a valve core tool, which you can purchase at most bike shops or online retailers. Once you have your supplies, remove the valve core with the valve core tool and add sealant to the tire. Then, reinsert the valve core and use the tire pump to reinflate the tire.
It’s important to keep an eye on the pressure and add more air as needed until you reach the desired pressure for your tire. With these tools and a little bit of elbow grease, you can easily reinflate your tubeless tire and get back to biking without breaking a sweat.
Tools Needed: Tire Sealant, Air Compressor, and Valve Core Removal Tool
Getting a flat tire can be frustrating, but with the right tools, you can quickly and easily repair it yourself. To fix a flat tire, you will need three essential tools: tire sealant, an air compressor, and a valve core removal tool. Tire sealant is a crucial component of the repair process, as it fills the puncture and secures the tire’s seal.
An air compressor is necessary to re-inflate the tire once the sealant has been added. Lastly, the valve core removal tool is used to remove the valve core from the tire, allowing you to add the sealant properly. These tools are readily available at any automotive store and are relatively easy to operate.
It’s always better to be prepared and have these essential tools on hand rather than having to deal with a flat tire without them. By having everything you need to make the repair yourself, you can save time, money, and frustration. It’s always better to be safe than sorry, so invest in these essential tools and be prepared for any potential flat tire mishaps on the road.

Removing the Valve Core
If you are struggling with how to reinflate a tubeless tire, one essential step to consider is removing the valve core. The valve core is a small part located inside the valve stem that controls the airflow. Removing it allows for quicker and more effective reseating of the tire bead to the rim.
To start, find a valve core remover tool, which can be obtained at any bike or automotive store. Once you locate the valve stem, press the tool down and twist it counterclockwise until the core comes out. Be careful not to drop the core and keep it in a safe place to avoid losing it.
After removing the core, you will then be able to inflate the tire with your pump or CO2 cartridge. Put the valve core back in once you have successfully reinflated the tire, using the valve core remover tool to secure it in place. Remember to always ensure that the valve core is tight to prevent air leaks and avoid any potential issues when riding.
Using the Valve Core Removal Tool to Remove the Valve Core
Removing the valve core from a tire is an essential task that can be easily accomplished with the help of a valve core removal tool. This handy tool is specifically designed to remove the small valve stem inside the tire’s valve stem, which can get stuck or become damaged over time. It’s crucial to remove the valve core before inflating or deflating a tire manually because leaving it in place can cause damage to the tire or even result in blowouts.
To use the valve core removal tool, simply insert it securely into the valve stem and turn it counterclockwise to unscrew the valve core from the valve stem. Once it’s removed, the tire can be safely inflated or deflated as needed. Remember, a valve core removal tool is a must-have tool for anyone who wants to maintain the health and safety of their tires regularly.
Injecting the Tire Sealant
Injecting the tire sealant is a vital step in the process of reinflating a tubeless tire. In order to do this, you will first need to locate the valve stem on your tire. Unscrew the valve cap and remove the valve core using a valve core remover tool.
Shake the sealant bottle to ensure it is well mixed before pouring it into the tire via the valve stem. After pouring in the sealant, make sure to replace the valve core and use a pump to inflate the tire to your desired pressure. The sealant will work its way around the tire, sealing any punctures or leaks as it goes.
It’s important to note that the sealing process may take a few minutes, so avoid riding your bike right away. Instead, give the sealant time to work its magic, giving the tire a few good shakes to help distribute the sealant evenly.
Inserting the Syringe into the Valve and Injecting the Tire Sealant
Once you have properly shaken the tire sealant bottle, you can begin the process of injecting it into your punctured tire. Take the syringe provided in the kit and insert it into the valve stem of the tire. This can be done by unscrewing the valve cap and placing the open end of the syringe onto the stem.
It’s important to make sure the syringe is properly aligned with the valve stem to avoid any spillage or blockages in the valve. Once the syringe is securely in place, slowly inject the sealant into the tire by pressing down on the plunger. Make sure to inject the correct amount of sealant as indicated on the bottle’s instructions.
It’s essential to keep a steady hand and maintain a slow, controlled pressure to ensure the entire tire is evenly coated with sealant. Once you have finished injecting the sealant, remove the syringe and use a pressure gauge to check the tire’s pressure. You should inflate the tire to the recommended level based on the manufacturer’s specifications.
This entire process should be done as quickly as possible to prevent the sealant from settling on the bottom of the bottle. So, take your time, follow the instructions, and be confident in your ability to inject your tire with sealant to get back on the road in no time!
Inflating the Tire
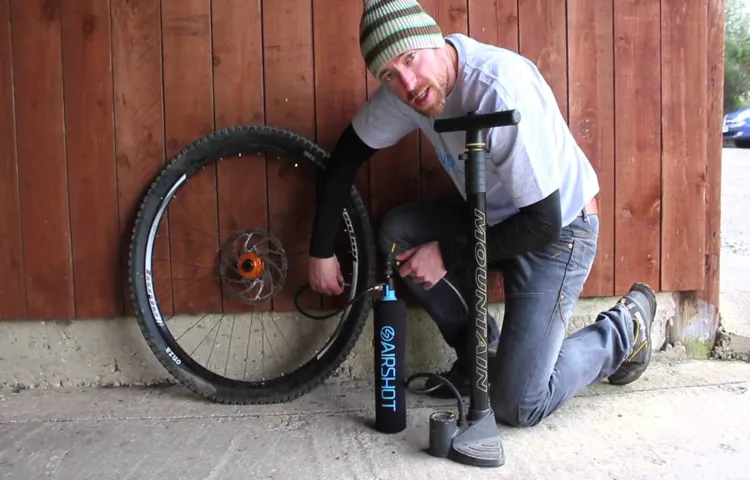
Are you struggling to reinflate a tubeless tire? Don’t panic, it’s a common issue among riders! First, locate the valve stem and remove the valve cap. Make sure you have a pump that is compatible with tubeless tires, as they require higher pressure than traditional tires. If you don’t have a pump, head to your nearest bike shop.
Then, position the pump’s nozzle over the valve stem and lock it in place. Begin pumping until you reach the recommended PSI for your tire. The valve stem should make a hissing noise when you remove the pump nozzle, indicating that the air is sealed inside.
Double-check the PSI with a gauge and replace the valve cap. Voila! Your tubeless tire is now ready for your next adventure on the road or the trail. Remember to check your tire pressure regularly to avoid any future issues.
Using an Air Compressor to Inflate the Tire to the Recommended Pressure
When it comes to inflating tires, an air compressor is a great tool to have in your garage. To start, attach the air hose to the tire’s valve stem, ensuring a tight seal. Next, turn on the air compressor and adjust the pressure to the recommended level for your tire.
This information can be found in your vehicle’s manual or on the tire sidewall. It’s important to never exceed the tire’s maximum pressure, as this can lead to a dangerous blowout. Keep the compressor running until the tire reaches the desired pressure, checking the gauge periodically to ensure you don’t go over or under.
Once the tire is properly inflated, turn off the compressor and remove the air hose, always remembering to replace the valve cap. With an air compressor, inflating tires becomes a quick and easy task, keeping you safe on the road.
Checking for Leaks
If you’re having trouble with a flat tire on your tubeless bike, the first step is to check for leaks. One of the most common reasons for a flat is a small prick or puncture in the tire surface. To find the leak, remove the tire from the bike, add a small amount of soapy water to the tire surface, and look for bubbles forming.
Once you’ve located the leak, mark it with a piece of tape or pen to make fixing the puncture easier. If the leak is small enough, you may be able to reinflate the tire and get back on the road. However, if the puncture is large or the tire is severely damaged, you’ll need to replace the tire altogether.
When you’ve reinflated the tire, keep a close eye on the pressure to make sure it doesn’t drop again.
Listening for Leaks and Checking the Tire Pressure
Checking for leaks is an essential part of maintaining your vehicle’s health. The last thing you want is to end up stranded on the side of the road because you failed to identify a leaky tire or engine. Start by looking for any puddles or drips under your vehicle, which could be an indication of a leak.
Check the oil, brake fluid, radiator coolant, and power steering fluid levels to make sure they’re not decreasing more than usual. You can also perform a visual check of your tires to see if they’re losing air more than normal. If you do identify a leak, it’s important to get it fixed as soon as possible to prevent further damage.
Remember that regular checks for leaks can save you time, money, and trouble in the long run.
Conclusion
In conclusion, reinflating a tubeless tire is not rocket science, but it does require a bit of finesse. If you want to avoid the frustration of constantly replacing punctured tubes or paying for expensive repairs, mastering this skill is essential. Remember to check your tire pressure regularly, invest in a good air compressor, and never underestimate the power of a little elbow grease.
So go forth and conquer the terrain, knowing that you have the knowledge and skills to keep your tubeless tires rolling smoothly and safely. Happy trails!”
FAQs
What are the common causes of tubeless tire deflation?
The common causes of tubeless tire deflation include punctures, valve stem damage, rim leaks, and bead separation.
Can you reinflate a tubeless tire without removing it from the rim?
Yes, you can reinflate a tubeless tire without removing it from the rim by using a portable air compressor or a tire inflator.
What pressure should I inflate my tubeless tires to?
Refer to the manufacturer’s recommendations for your particular tires, but typically, tubeless tires should be inflated to between 30 and 50 psi.
How do I detect a leak in a tubeless tire?
You can detect a leak in a tubeless tire by using a solution such as soapy water to spray on the tire and look for bubbles or by using a tire pressure gauge to check for a drop in pressure.
How do I fix a puncture in a tubeless tire?
To fix a puncture in a tubeless tire, you can use a plug or a patch kit. Remove the object causing the puncture, clean the area, and insert the plug or apply the patch.
Can I use a sealant in my tubeless tires to prevent punctures?
Yes, you can use a sealant in your tubeless tires to prevent punctures. The sealant will fill small holes and create a barrier to prevent air from escaping.
When should I replace my tubeless tires?
Replace your tubeless tires when they are worn or damaged beyond repair. Look for signs of cracking, uneven wear, or other damage that may compromise the safety of the tire.


