Are you tired of driving around with a giant dealership logo plastered on the back of your car? While some people enjoy proudly displaying their brand loyalty, others prefer a cleaner, more customized look. Fortunately, removing dealer badges from your car is a relatively simple process that can transform your vehicle’s appearance. Not only does it eliminate the unsightly logo, but it also gives you the freedom to add your own personal touch.
Whether you want to install a custom emblem or leave it plain, the choice is yours. So, why not take the first step towards a more personalized ride? Let’s dive into the details of how to remove dealer badges from your car.
Why Remove the Dealer Badge?
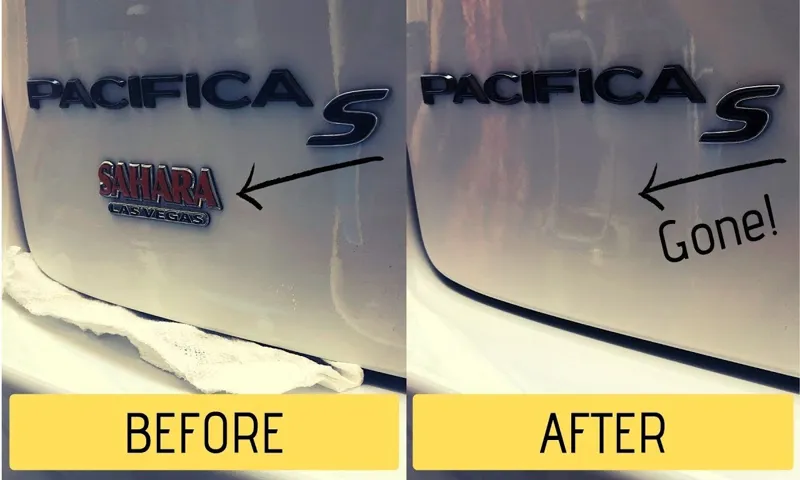
If you’re a proud car owner, you may be wondering why you should remove the dealer badge from your vehicle. A dealer badge is essentially a small emblem located on the back of your car that showcases the dealership’s branding. Although it may seem like a minor detail, removing this badge can actually have a significant impact on the appearance of your vehicle.
By doing so, you can make your car look more customized and unique, and less like a standard dealership model. But how do you remove the dealer badge from your car? One simple way is by using a hairdryer to heat up the emblem and then gently prying it off with a plastic card or credit card. Be sure to use a gentle touch and take your time, as you don’t want to damage the paint or leave any residue behind.
With a little patience and effort, you can easily remove the dealer badge from your car and enjoy a more personalized look.
Reducing Advertising on Your Car
Removing the dealer badge from your car may seem like a small and insignificant detail, but it can make a big difference when it comes to reducing advertising on your vehicle. The dealer badge, also known as the dealership emblem, is usually located at the back of your car and indicates where you purchased your vehicle. While some may see this as a point of pride, others may see it as free advertising for the dealership.
By removing the dealer badge, you can give your car a cleaner and more streamlined look, while also reducing the amount of unwanted advertising on your vehicle. Not only does removing the dealer badge give your car a more polished appearance, but it can also increase its resale value. Potential buyers may be turned off by a car that has excessive dealership branding, as it can make the vehicle appear less individualized and more like a mass-produced product.
By removing the dealer badge, you can make your car stand out and give it a more unique identity. This can ultimately lead to a higher resale value and more interest from potential buyers. Additionally, removing the dealer badge can also provide you with a sense of ownership and control over your vehicle.
While you may have purchased your car from a dealership, it is ultimately yours to do with as you please. By removing the dealer badge, you can take ownership of your car’s appearance and make it truly your own. This can provide you with a sense of pride and satisfaction in your vehicle, and can also help you stand out from other cars on the road.
In summary, removing the dealer badge from your car is a simple and effective way to reduce unwanted advertising and make your vehicle truly your own. Not only can it improve the appearance of your car and increase its resale value, but it can also provide you with a sense of ownership and control over your vehicle. So if you’re looking to give your car a makeover and reduce the amount of dealership branding on your vehicle, consider taking off the dealer badge and enjoying a cleaner, more personalized ride.

Creating a Clean Look for Your Car’s Exterior
If you’re looking to create a clean and sleek look for your car’s exterior, removing the dealer badge is a great place to start. The dealer badge is typically attached to the trunk or tailgate and displays the dealership’s name and logo. While it may be tempting to leave it on for brand recognition, removing it can significantly enhance the appearance of your vehicle.
Not only does it eliminate a bulky and distracting element, but it also gives your car a more personalized and unique look. Plus, it can even improve the resale value of your car since potential buyers won’t have to worry about the badge being a permanent feature. So, why not give it a go and see the difference for yourself? It’s a simple and easy task that can make a big difference in the overall appearance of your car.
Tools Needed
If you’re considering removing the dealership badge from your car, you’ll need a few tools to do it right. First, you’ll need a heat gun or a hairdryer to warm up the adhesive holding the badge in place. This will help loosen the glue and make it easier to remove the badge without causing any damage to the paint.
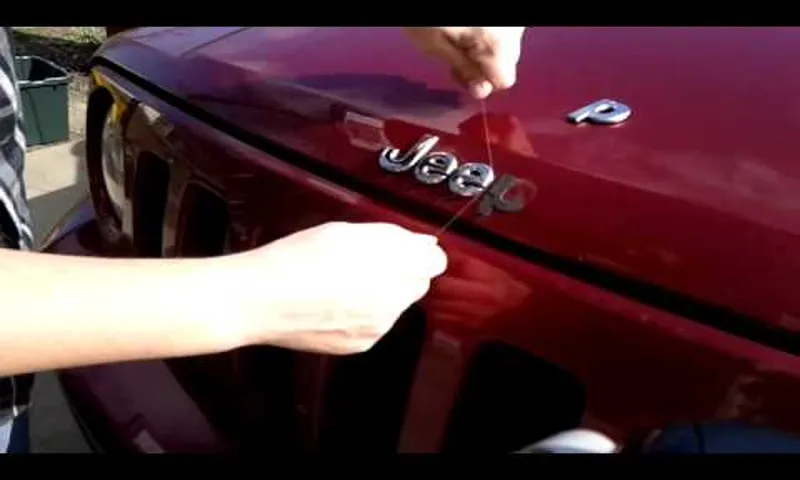
You’ll also need a plastic wedge or a fishing line to get underneath the badge and pry it away from the car. Be sure to use a plastic wedge, as a metal one could scratch the paint. If you’re using fishing line, be sure to tie it in a knot and pull it in a sawing motion back and forth to cut through the adhesive.
Finally, you’ll need Goo Gone or another adhesive remover to clean up any leftover glue residue. With these tools and a bit of patience, you’ll have a smooth, badge-free car in no time.
Heat Gun or Hair Dryer
When it comes to DIY projects, a heat gun or hair dryer can be both useful tools to have in your arsenal. A heat gun is typically more powerful and can reach higher temperatures than a hair dryer which is perfect for tasks such as stripping paint or thawing frozen pipes. On the other hand, a hair dryer is a great tool for smaller projects such as drying paint or warming up adhesive for easier removal.
When choosing between the two, it’s important to consider the specific task you’ll be working on and which tool will be more effective. Ultimately, having both a heat gun and a hair dryer on hand will provide maximum versatility for all your DIY needs. So go ahead, and add them to your toolbox- you never know when you might need one.
Plastic Pry Tool or Fishing Line
When it comes to phone repairs, having the right tools is crucial to getting the job done right. Two essential tools for opening up a phone are a plastic pry tool and fishing line. The plastic pry tool is perfect for safely popping open the phone’s casing, while the fishing line can be used to carefully cut through adhesive or unstick parts that are stuck together.
Both of these tools are relatively inexpensive and easy to find online or at phone repair shops. If you plan on doing phone repairs often, investing in these tools is a smart choice. However, remember to use them carefully and properly to prevent unintentional damage to the phone’s internal components.
Rubbing Alcohol or Adhesive Remover
If you’re looking to remove adhesive residue or stains, you may be wondering whether rubbing alcohol or adhesive remover is the best way to go. The good news is that both options can be effective, depending on the situation. Rubbing alcohol can be a good choice if you’re dealing with a small area of residue, as it can break down the adhesive and make it easier to clean away.
On the other hand, adhesive remover may be a better option if you’re dealing with a large amount of residue or if the residue is particularly stubborn. To use either product, you’ll need a few basic tools, including a clean cloth or paper towel, gloves to protect your hands, and possibly a scraper or razor blade for tougher jobs. With a little bit of elbow grease and the right products, you can remove even the toughest adhesive residues and stains, leaving your surfaces looking clean and new again.
Step-by-Step Guide
If you want to remove the dealer badge from your car, there are a few easy steps you can follow. First, gather all the tools you’ll need: a hair dryer or heat gun, fishing line or dental floss, rubbing alcohol, and a microfiber cloth. Start by warming up the badge with the hair dryer or heat gun, being careful not to overheat or damage the paint.
Once the adhesive has softened, use the fishing line or dental floss to gently work it underneath the badge and cut through the adhesive. Next, apply the rubbing alcohol to a microfiber cloth and use it to remove any remaining residue. Finally, use another microfiber cloth to buff the area and make sure it looks clean and polished.
With these simple steps, you can remove the dealer badge from your car and give it a sleek new look.
Prepare the Surface Around the Badge
When it comes to adding badges to your clothing, preparing the surface around the badge is crucial. This step is often overlooked but it’s essential in ensuring that the badge stays in place for the long haul. Here’s a step-by-step guide on how to prepare the surface around your badge.
First, choose the location where you want your badge to be placed. Next, clean the area thoroughly with a damp cloth to remove any dirt, dust, or debris that might interfere with the adhesive’s grip. If you’re attaching the badge to a fabric surface, make sure that the fabric is free of any wrinkles or bumps as they can create air bubbles between the badge and the fabric.
Secondly, if you’re attaching the badge to a synthetic or waterproof surface, lightly abrade the area with fine-grit sandpaper. This will help the adhesive bond better with the surface. Lastly, make sure that the surface is completely dry before proceeding to the next step.
Any moisture residue can interfere with how well the adhesive works, causing the badge to come loose over time. By preparing the surface around your badge properly, you can ensure that your badge will stay in place for a long time. It may seem like a small step but it can make all the difference in the world.
So, invest a few minutes in this process to make your badge look great and last longer. Keyword: badge.
Heat the Badge with a Heat Gun or Hair Dryer
To attach a badge onto a fabric or clothing item, you should use a heat gun or hair dryer to activate the adhesive on the back of the badge. This process is straightforward and easy to follow. First, place the badge on the desired location on the fabric or clothing item.
Then, use a heat gun or hair dryer, set on high heat, and aim it at the back of the badge. Hold the heat gun or hair dryer about 2-3 inches away from the badge and move it around constantly. Ensure to not hold it in one spot for too long to prevent burning the fabric or badge.
As you heat the badge, make sure to press and smooth it down with your fingers or a small cloth. Continue heating the badge until the adhesive fully activates and the badge attaches securely to the fabric or clothing item. This quick and effective process will leave you with a perfectly attached badge that won’t fall off.
Insert a Plastic Pry Tool or Fishing Line Under the Badge
If you want to remove a badge from your car, you’ll need to have a plastic pry tool or fishing line. The process of removing a car badge is relatively simple, but you need to go about it with care to avoid damaging your car’s bodywork. Here’s how you do it:
Start by smoothing out the space around the badge with your hand, so that the glue is easier to work with. Next, insert the pry tool or fishing line under the badge, and gently start to pry it off the car’s bodywork.
Be careful not to use too much force or to break the badge. Once you have lifted the badge off the car, use a solvent or adhesive remover to dissolve the glue residue that remains.
Wait for the glue’s solvent to take effect, and then use a soft cloth to clean off any remaining residue.
You can then apply a fresh badge to your car if you so desire. In conclusion, removing a car badge is easy if you have the right tools and know what to do. With a little bit of patience and care, you can take off the badge without damaging your car’s bodywork.
So go ahead and try it out today!
Remove Adhesive Residue with Rubbing Alcohol or Adhesive Remover
If you’re battling with adhesive residue on your surfaces, don’t fret! You can easily remove it using rubbing alcohol or adhesive remover. Rubbing alcohol works wonders in breaking down the sticky substance and making it easier to wipe off with a cloth. All you need to do is pour some rubbing alcohol onto a sponge or cloth and rub it gently over the affected area.
For more stubborn residue, adhesive remover is the way to go. It’s specifically designed to dissolve adhesives and sticky substances, leaving your surfaces clean and residue-free. Apply it to the area, wait a few minutes, and then wipe it away with a cloth.
Whichever method you decide to use, always test it on a small, inconspicuous area first to ensure there are no adverse effects. With these simple steps, you’ll be able to tackle any adhesive residue with ease and keep your surfaces looking clean.
Clean the Area
Cleaning the area is an essential step in maintaining a clean and organized space. When you’re about to start cleaning, it’s best to remove any clutter and unnecessary items first. This allows you to have a clear space to work with and also helps to make the process more efficient.
Once you’ve cleared the area, start by dusting and wiping surfaces with a damp cloth. Pay extra attention to spots that tend to accumulate dirt and grime. If there are any stains or spills, use an appropriate cleaning solution to remove them.
Don’t forget to vacuum or sweep the floors as well. It’s best to work from top to bottom, so start with the highest surfaces and work your way down. This way, any dust that falls will be cleaned up when you get to the lower surfaces.
Remember to clean and disinfect any tools or equipment used during the cleaning process before storing them away. By following these steps, you can keep your space clean and tidy.
Conclusion
Don’t let your car suffer from dealer badge syndrome any longer! Say goodbye to the unwanted branding and put your car back in control of its own identity. With a few simple steps, removing the dealer badge can be accomplished quickly and painlessly. Your car will thank you for the newfound confidence and freedom to express its true self on the open road.
So go ahead, peel away the old and let your car shine with its own unique personality.”
FAQs
What is the purpose of dealer badges on cars?
Dealer badges on cars are typically used as a marketing tool to advertise the dealership that sold the car.
Can a dealer badge be removed without damaging the car’s paint?
Yes, a dealer badge can be removed without damaging the car’s paint. Using a hairdryer or heat gun to warm up the adhesive, then gently use a plastic spatula or credit card to peel it off.
Is it legal to remove a dealer badge from a car?
Yes, it is legal to remove a dealer badge from a car. However, some dealerships may require the badge to stay on the car as part of the agreement of the sale.
What are some alternatives to removing a dealer badge from a car?
Some alternatives to removing a dealer badge from a car include using a detailing clay bar to “erase” the badge, or covering it up with a custom decal or badge.
Will removing a dealer badge from a car affect its resale value?
In most cases, removing a dealer badge from a car will not affect its resale value. However, if the dealership is well-known or has a good reputation, the badge may add some value to the car.
How can I prevent dealer badges from being installed on my car in the first place?
When purchasing a car, you can request that the dealer does not install any badges or decals on the car. Make sure to include this in your purchase agreement.
Are there any special products or tools I need to remove a dealer badge from my car?
No, you do not need any special products or tools to remove a dealer badge from your car. A hairdryer or heat gun, plastic spatula or credit card, and some rubbing alcohol should suffice.


