Do you know how to replace your tire stem? It might seem daunting at first, but with the right tools and a little guidance, it can be a quick and easy fix. The tire stem, also known as the valve stem, is the small component on your tire that allows you to inflate or deflate it. Over time, valve stems can become damaged or even break off entirely, causing air leaks and potentially flat tires.
That’s why it’s important to know how to replace them. In this step-by-step guide, we’ll walk you through the process of replacing your tire stem so you can get back on the road in no time. So, grab your tools and let’s get started!
Table of Contents
Gather Your Supplies
Replacing a tire stem can be a daunting task, but with the right supplies, it can be done easily and efficiently. First, gather all necessary supplies, including a new valve stem, a valve stem tool, pliers, and a tire pressure gauge. It is also helpful to have a jack and lug wrench on hand in case the tire needs to be removed.
Make sure to purchase a valve stem that matches the size and shape of the old one to ensure a proper fit. The valve stem tool is needed to remove the old stem and install the new one. Pliers can be used to hold the valve stem in place while tightening it, and the tire pressure gauge is essential for ensuring the tire is properly inflated once the new stem is installed.
By having all the necessary supplies on hand, the process of replacing a tire stem can be a simple and stress-free task.
Tire Pressure Gauge
When it comes to checking your tire pressure, one essential tool to have on hand is a tire pressure gauge. It might seem like a no-brainer, but it’s easy to forget or misplace this handy tool. To avoid any frustration, it’s best to gather your supplies before checking your tire pressure.
Make sure you have a reliable tire pressure gauge, such as a digital or analog gauge, depending on your preference. Keep in mind that different types of tires require different readings, so it’s essential to refer to your vehicle’s manual or the tire manufacturer’s specifications for the correct pressure. Additionally, it’s advisable to have a tire inflator or air compressor available for quick and easy inflation of your tires.
With these supplies on hand, you’ll be able to maintain optimal tire pressure and keep your tires running smoothly for longer.

Valve Stem Tool
If you’re planning on changing your tire or checking your tires’ air pressure, you’ll need a valve stem tool. This handy little gadget allows you to remove and insert valve cores from the valve stem with ease. Before you get started, make sure you have all the necessary supplies.
In addition to the valve stem tool, you’ll need a tire pressure gauge, valve cores, valve caps, and a valve core removal tool. Once you have all your supplies, you’re ready to check your tire pressure. First, remove the valve cap from the valve stem.
Then, use the valve core removal tool to remove the valve core from the valve stem. You can then use your tire pressure gauge to check the air pressure in your tire. If you need to add air, use the valve stem tool to insert a new valve core into the valve stem.
Finally, replace the valve cap, and you’re good to go! With the right supplies and a valve stem tool, checking your tire pressure has never been easier.
New Tire Valve Stem
If you’re planning to replace your tire’s valve stem, you’ll need a few supplies to get the job done right. The first item you’ll need is a valve stem removal tool. This tool fits over the valve stem and allows you to unscrew it from the tire.
You’ll also need a new tire valve stem that fits your tire. Be sure to check the size of your old valve stem so you purchase the correct replacement. It’s also a good idea to have some valve stem lubrication on hand to help you install the new valve stem.
If you’re not sure about the process or don’t feel comfortable doing it yourself, it’s always best to take your vehicle to a professional. But with the right tools and a little know-how, replacing a tire valve stem is a simple way to keep your tires functioning properly. So, gather your supplies and get ready to take care of your vehicle in no time!
Remove the Old Tire Stem
Replacing a tire stem can be a daunting task, especially if you’re a novice at it. One of the first steps in replacing a tire stem is to remove the old one successfully. To do this, you’ll need to take a few precautionary steps.
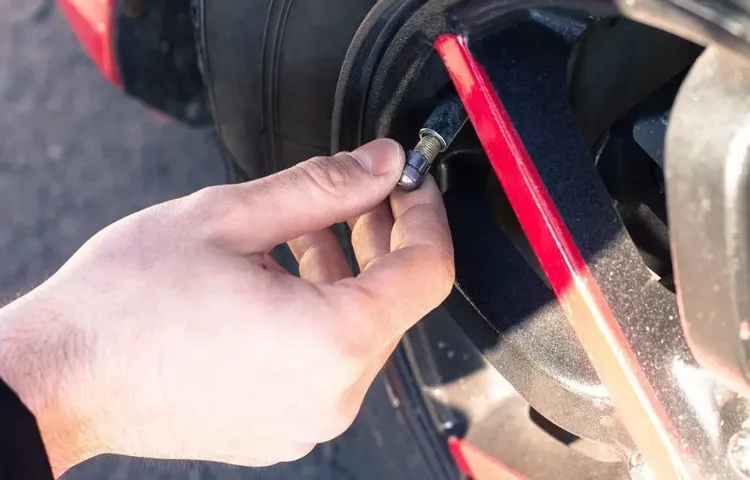
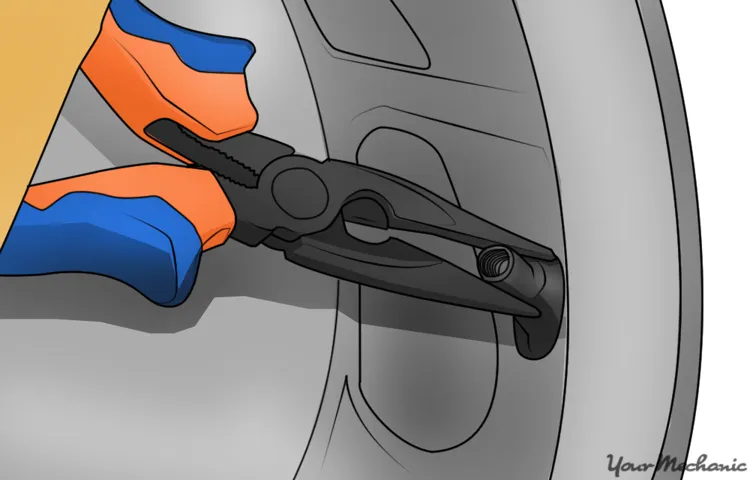
Begin by deflating the tire entirely before placing it on its side. Afterward, use a tool like pliers or a valve stem remover to take out the old stem from the rim. Ensure the removal process is done carefully to avoid damaging the tire or the rim.
Once the old stem has been removed, clean the inner rim to remove any debris and prepare for the installation of the new stem. While removing a tire stem may seem like a basic task, it’s crucial to handle it with care to avoid any hiccups and ensure success.
Let Out the Air
When it’s time to change your tire, one of the first steps is to let out the air. This is an important step because it will make it much easier to remove the tire stem. Before you begin, you’ll need a tire pressure gauge to check the air pressure in the tire.
Once you know how much air is in the tire, you can use a tire valve tool or pliers to remove the cap from the stem. Next, use the valve tool to press down on the center pin in the valve stem to release the air. It’s best to do this outside or in a well-ventilated area because the air can be quite loud.
After a minute or so, all the air should be out of the tire and you can move on to the next step in the process. Remember, letting out the air is an important step in changing a tire, and it will make the process much smoother and easier overall.
Use the Valve Stem Tool to Remove the Stem
When it comes to tire maintenance, one important task is replacing the old tire stem. But before installing a new one, the old stem must be removed. This can be done using a valve stem tool, which helps to loosen and remove the stem from the tire’s rim.
To start, locate the stem on the tire and gently push down on the valve core to release any remaining air pressure. Once you’ve done that, use the valve stem tool to loosen the stem by turning it counterclockwise. You may need to apply some force to break the seal, but be careful not to damage the tire or rim.
Once the stem is loose, use your fingers to unscrew it the rest of the way and remove it from the tire. With the old stem removed, you can then install a new one and make sure your tires are in top condition. Remember, proper tire maintenance is essential for safe driving, so don’t overlook this important task.
Install the New Tire Stem
If you’re wondering how to replace tire stem, don’t worry, it’s actually quite straightforward. Firstly, you’ll need to remove the damaged tire stem using a pair of pliers. After removing the old stem, clean around the hole with a wire brush to ensure there’s no debris left behind.
Next, take the new tire stem and insert it into the hole. Make sure it’s securely in place by tugging on it gently. Then, use the pliers to screw on the valve cap tightly.
It’s important to ensure the tire stem is completely secure before adding air to the tire. Once you’ve installed the new tire stem, you can inflate your tire to the recommended PSI and you’re good to go. Remember, a damaged tire stem can lead to a flat tire, so it’s important to address this issue as soon as possible.
Insert the New Stem
After removing the old tire stem, the next step is to insert the new stem into the hole in the rim. Before installation, make sure the new stem and rim hole match in size and diameter. Apply a small amount of lubricant to the stem to make it easier to insert.
Use pliers to hold the stem and gently insert it into the rim hole. Be careful not to push it too hard as it can damage the stem. Ensure that the stem is straight before tightening it securely with a stem tool.
Failing to tighten it enough can cause air leakage and deflate the tire. On the other hand, overtightening can damage the stem, causing a flat tire. Once the stem is in place, you can now inflate your tire to the recommended pressure and check for any leaks.
With a new tire stem in place, you can now enjoy a smooth and safe ride.
Secure the Rim
When it comes to changing a tire, it’s crucial to ensure that the rim is secure before hitting the road. One important step in this process is installing the new tire stem. This small but essential component is responsible for maintaining proper air pressure in the tire and preventing punctures.
Begin by removing the old stem with pliers and inserting the new stem into the rim’s valve hole. Then, use a valve stem tool to tighten the stem in place, making sure it is snug and secure. It’s also a good idea to add a small amount of lubricant to the stem’s threads to prevent corrosion.
By taking the time to properly install the new tire stem, you’ll be able to drive with confidence, knowing that your tire is both safe and secure.
Inflate the Tire
When it comes to installing a new tire stem, there are a few steps you need to follow. But before you install the new stem, you need to make sure the tire is properly inflated. Over-inflated tires can lead to decreased tire life and decreased traction, while under-inflated tires can cause poor handling and increased fuel consumption.
So, it’s important to check your tire pressure before proceeding with the installation. Once you’ve checked the pressure, you can start by removing the old tire stem and inserting the new one into the valve hole. Make sure it’s properly seated before tightening the nut with a valve stem tool.
And that’s it! Just make sure to check the pressure again and adjust as necessary. With your new tire stem in place, you can hit the road with peace of mind.
Double-Check Your Work
When it comes to replacing a tire stem, it’s important to double-check your work to ensure it’s done correctly. Start by removing the old stem and inserting the new one using a valve stem tool. It’s crucial to ensure that the new stem is the same size as the old one to avoid any complications.
Once the new stem is in place, it’s essential to check for leaks by using a tire pressure gauge and inflating the tire to the recommended pressure. Don’t forget to tighten the valve stem cap to prevent any air from escaping. Before hitting the road, check the tire pressure again to make sure everything is working correctly.
By doing a thorough check and double-checking your work, you can ensure a safe and reliable tire replacement process.
Check the Tire Pressure
When it comes to ensuring your car is in top shape, checking tire pressure is a critical task that often gets overlooked. Properly inflated tires can improve your car’s handling, fuel efficiency, and overall safety. So, double-check your work after inflating your tires to ensure they are inflated to the recommended pressure, which can be found in your car’s manual or on the door jamb.
It’s also essential to check tire pressure regularly, especially during temperature changes or before long trips. Low tire pressure can cause tire wear and even blowouts, putting you and your passengers at risk. So, take a few minutes to check your tire pressure and stay safe on the road.
Check for any Leaks
When it comes to any home improvement project, it’s always essential to double-check your work, and checking for leaks is no exception. After fixing any leaks or installing new plumbing fixtures, it’s vital to inspect the work area thoroughly to ensure there are no leaks. Even the smallest of leaks can cause significant problems, from water damage to increased utility bills.
One way to identify potential leaks is to keep an eye out for any water stains or signs of mold and mildew. Additionally, you can turn off all faucets and running water and check the water meter to see if it’s still running. If so, there could be a hidden leak that needs further investigation.
Taking these precautions can save you a lot of money and stress down the line. Remember, prevention is always better than cure, so double-check your work and fix any leaks swiftly to avoid future headaches.
In Conclusion
In conclusion, replacing a tire stem may seem like rocket science, but it’s actually quite simple. All you need is a little bit of know-how, a tire iron, and a replacement stem. With a steady hand and a dose of confidence, you can easily swap out a faulty stem and get back on the road in no time.
So don’t let a flat tire deflate your spirits – take charge and tackle the task like a pro. Your car will thank you, and you’ll feel like a true tire-changing champ.”
FAQs
What tools are necessary to replace a tire stem?
You will need a valve core tool, pliers, and a new tire stem.
Can a tire stem be replaced without removing the tire?
Yes, you can replace a tire stem without removing the tire. Just make sure to deflate the tire first.
How often should tire stems be replaced?
It’s recommended to replace tire stems every time you replace your tires or every 3-5 years.
How do I know if my tire stem is damaged and needs to be replaced?
Signs of a damaged tire stem include air leaking from the valve, difficulty inflating the tire, and visible cracks or splits in the stem.
Can I replace a tire stem myself or should I take it to a mechanic?
You can replace a tire stem yourself if you have the necessary tools and knowledge. However, if you are unsure, it’s best to take it to a mechanic.
What is the average cost to replace a tire stem?
The cost to replace a tire stem can vary depending on the make and model of your car, but typically ranges from $20-$50.
How long does it take to replace a tire stem?
The time it takes to replace a tire stem can vary depending on your experience and the tools you have, but typically takes around 30 minutes.


