
Riding a bike can be an exhilarating experience, but there’s nothing quite as frustrating as getting a flat tire during a ride. Not only does it ruin your fun, but it also leaves you stranded until you can get it fixed. That’s where a CO2 bike tire inflator can be a lifesaver.
This handy device uses compressed CO2 to quickly and effortlessly inflate your tires, getting you back on the road in no time. But how do you use one? In this guide, we’ll walk you through the steps to using a CO2 bike tire inflator like a pro. So, grab your inflator and let’s get started!
What You’ll Need
If you’re a cyclist, you know how frustrating it can be to get a flat tire during a ride. That’s where a CO2 bike tire inflator comes in handy. But, before you can use one, you’ll need a few things.
Firstly, you’ll need a CO2 cartridge. These come in a variety of sizes, so make sure you choose the right one for your tire. Additionally, you’ll need a CO2 inflator head.
This is the part that attaches to the cartridge and inflates your tire. Some inflators come with an integrated head, while others require a separate head to be purchased. Lastly, you’ll need a tire lever to remove the tire from the rim and a bike pump to top off the tire pressure once you’ve used the CO
With these tools on hand, you’ll be ready to quickly and easily inflate your tire and get back on the road in no time.
CO2 tire inflator, CO2 cartridge, tire valve adapter
If you’re planning on using a CO2 tire inflator, you’ll need a few things to get started. First, you’ll need the CO2 cartridge itself. These come in various sizes, so be sure to check your tire’s recommended inflation pressure and choose a cartridge that can provide enough CO2 to meet that pressure.
Next, you’ll need a tire valve adapter. This is the piece that attaches the CO2 inflator to your tire’s valve stem. Make sure you choose an adapter that is compatible with your tire’s valve type.
There are different types of valve adapters available, so it’s important to get the right one. Once you have these three things – the CO2 tire inflator, the CO2 cartridge, and the tire valve adapter – you’ll be ready to inflate your tires quickly and easily whenever needed. So, if you like to ride your bike or drive your car often, having this kit can be a lifesaver!

Prepare Your Inflator
Using a CO2 bike tire inflator can save you a lot of time and energy when you need to inflate your bike tire quickly. However, to ensure that you use it correctly, you need to prepare your inflator properly. Firstly, ensure that your CO2 canister is not punctured and is correctly threaded onto the inflator.
Once you have confirmed this, you can then fit the inflator onto the valve stem of your bike tire. It is important to ensure that the inflator is seated correctly on the valve stem to prevent any leaks. Finally, use the puncture lever to release the CO2 canister and inflate your tire to the desired pressure.
Remember to keep the inflator away from your face while inflating the tire, and once you’re done, remove the inflator from the valve stem and store it safely. By following these simple steps, you can quickly and easily use a CO2 bike tire inflator to get back on the road in no time.
Twist inflator head counterclockwise to expose valve
If you’re about to use an inflator to pump up your tire, there are a few things you’ll need to do first to prepare your equipment. The first step is to twist the inflator head counterclockwise. This will expose the valve, which is where you’ll attach the inflator to the tire.
You might feel a bit unsure about how to do this if you’ve never used an inflator before, but it’s actually a simple process once you know how. Just hold onto the inflator firmly with one hand, then use your other hand to twist the head counterclockwise until it comes loose. You’ll then be able to see the valve and connect the inflator to it.
By following these steps, you’ll be all set to start pumping up your tire and getting back on the road. So next time you need to use an inflator, don’t worry – just remember to prepare your equipment by twisting the inflator head counterclockwise to expose the valve.
Screw in CO2 cartridge clockwise until punctured
If you are an avid cyclist or just getting into the sport, then you know how important it is to prepare your inflator before heading out for a ride. One of the crucial steps that should never be skipped is screwing in the CO2 cartridge clockwise until punctured. This ensures that the cartridge will be ready for use in case of a flat tire or any other emergency situation.
But why clockwise, you may ask? Well, it’s pretty simple. The threading on the cartridge and inflator is designed to go in one direction only, and that is clockwise. This means that if you try to screw it in counterclockwise, it won’t fit properly, and you won’t be able to puncture the cartridge, rendering it useless.
So, next time you get ready to hit the road, make sure to properly prepare your inflator and always remember to screw the CO2 cartridge in clockwise until punctured. Safety first!
Attach Valve Adapter
Using a CO2 bike tire inflator can be a real lifesaver when you need to quickly and easily inflate your tires. One of the most important steps when using a CO2 inflator is attaching the valve adapter to your tire’s valve stem. To do this, start by unscrewing the inflator head from the canister and removing the plastic seal.
Then, locate the valve stem on your tire and unscrew the valve cap. Next, slide the valve adapter over the valve stem and press it firmly against the valve. Twist the valve adapter to lock it into place, and then screw the inflator head onto the canister.
Once everything is securely in place, press down on the inflator head to release the CO2 into your tire. With a little practice, you’ll be able to attach the valve adapter quickly and easily every time you need to inflate your bike tires on the go.
Match adapter with valve, press onto valve
When it comes to inflating your tires, it’s important to have the right valve adapter. Without it, you won’t be able to properly attach your air compressor or tire pump to your tire’s valve. The first step is to match the adapter with the valve.
It may seem obvious, but there are different types of valves out there, and not all adapters will fit all valves. Once you’ve found the right adapter, press it onto the valve. Make sure it’s on securely, so air won’t leak out as you try to fill up your tire.
Double-check that the adapter is fully pressed onto the valve before proceeding. With the adapter attached securely, you’re ready to inflate your tire to the desired pressure. Don’t forget to remove the adapter once you’re done, so you can cap the valve and keep the air in.
By following these simple steps, you’ll be able to properly attach your valve adapter and inflate your tire with ease.
Screw inflator head clockwise onto valve adapter
Attaching the valve adapter is a crucial step in inflating your tires, and it’s essential that you do it correctly. To begin, find the valve adapter that came with your screw inflator head, and make sure it’s clean and free of debris. Next, take the screw inflator head and screw it clockwise onto the valve adapter until it’s tight and secure.
You’ll know it’s attached correctly when there’s no air escaping from the connection between the two pieces. Remember to use firm, even pressure when attaching the screw inflator head to the valve adapter. If you’re having trouble getting the pieces to connect, double-check that you’re using the correct adapter for your valve type and that all the components are clean and free of dirt or debris.
With the valve adapter securely attached, you’re ready to move on to inflating your tires and enjoying a smoother, safer ride.
Inflate the Tire
Using a CO2 bike tire inflator is a breeze and can make inflating your bike tires a quick process. First, ensure that your tire is properly secured to the wheel rim. Next, take out the CO2 cartridge and attach the inflator head to the valve stem.
Trigger the inflator by twisting the cartridge, and you should hear a quick hiss indicating that the CO2 is filling up the tire. It is essential to keep an eye on the pressure as you inflate and stop when the desired pressure is reached. Remember not to overinflate as this can damage your tire or even cause it to burst.
Using a CO2 bike tire inflator is an easy and efficient way to ensure that your bike tires are always properly inflated and ready to take on any riding terrain.
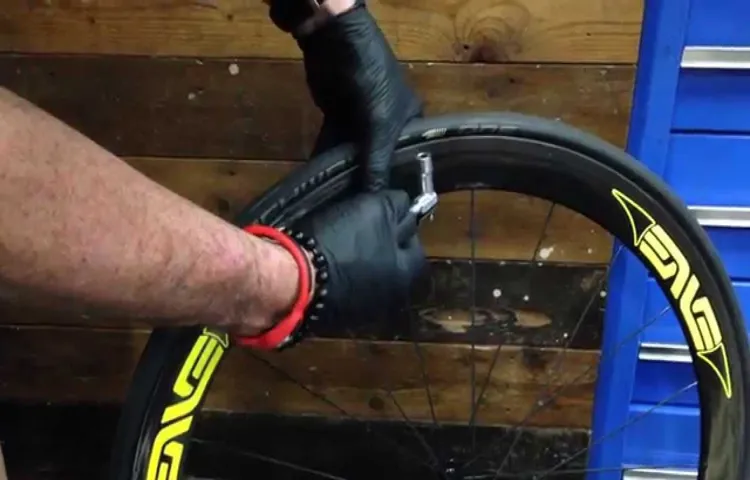
Hold inflator with both hands, press cartridge to inflate tire
When it comes to inflating your bike tire, it’s essential to know how to do it correctly to avoid any mishap or inconvenience. So, the first step is to hold the inflator with both hands firmly. Once you have a secure hold on the inflator, press the cartridge against the tire valve, and the inflator will release the gas to inflate the tire.
It’s a simple process that needs to be done accurately to get the desired result. Make sure the inflator is correctly seated on the valve to avoid leakage and twist the cartridge to puncture it. As soon as you hear the hissing sound of inflating the tire, release the gas and check the tire pressure with a gauge to ensure it’s at the recommended level.
Keeping your bike’s tire inflated is crucial as low tire pressure can make biking uncomfortable and hazardous. So, inflate your tire as needed, and enjoy a smooth ride with the correct tire pressure.
Stop inflating once desired pressure is reached
When it comes to inflating your tires, it’s important to know when to stop. Inflating your tires to the correct pressure rating can help with fuel efficiency and prevent uneven wear and tear. However, overinflating your tires can be dangerous and lead to a blowout.
That’s why it’s crucial to follow the recommended pressure listed in your vehicle’s owner’s manual. When inflating your tires, start by checking the pressure with a tire pressure gauge. Then, add air as needed until you reach the recommended pressure.
Don’t forget to check the pressure periodically as it can change with fluctuations in temperature. Once you have the correct pressure, stop inflating and double-check that the valve stem cap is securely in place. Remember, overinflating your tires can be just as bad as underinflating, so always use caution and follow the recommended pressure for your vehicle.
Finishing Up
Now that you’ve successfully inflated your bike tire using a CO2 inflator, it’s important to finish up properly. First, twist the CO2 cartridge off the inflator head to release any remaining air pressure. Then, remove the inflator head from the valve stem and replace the valve cap.
Make sure the valve cap is secure to prevent any air from leaking out. Finally, take a moment to check the tire pressure with a gauge and make any adjustments as needed. Remember, properly inflated tires not only ensure a smooth ride but also prevent damage to your bike’s wheels.
So, take a few extra minutes to finish up and enjoy a safe and enjoyable ride!
Disconnect inflator head and valve adapter from tire valve
As you’ve completed inflating your tire, it’s time to disconnect the inflator head and valve adapter. Remember to release any remaining air pressure before doing so. Carefully remove the valve adapter from the tire valve and slide it off.
Then, unscrew the inflator head from the adapter and make sure it’s fully disconnected. This helps to prevent any air from escaping and causing further damage to the tire or any surrounding components. It’s essential to ensure a proper disconnection to avoid accidents or injury.
With the inflator head and valve adapter detached, you can now store them in a safe place until your next use. Don’t forget to check your tire pressure with a tire pressure gauge to make sure it’s at the recommended level before driving. Following these steps ensures a safer and more efficient tire inflation process.
Remove punctured CO2 cartridge from inflator head
Removing the punctured CO2 cartridge from the inflator head is the final step in finishing up your bike’s tire inflation. It’s important to remember that these cartridges are hazardous and cannot be reused, so proper disposal is necessary. Once you’ve successfully inflated your tire, carefully unscrew the inflator head from the valve stem, making sure to hold onto the cartridge to prevent it from falling and potentially causing injury.
Next, unscrew the empty cartridge from the inflator head, taking care to avoid contact with any remaining CO2 that may be inside. Dispose of the empty cartridge responsibly, being mindful of any local regulations or guidelines for disposal of hazardous materials. With the cartridge removed, your tire is now fully inflated and ready for use.
So get back on your bike and enjoy a smooth ride, knowing that you’ve done your part to safely and responsibly complete this task.
Properly dispose of used CO2 cartridge and properly store inflator and adapter.
As you finish up your cycling journey, it’s important to properly dispose of the used CO2 cartridge and store the inflator and adapter correctly. You don’t want to leave any unnecessary waste on the side of the road, so make sure to pack your used cartridge in a plastic bag and dispose of it in an appropriate bin. As for your inflator and adapter, you want to keep them protected and easily accessible for your next ride.
Consider using a small bag or pouch that can fit into your bike bag or backpack. This way, you won’t have to worry about losing any parts or damaging your equipment. Think of it like putting your bike to bed: you want to make sure it’s cozy and safe until your next adventure!
Conclusion
So there you have it, folks – using a CO2 bike tire inflator is as simple as 1-2-3! Just remember to check your inflator before hitting the road, attach it to your valve stem with ease, and watch in awe as your tire inflates within seconds. And don’t forget to recycle those used cartridges! Now, you’ll never be stranded with a flat tire again – unless, of course, you forget to bring spare cartridges. But hey, practice makes perfect, right? Happy riding!”
FAQs
What is a Co2 bike tire inflator?
A Co2 bike tire inflator is a small tool used to inflate bike tires using compressed air in a canister.
How do you use a Co2 bike tire inflator?
First, remove the cap from the Co2 canister and screw it onto the inflator. Next, attach the inflator to the valve stem on your bike tire and press the button to release the compressed air.
How much air does a Co2 bike tire inflator dispense?
The amount of air dispensed by a Co2 bike tire inflator varies depending on the size of the canister and the pressure required for the tire. However, most inflators can inflate a tire to the desired pressure with one canister.
Can a Co2 bike tire inflator be reused?
Yes, most Co2 bike tire inflators are reusable. Simply unscrew the canister from the inflator and store it for later use.
Is a Co2 bike tire inflator better than a traditional pump?
It depends on personal preference and the situation. A Co2 bike tire inflator is faster and more convenient for on-the-go fixes, but a traditional pump is more reliable and can be used multiple times without refilling.
How should I dispose of a used Co2 canister?
Co2 canisters should be properly disposed of in accordance with your local recycling and waste regulations.
Can a Co2 bike tire inflator be used on any type of bike tire?
Co2 bike tire inflators can be used on most types of bike tires, including road, mountain, and hybrid tires. However, it’s important to check the compatibility of the inflator with your specific tire valve before use.